|
Category Archives: Recipes
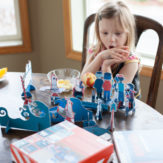
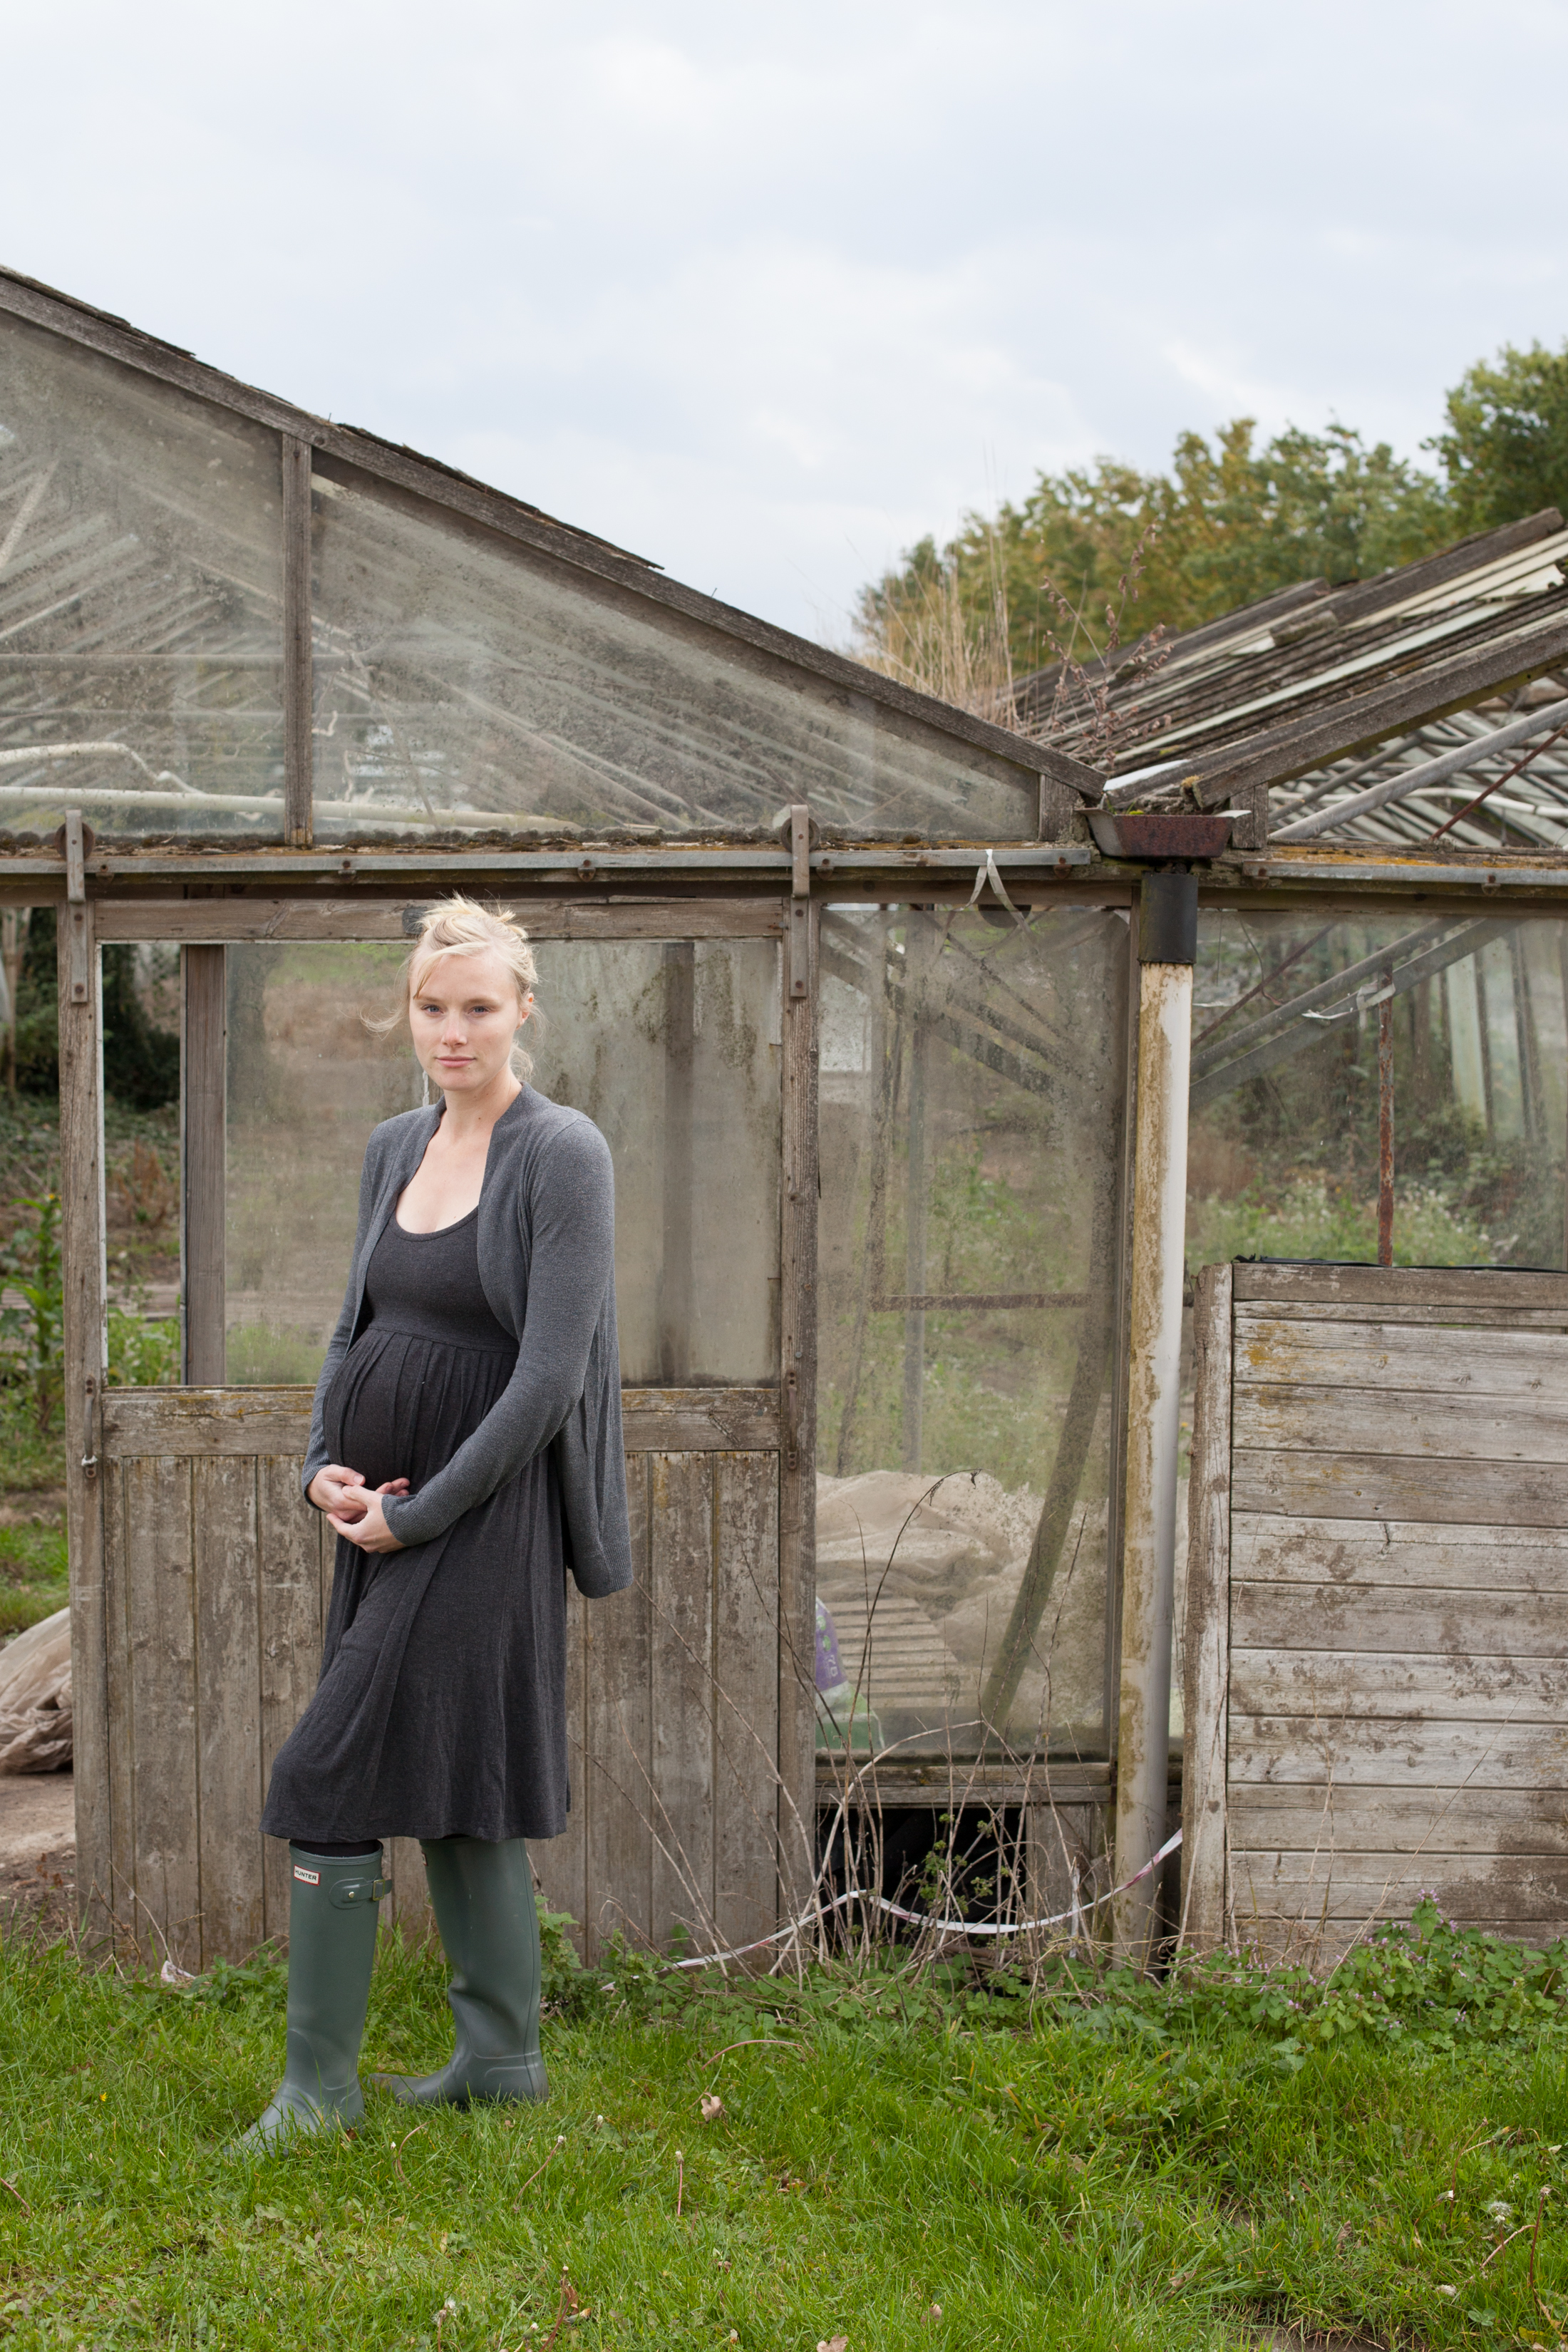
Kyle’s Mom arrives this afternoon and we’re looking toward to her arrival with the same anticipation and glee we normally withhold for the first snow of the season. She’s bringing along with her lots Christmas cheer in the form of: Christmas stockings, Hershey Kisses for making Peanut Blossoms, and a new set of homeschool books. She’s also bringing much needed hugs for all of us transplants, and she will be lifting a huge weight from our shoulders known as the “who-the-hell-do-we-call-when-I-go-into-labor?” weight which I felt intensely again last night as I weathered four hours of contractions through the middle of the night.
It feels like we’ve been holding our breath, waiting for Grandma to get here, and then we can all collectively relax, enjoy the holiday, and slip out to the birth center when we need to without any stress… because giving birth isn’t stressful on it’s own, right? It’s been three and half years since we welcomed Lulu to our little family, and I have to say I’m not particularly looking forward to the whole process again! I am, however, very much looking forward to having a teeny tiny, fuzzy skinned, sweet smelling baby to snuggle with. Both girls were born at exactly 39 weeks, so if this baby stays on that same program we could have a newborn by the start of next week!
We still don’t have a lot prepared for welcoming our babe, but the wonderful Nuna company sent us an amazing Ivvi Savi stroller (pushchair), and a Sena travel crib (cot), which will, for the time being, be the baby’s bassinet/crib. When the boxes arrived on Tuesday, I about hugged the delivery man! I set it up the Sena yesterday morning, and the girls quickly took it over as a crib for their dolls. I have a feeling their baby brother is going to have to get used to sharing his swaddles, bottles, new stroller, crib, board books, and tiny clothes with his sisters and their dolls. It’s amazing how much more “ready” I feel to have this baby now that we have someplace to set him down!
.jpg) PIN PIN .jpg) PINThe freezer here is tiny and doesn’t allow for my usual about to have a baby cooking and stocking the freezer extravaganza, but the fridge is stocked with simple ingredients for simple dinners. I’ve had a really hard here time finding ingredients for most of my “go to” meals, and have spent the past few months coming up with new go to meals. I feel like my draw towards innovative cooking has had to be put on a hold a bit due to the challenge of finding ingredients (that I seriously took for granted back home), and the fact that the convection oven seems to insist on torching about everything I attempt to bake or roast. PINThe freezer here is tiny and doesn’t allow for my usual about to have a baby cooking and stocking the freezer extravaganza, but the fridge is stocked with simple ingredients for simple dinners. I’ve had a really hard here time finding ingredients for most of my “go to” meals, and have spent the past few months coming up with new go to meals. I feel like my draw towards innovative cooking has had to be put on a hold a bit due to the challenge of finding ingredients (that I seriously took for granted back home), and the fact that the convection oven seems to insist on torching about everything I attempt to bake or roast.
I’m finding that if I stick to much more basic recipes and meals like tuna noodle casserole, sausage lentil soup, and roasted chicken, I’m much less likely to end up in tears (although, it’s still pretty likely regardless of the success of the dish, given my current hormonal state). If you were to ask Kyle how many times he’s found me weeping in the kitchen over a pan of dry brownies, a garbage bin full charred root vegetables, or an overcooked chicken, he would say, “A lot.”
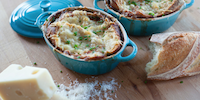
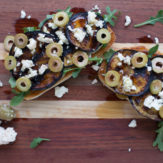
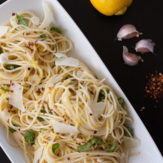
.jpg) PIN PIN PINFor the most part I’m finding the stove top to be much more controllable and predictable, so I prefer to make dinner with a pots and pans “on the hob”, as they say here. One of the easiest things I’ve started making regularly, is pasta with herbs and garlic breadcrumbs. I begin with salty water boiling away, ready to cook my pasta – any type of pasta will do and the kids love macaroni so we do that, and a non-stick skillet over medium heat with a small pool of olive oil warmed through. Into that pool I toss some breadcrumbs and dried herbs, allowing them to begin toasting before I add in lots of garlic. The fragrant, toasty breadcrumbs are then simply tossed with the al dente pasta, and a bit of pasta water and served with some grated Parmesan cheese (which I know is not traditional, but I just can’t eat pasta without a little salty Parmesan!), lemon zest, a few more of the breadcrumbs, a hefty drizzle of olive oil, and a sprinkling of flakey salt. The finished result also benefits from a handful of thawed frozen pea for a bit of color and pop, or can be topped with a lacy-edged olive oil fried egg. The whole dinner takes about 20 minutes to make. With meals like that in the queue, who needs a fully stocked chest freezer? PINFor the most part I’m finding the stove top to be much more controllable and predictable, so I prefer to make dinner with a pots and pans “on the hob”, as they say here. One of the easiest things I’ve started making regularly, is pasta with herbs and garlic breadcrumbs. I begin with salty water boiling away, ready to cook my pasta – any type of pasta will do and the kids love macaroni so we do that, and a non-stick skillet over medium heat with a small pool of olive oil warmed through. Into that pool I toss some breadcrumbs and dried herbs, allowing them to begin toasting before I add in lots of garlic. The fragrant, toasty breadcrumbs are then simply tossed with the al dente pasta, and a bit of pasta water and served with some grated Parmesan cheese (which I know is not traditional, but I just can’t eat pasta without a little salty Parmesan!), lemon zest, a few more of the breadcrumbs, a hefty drizzle of olive oil, and a sprinkling of flakey salt. The finished result also benefits from a handful of thawed frozen pea for a bit of color and pop, or can be topped with a lacy-edged olive oil fried egg. The whole dinner takes about 20 minutes to make. With meals like that in the queue, who needs a fully stocked chest freezer?
PINPINPINPINPASTA WITH HERBS AND GARLIC BREADCRUMBS
Ingredients.
1 lb. pasta
3 garlic cloves, finely minced
zest of 1 lemon
1 cup frozen peas, thawed
1 1/2 cups fresh breadcrumbs
1/2 teaspoon dried parsley (or a small palmful minced fresh parsley)
1/4 teaspoon dried oregano
1/4 teaspoon dried thyme
grated Parmesan cheese (optional)
extra virgin olive oil
kosher salt
flake salt
freshly ground black pepper or red pepper flakes
olive oil fried eggs (optional)
Directions.
Bring a large pot of salted water to a boil.
In a non-stick skillet, heat 1/4 cup olive oil over medium heat. When the oil is just starting to shimmer, add in the breadcrumbs and dried herbs, stirring to coat them in the oil.
When they are just to turn a light golden brown, use your spatula to move the breadcrumbs to the outside of the pan, leaving an exposed space in the center. Pour another tablespoon of olive oil into the center of the pan and allow it to heat up a bit before adding the minced garlic, and a pinch of red pepper flakes if you’re using them. Gently sauté the garlic for a minute or so until fragrant, then mix the garlic into the breadcrumbs.
Stir occasionally until the breadcrumbs are deep, warm caramel color, and smell wonderfully toasty. Transfer the breadcrumbs to a large bowl and season well with salt and freshly ground black pepper (skip the back pepper if you used red pepper flakes). Scoop out about 1/2 cup of the breadcrumbs and set aside for topping the pasta.
Cook your pasta to al dente. Drain it, reserving about 1/2 cup of the starchy pasta water.
Add the pasta to the large bowl with the breadcrumbs and begin to toss it together, adding splashes of the pasta water as needed to help the breadcrumbs adhere to the pasta. Toss in the peas, lemon zest, and fresh parsley if you have it on hand.
Transfer the pasta to serving bowls, drizzle with a bit more olive oil, top with a sprinkle of Parmesan, an extra bit of breadcrumbs, and a pinch of flake salt.
Serve on it’s own or top it with an olive oil fried egg.
PRINTABLE RECIPE.
PASTA WITH GARLIC AND HERB BREADCRUMBS
Save
Save
Save
Save
We’ve been pretty much homebound the past couple of weeks, which is par for the course this time of year. Last weekend I had a round of preterm contractions that left us all a bit rattled and motivated; nothing will kick you into gear like thinking your little bundle might just arrive sooner than you expected! I should know by now that that’s a possibility since I had similar experiences with the girls. But, alas…
We don’t have so much as a bassinet, diapers, or baby wipes in the house – although I do have a laundry basket of clean, folded, newborn clothes tucked away in our closet. It’s strange because as much as I want to nest and prepare for our baby’s arrival, we still feel somewhat-not-at-home here, and that has made it hard for me to nest and for me to create a space and prepare for the baby. So, while we still have a completely bare nursery with wall to wall mauve carpeting, I allowed those six hours of contractions to motivate me to log in to our Amazon account and get the basics lined up. Slowly but surely the deliveries have started arriving and by the end of the week we’ll have our stash of newborn diapers, a new booster seat for Gigi so the babe has her carseat to ride home from the hospital in, and baby wipes. The basics will be covered, and we’ll figure out where to go from there as needed. Even though this is my third baby, in so many ways it feels like it’s my first.
Another cause for our current lay-low-lifestyle is that the kids have gotten knocked down by their first major cold of the season. High fevers, coughs, and sore throats call for spending lots of time in our pajamas, making chicken stock, binge watching Curious George, lots of essential oils rubbed on chests and backs, and early bedtimes.
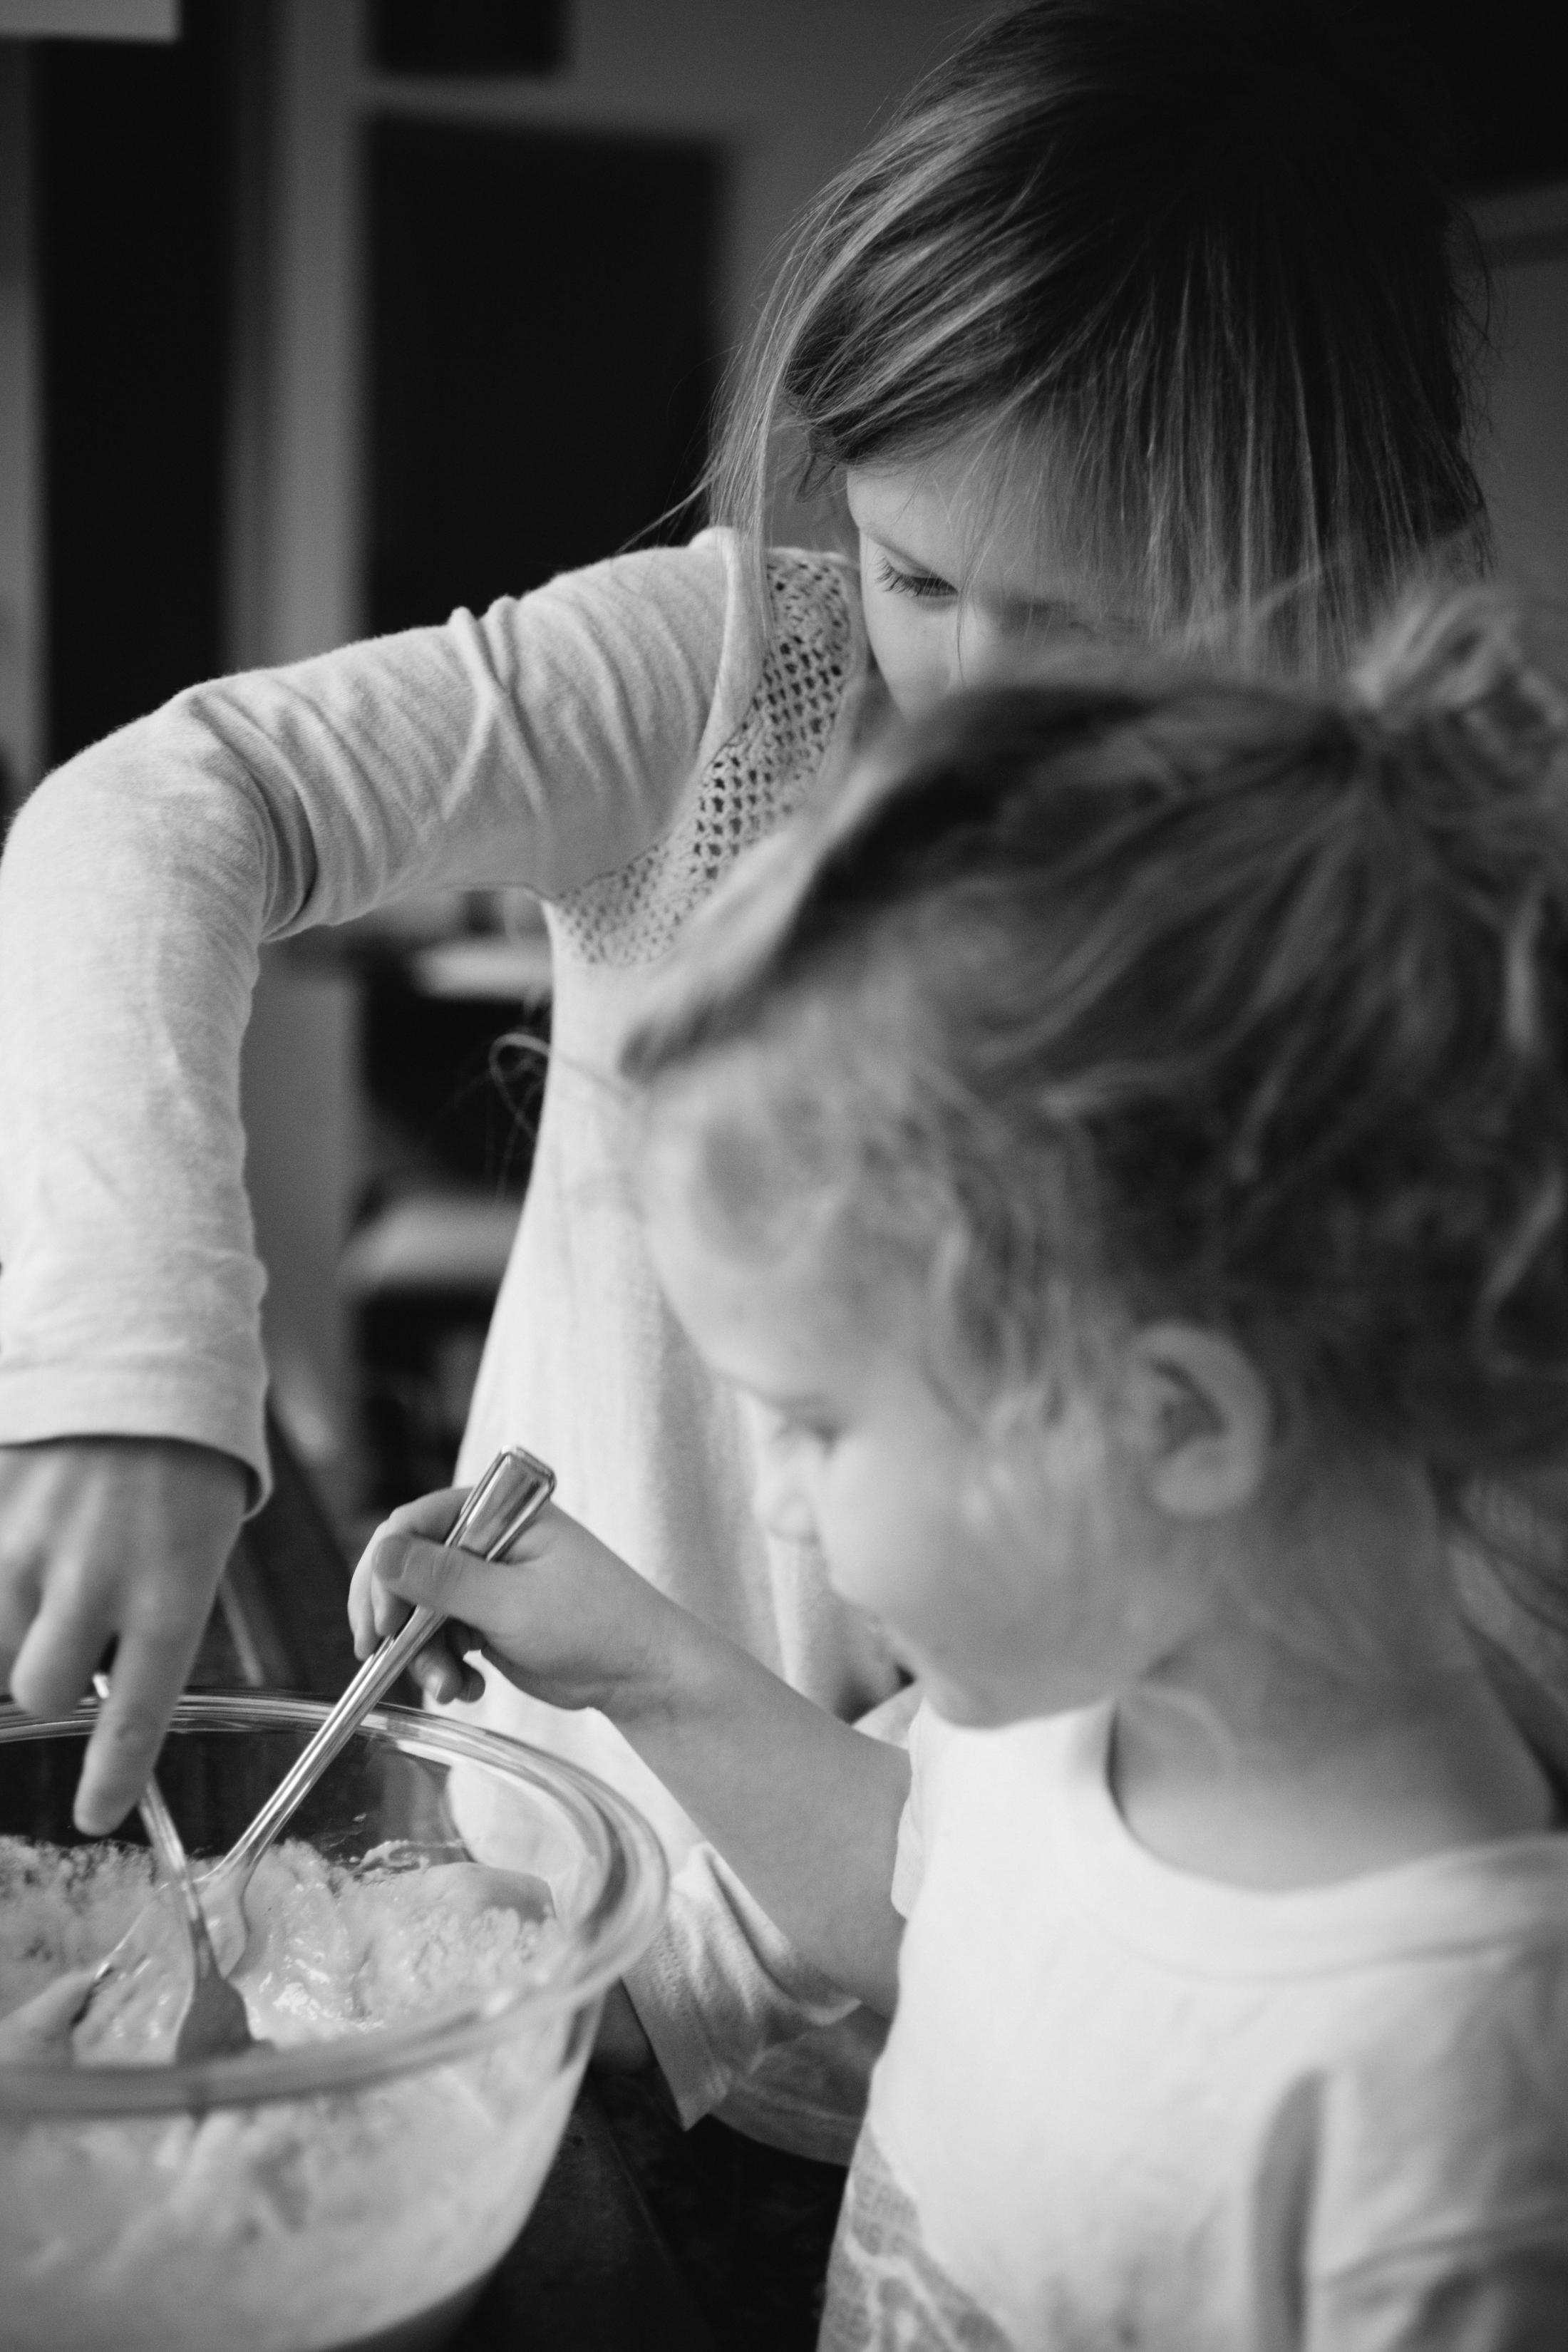
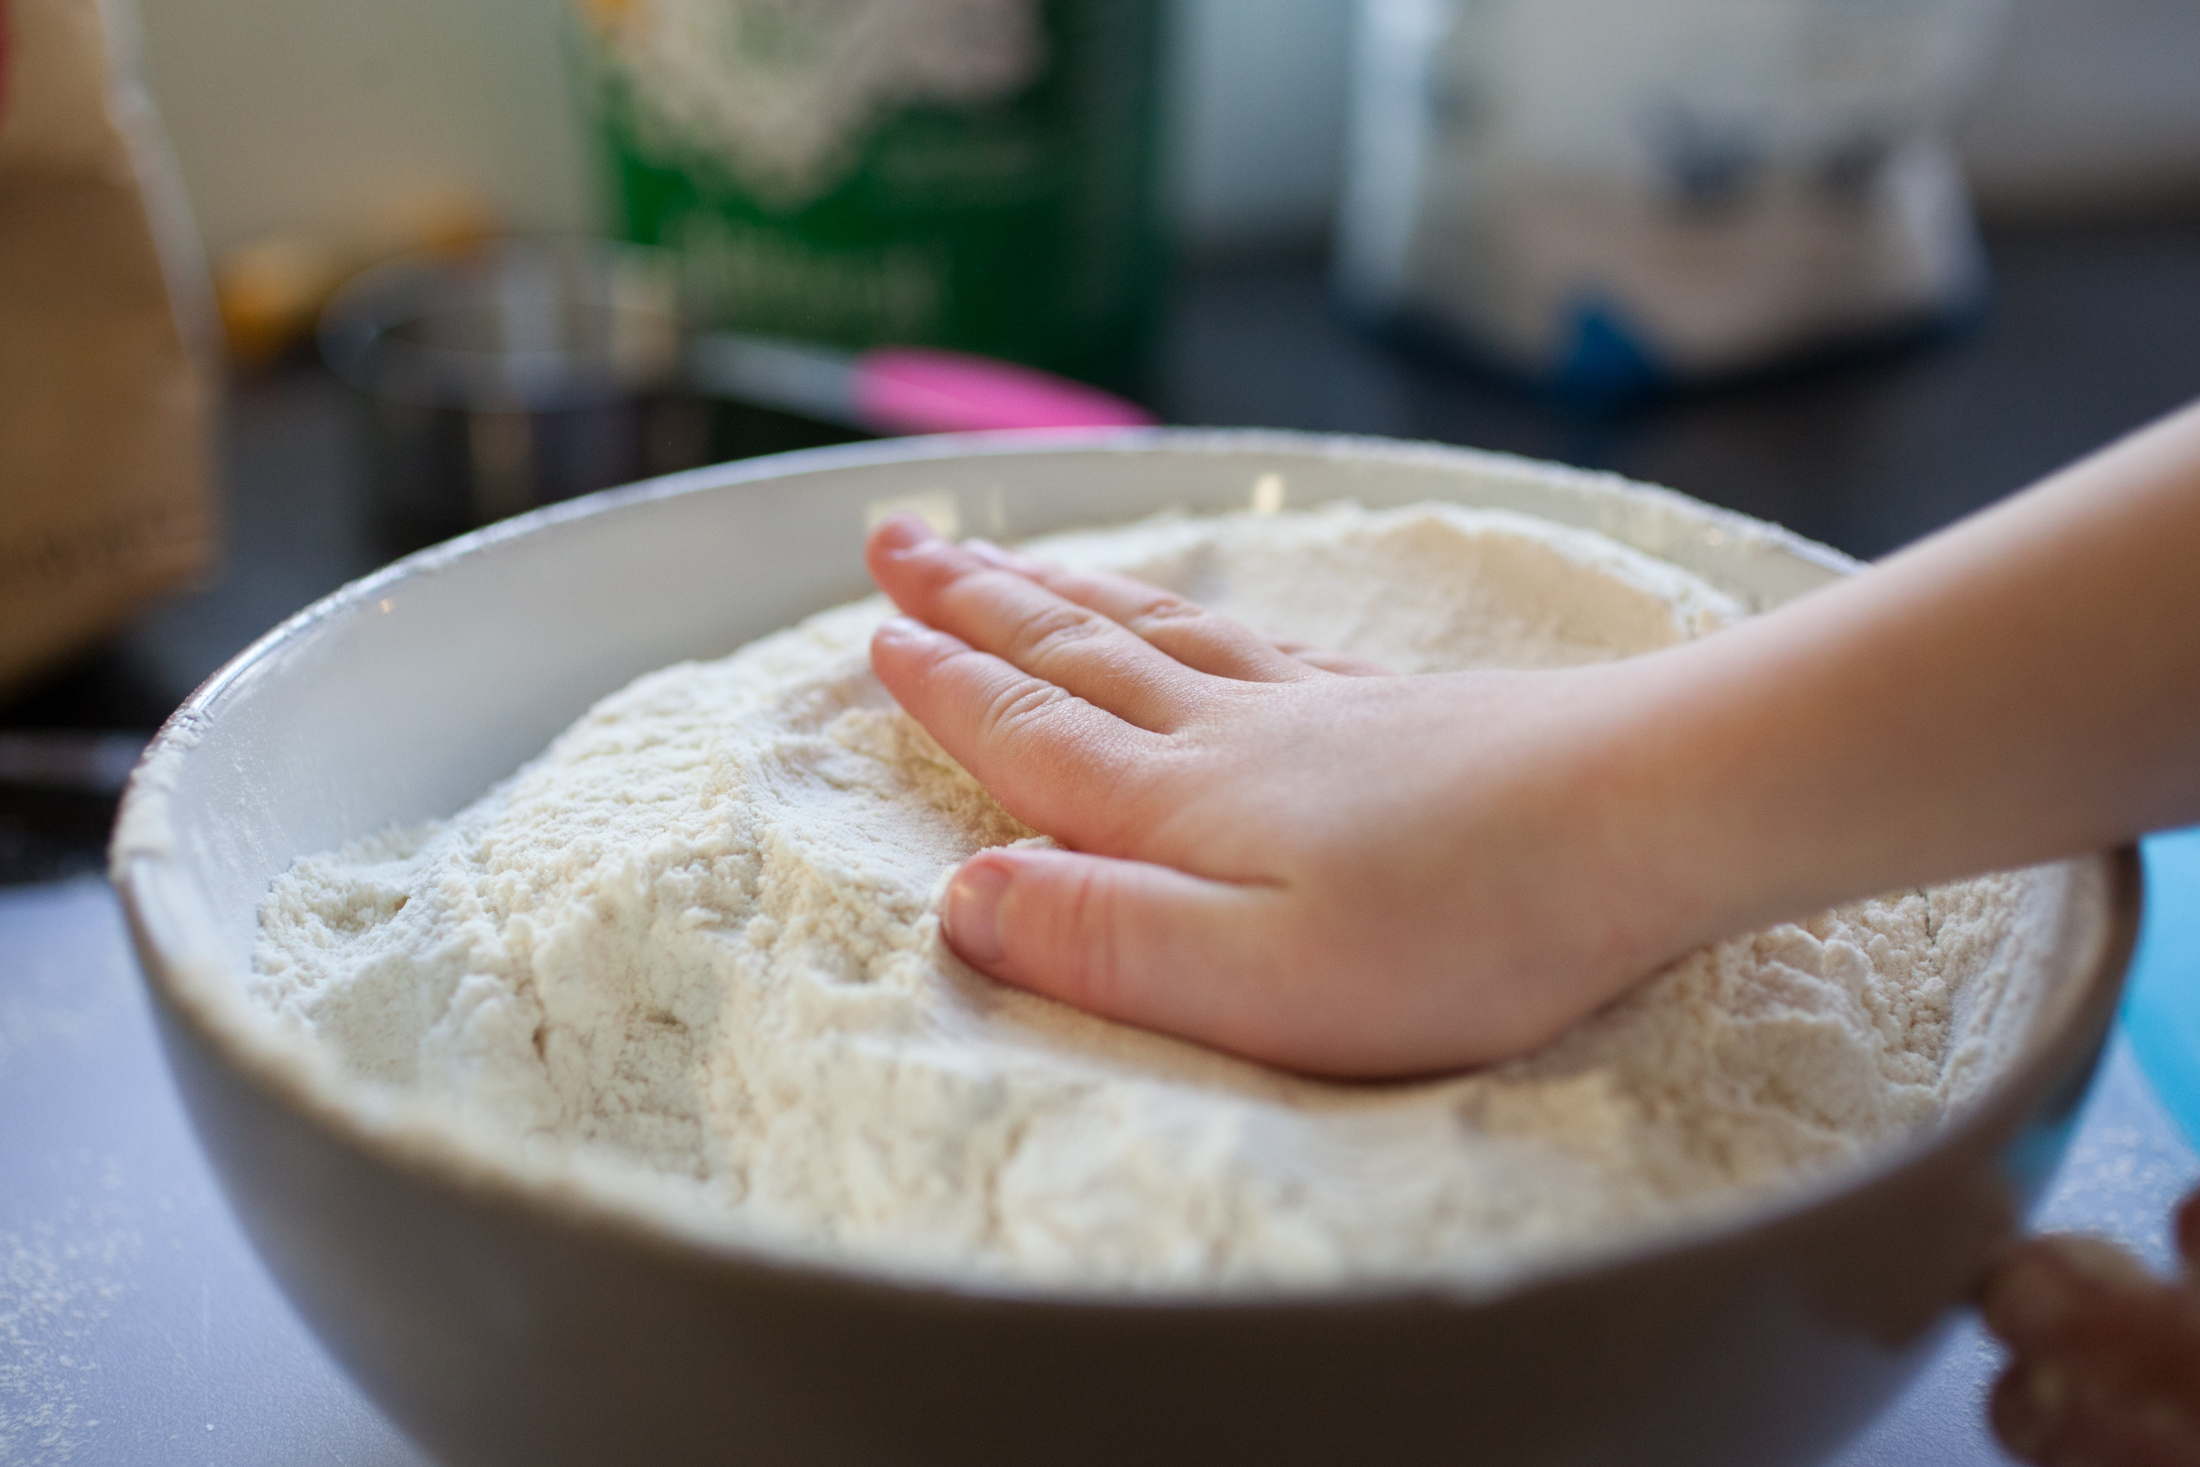
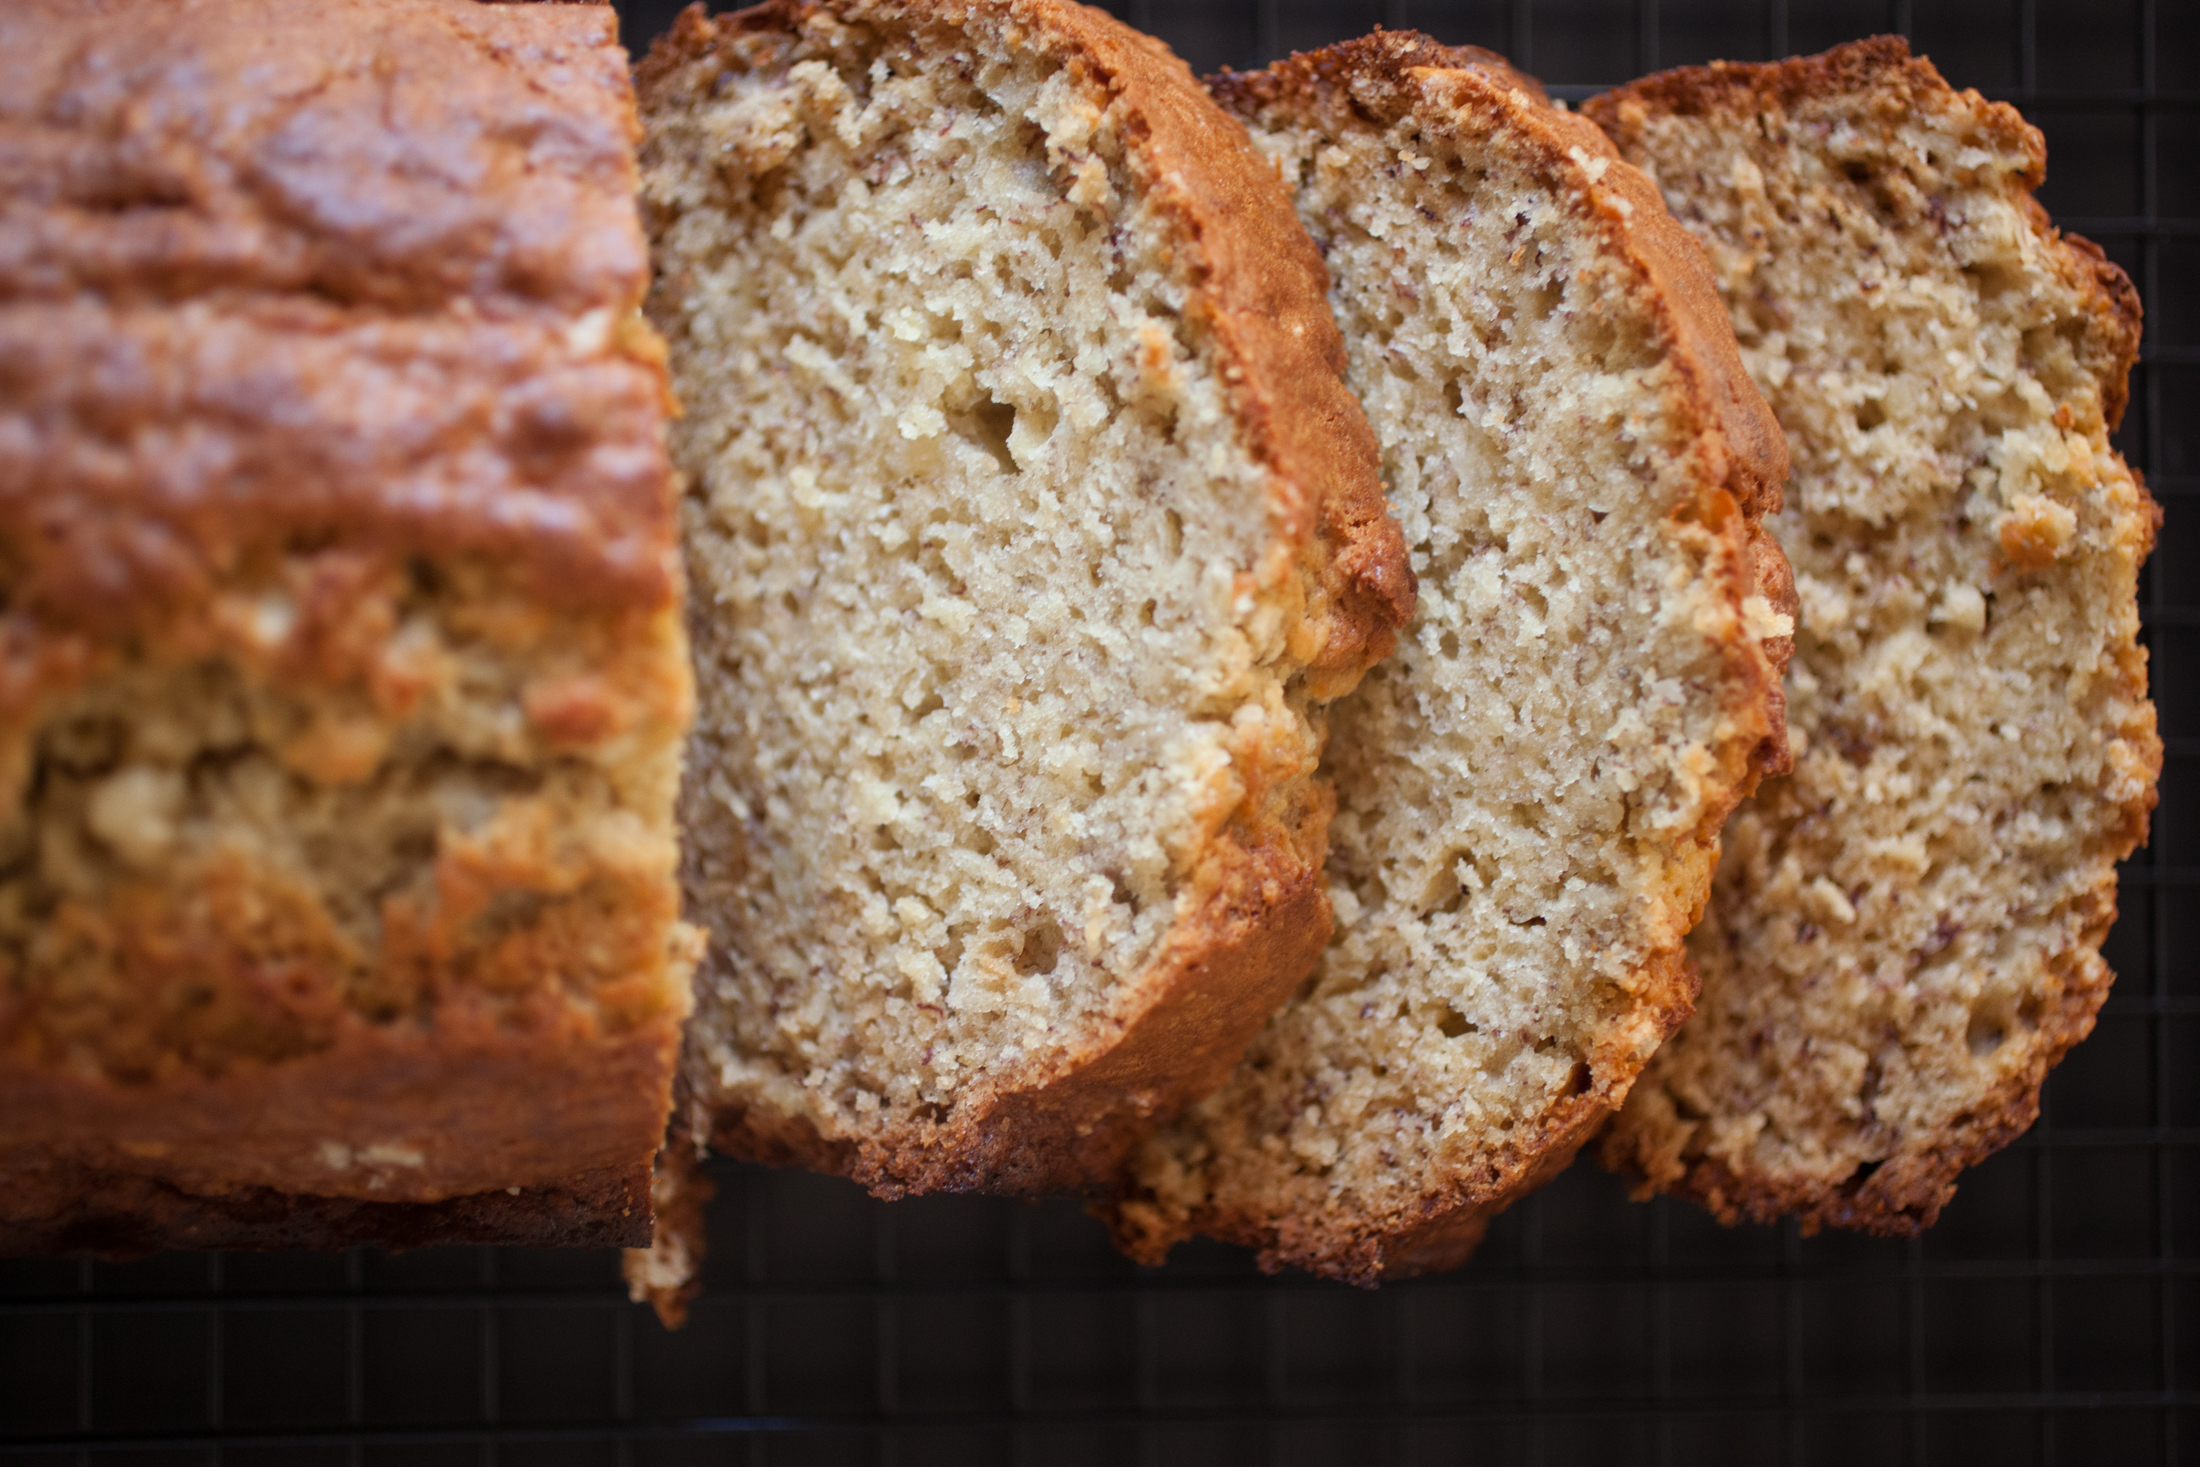
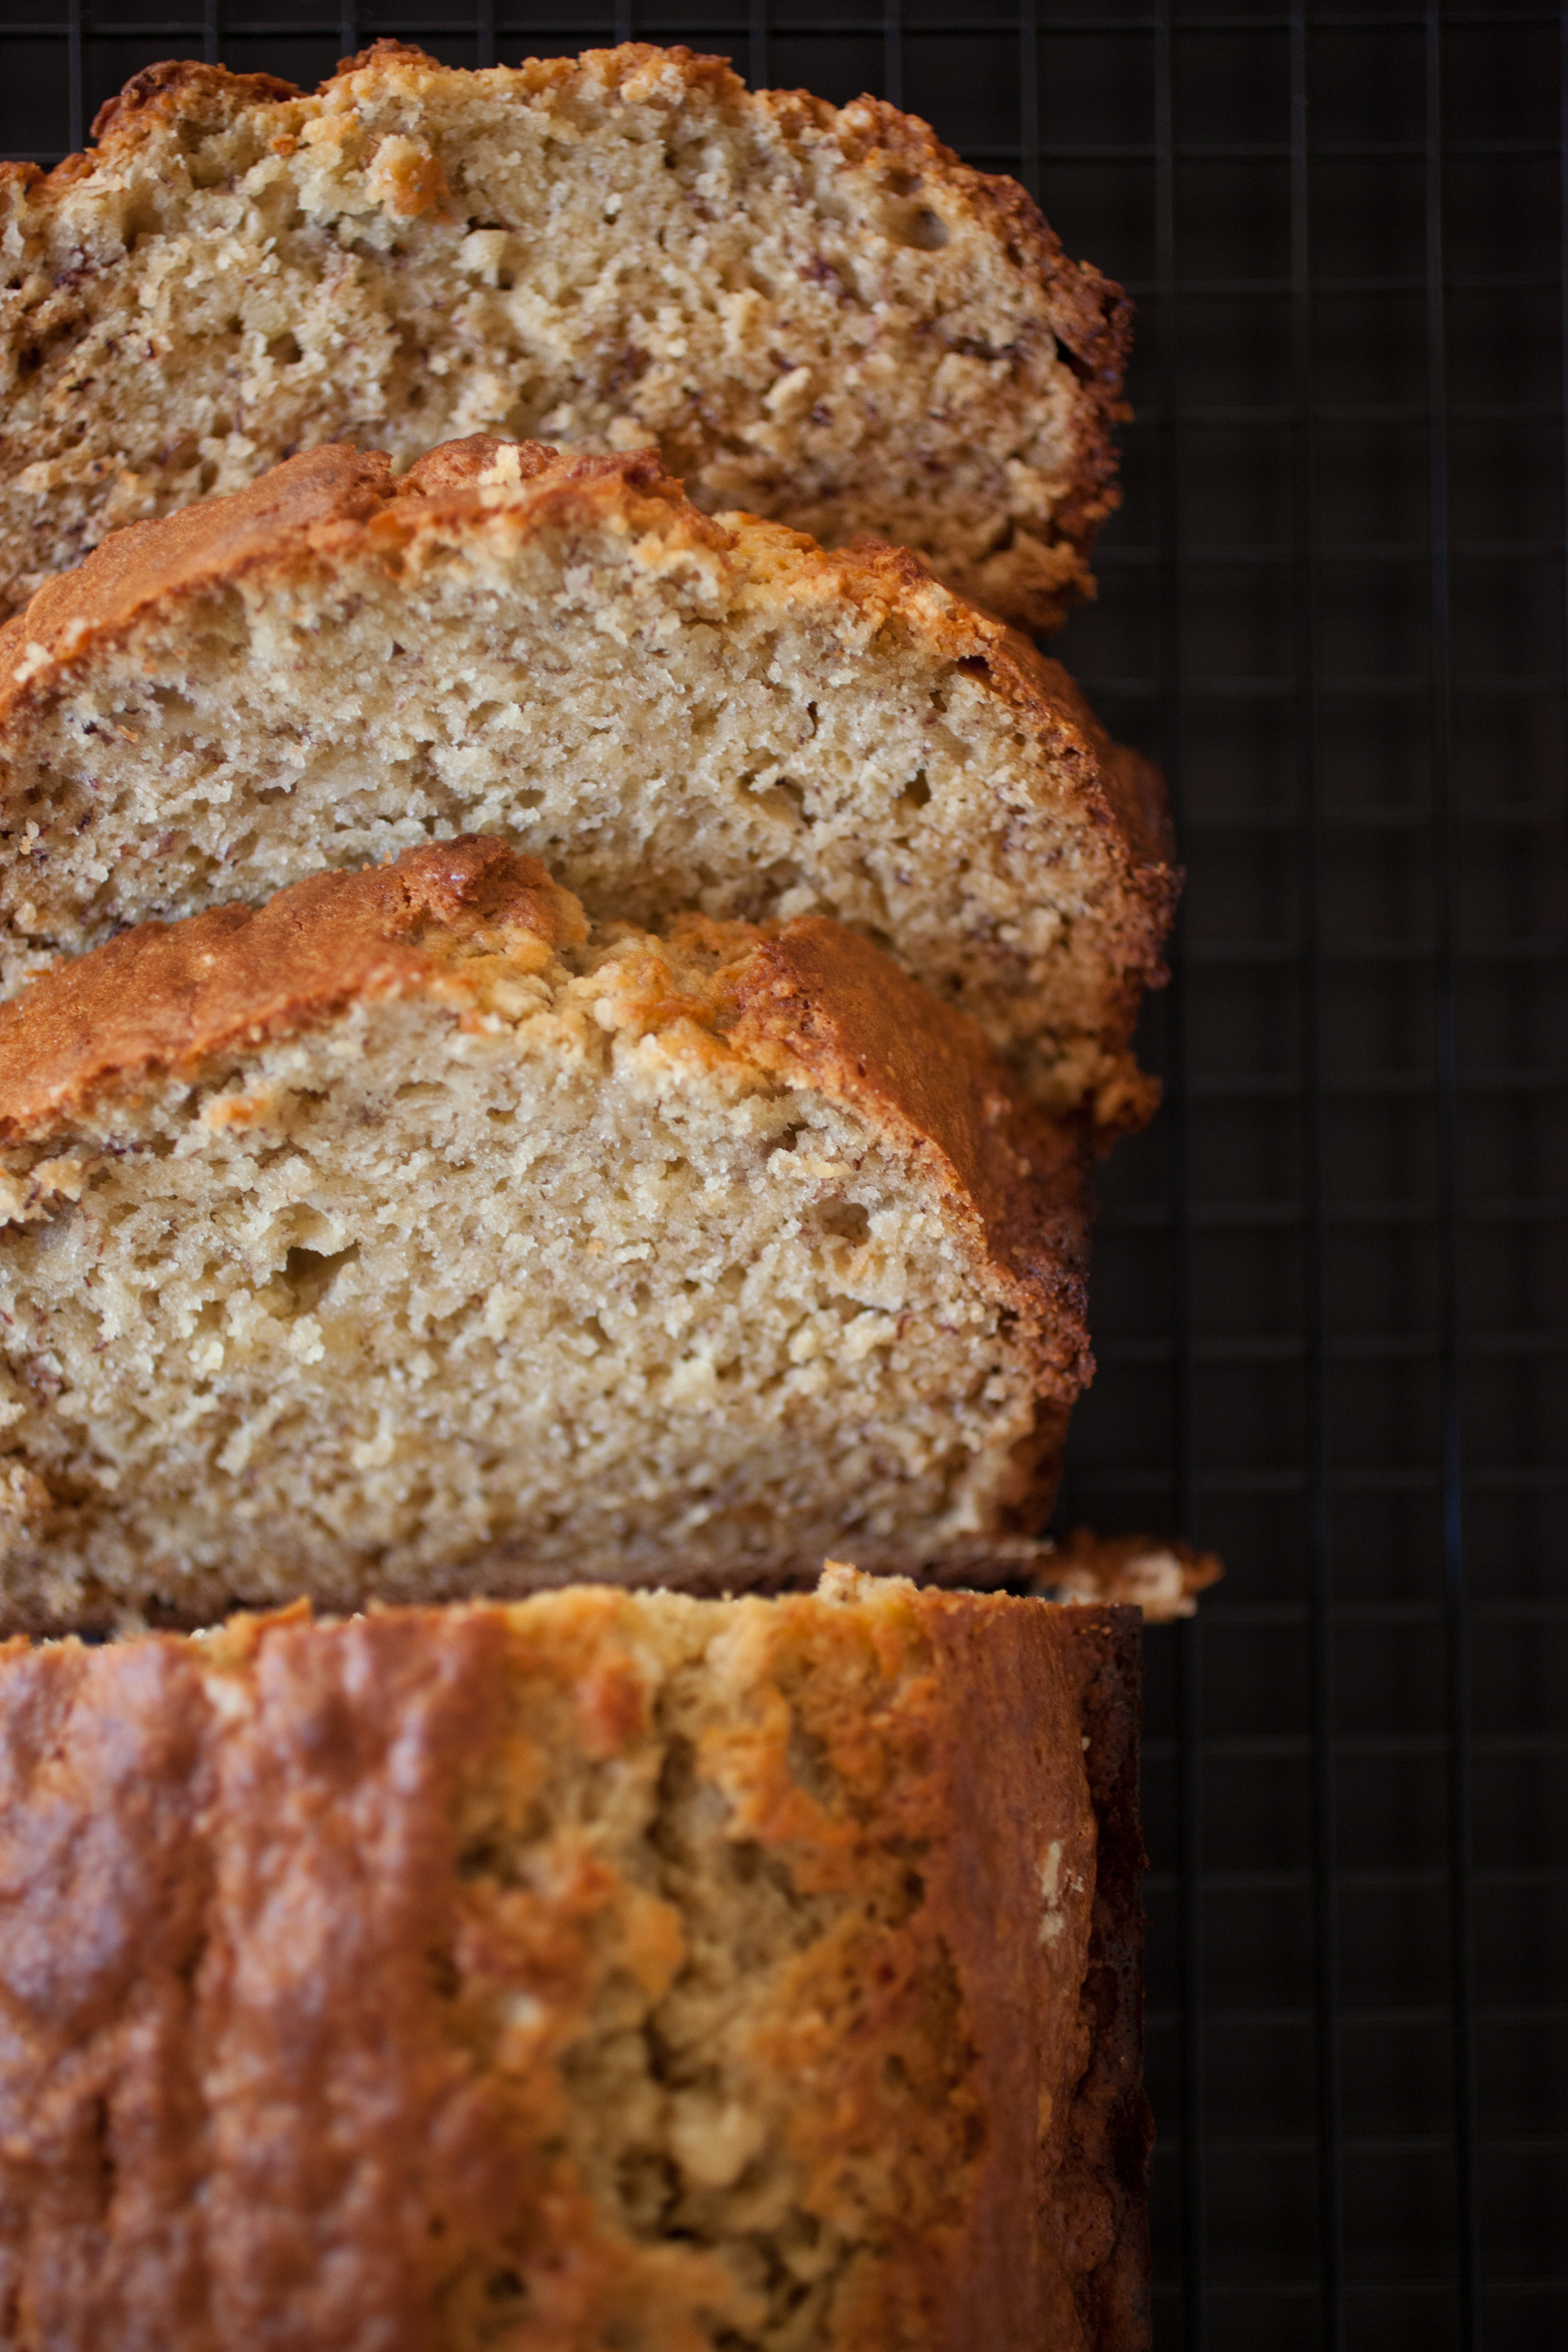
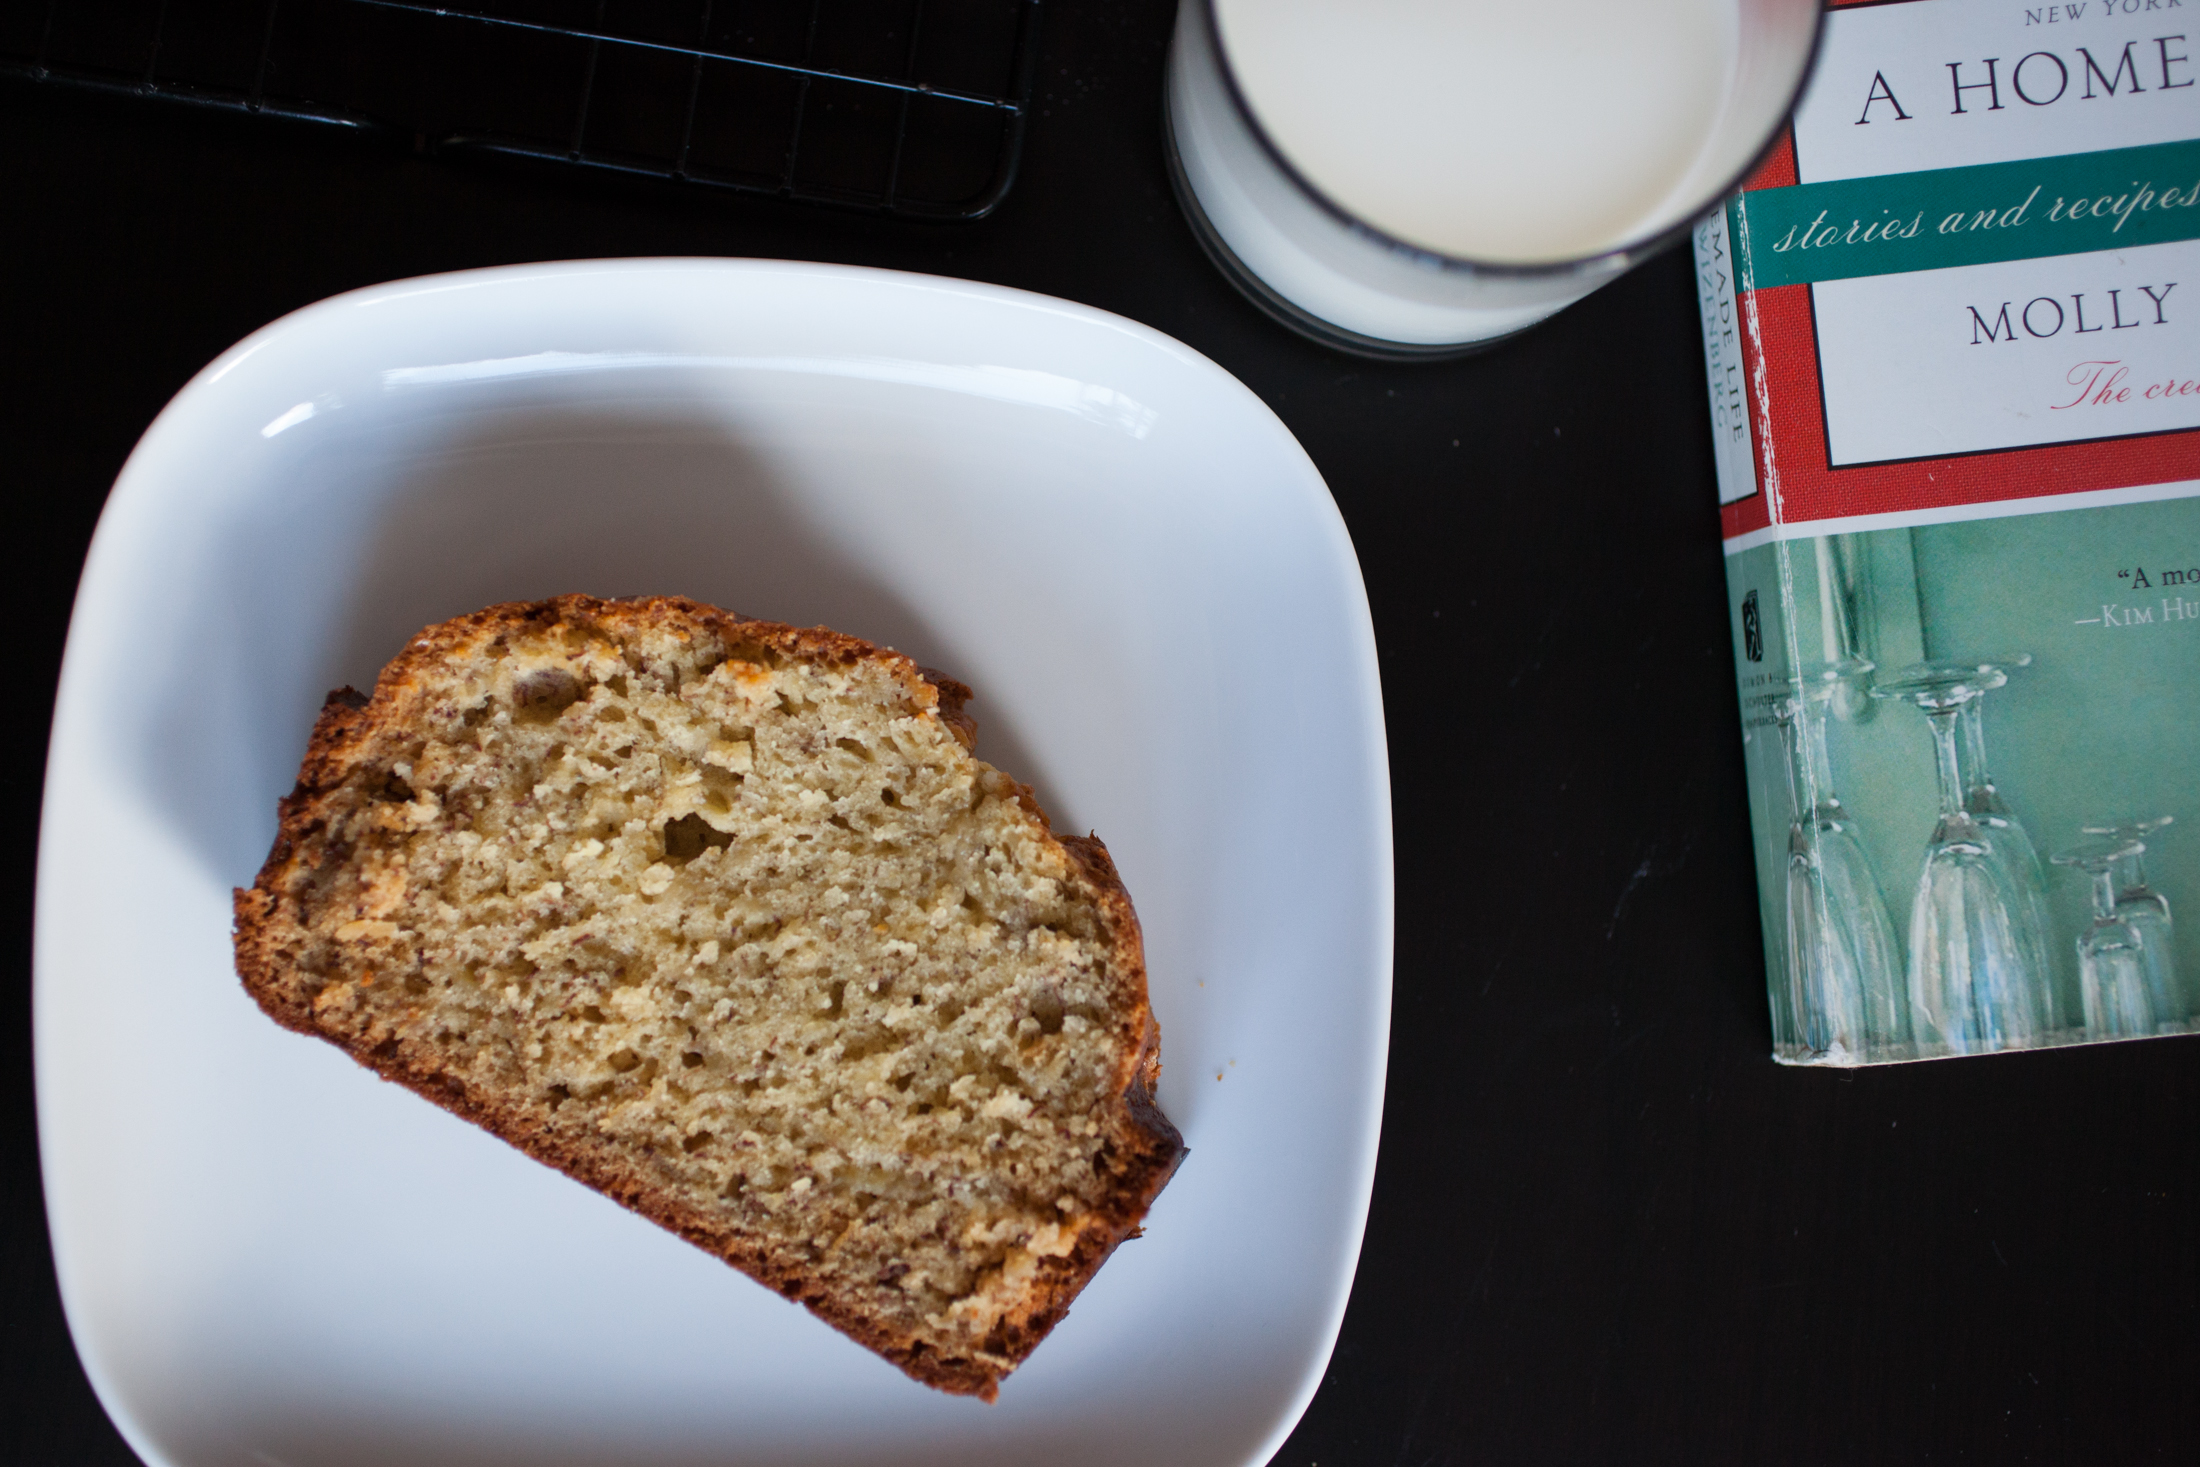
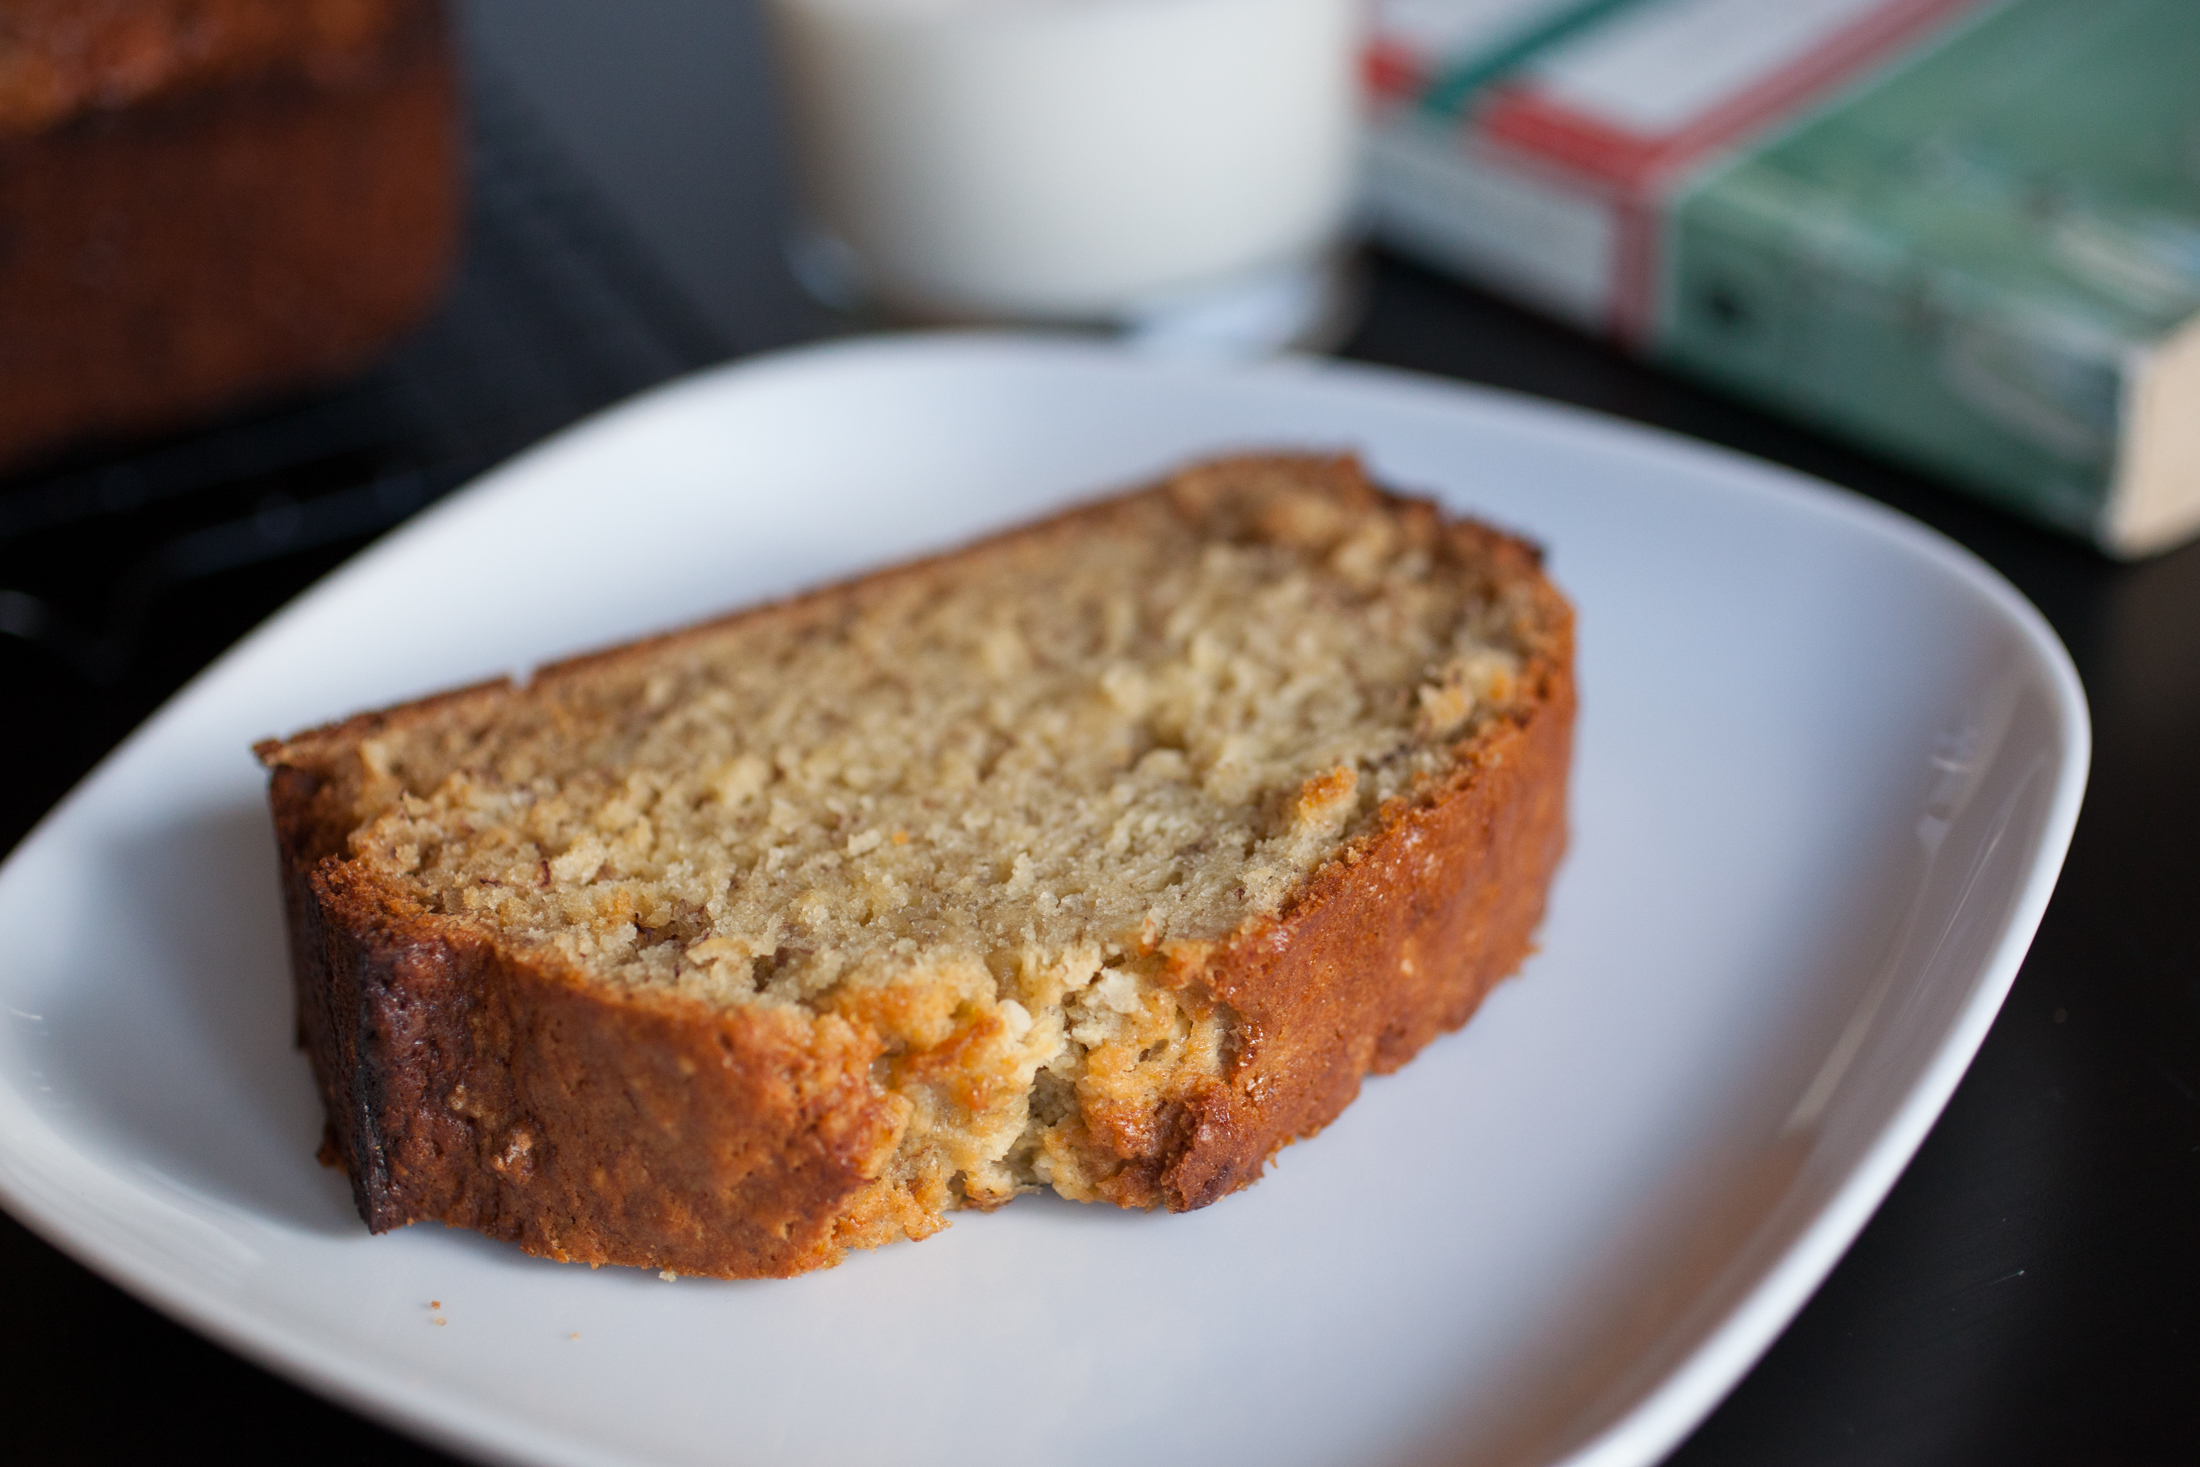
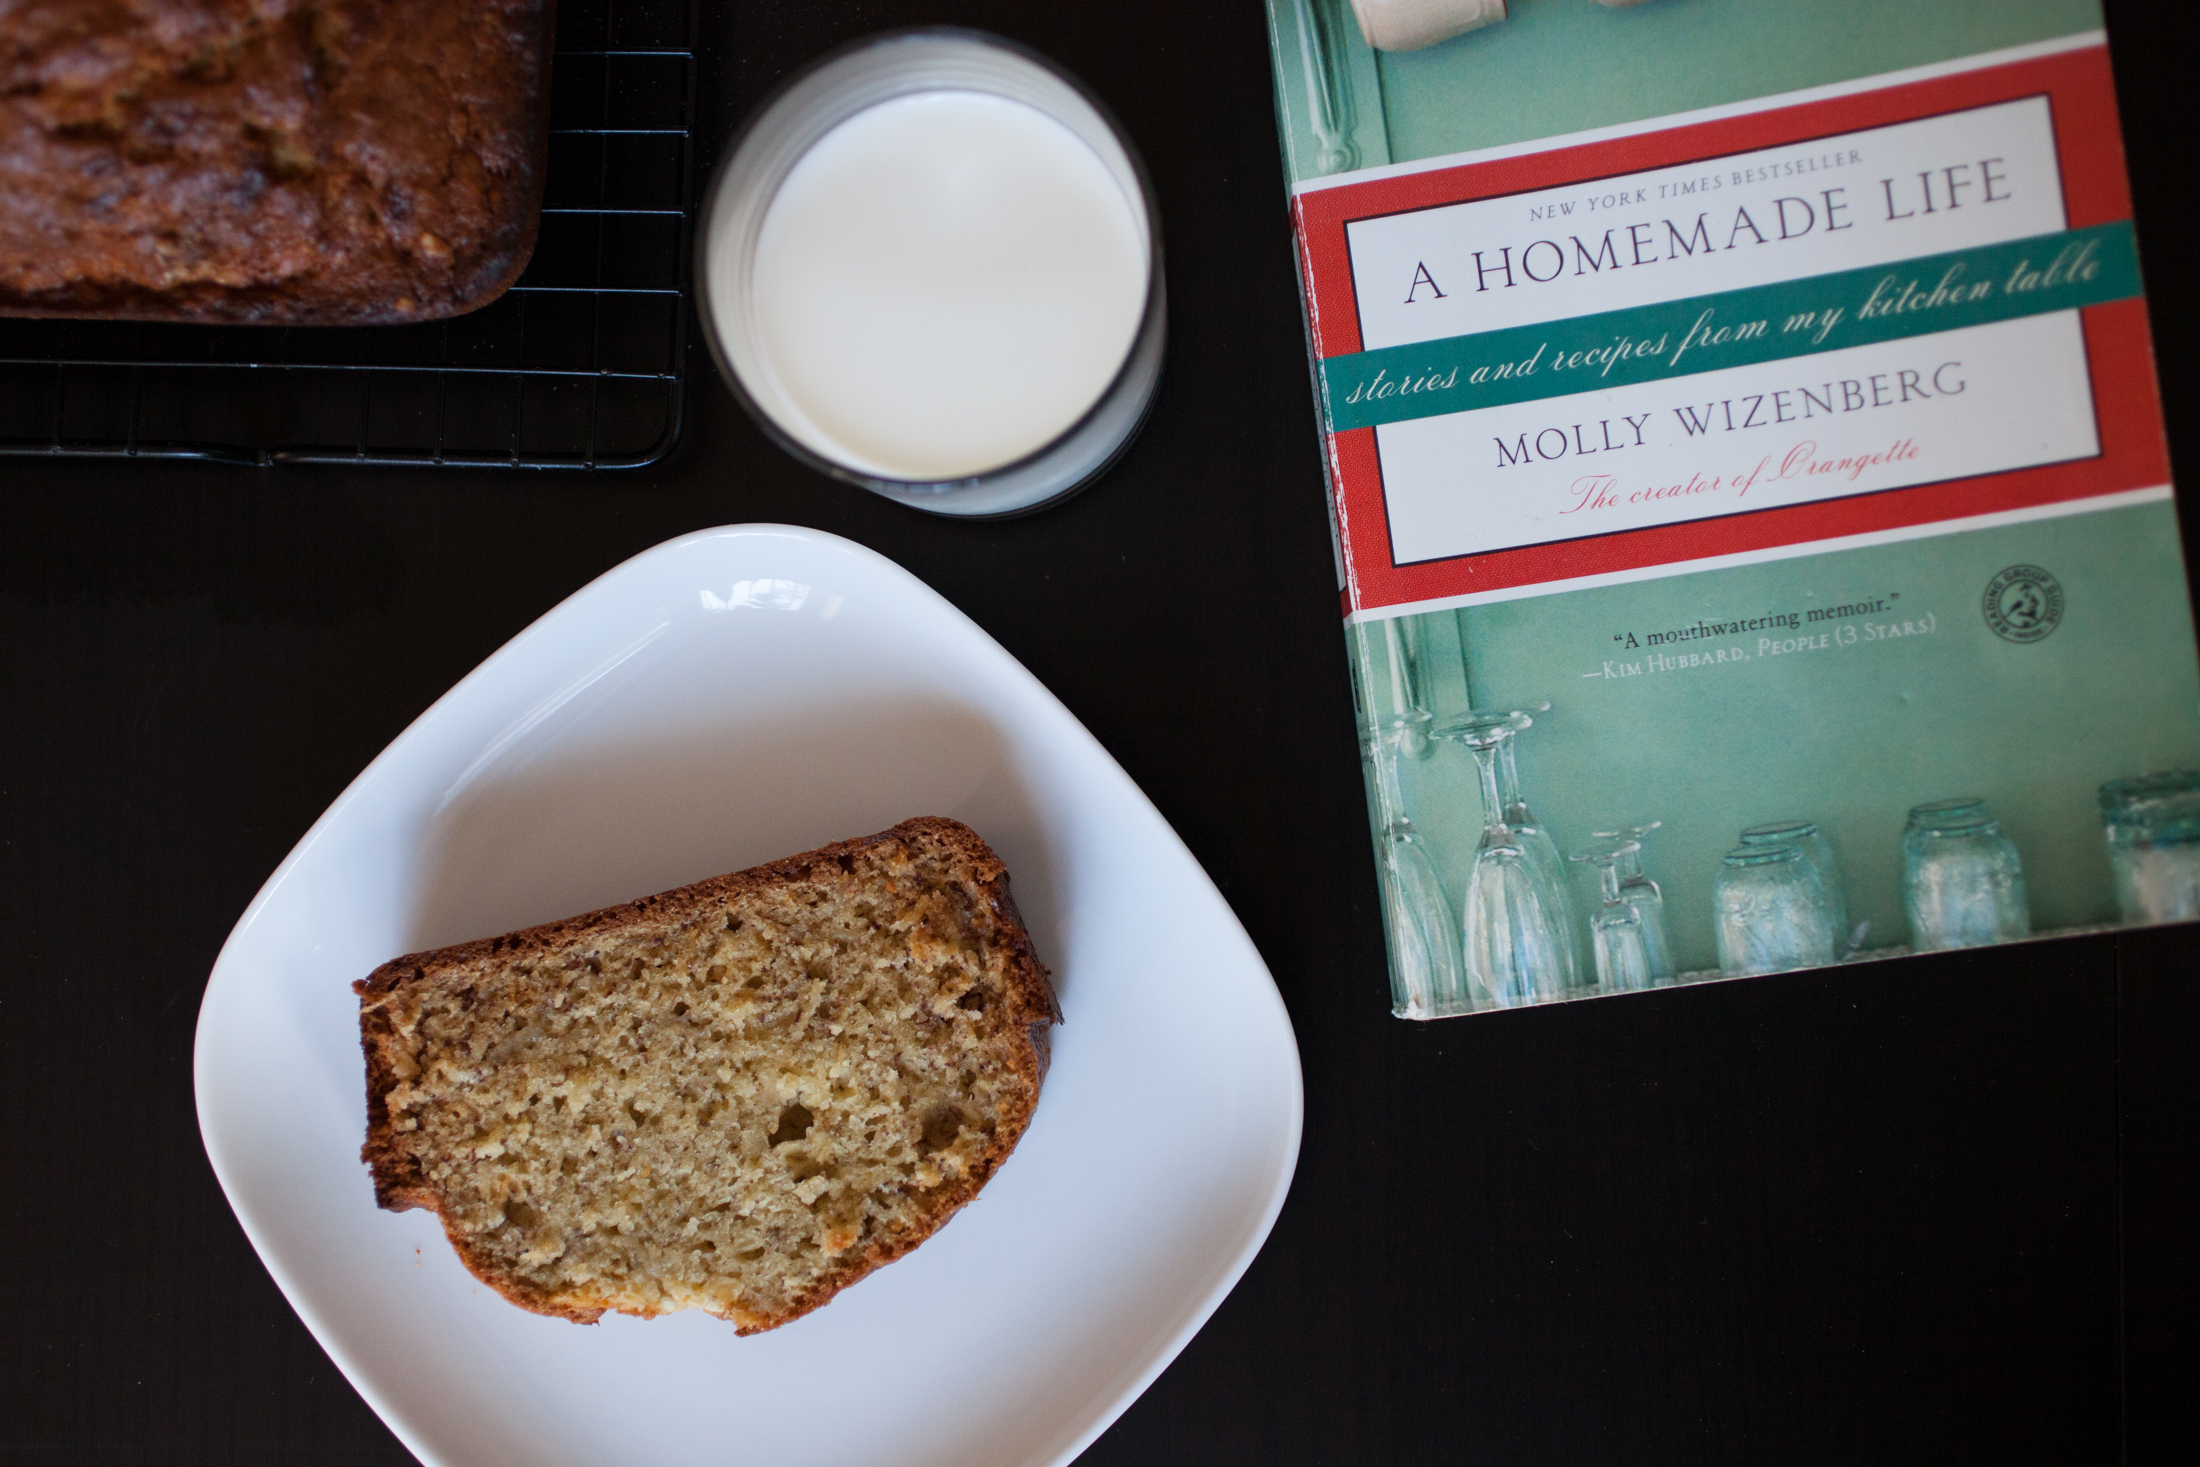
In the midst of our quarantine, we managed to pull together a little Thanksgiving dinner for the four of us on Sunday, and so have been nibbling at leftover stuffing and apple cobbler into the start of the week. But today the Thanksgiving leftovers are gone, and I’m mapping out what to make for the remainder of the week. I have no idea what’s for dinner tonight, but I do know that we will be making a loaf of banana bread this afternoon, an activity that has brought me untold comfort in our few months here in England.
PINPINFinding little comforts is what I’m all about at the moment. The baby’s nursery might not be complete (today or ever), but there will be banana bread. Aside from the one proper cookbook that made the suitcase cut (Mastering the Art of French Cooking), only a few food memoirs came along for the journey. Most notably, and most in rotation, is Molly Wizenberg’s wonderful A Homemade Life. I’ve made her banana bread recipe at least a dozen times since we moved. The recipe calls for chocolate chips and crystallized ginger, and it’s great with both, one or the other, or without the edition of either which is how I find myself making it most of the time.
PINPINPINThere’s something resourceful and comforting about making banana bread – even if you find yourself buying extra bananas just to let them turn overripe on the counter, or find yourself marking perfectly edible bananas with a marker with phrases like “Don’t eat me!” and “I’m for banana bread!”
PINPINPINI love the way that banana bread smells when it’s baking. I love the way that the recipe for it has become so familiar that I almost don’t have to look at it. I love that the ingredients are always on hand as long as you have those bananas at the ready. Mostly, I love that the girls love to make it with me and I feel so much like a “mom” when we are making it together, and even more like a “mom” when we’re sitting together eating warm, steaming, fragrant slices of it with glasses of cold milk in the middle of the afternoon… as we will be doing, yet again, about one hour and a half from now.
PINPINPINPINMOLLY WIZENBERG’S BANANA BREAD
Ingredients.
6 tablespoons (3 ounces) unsalted butter, melted and then cooled slightly
2 cups all-purpose flour
3/4 cup sugar
3/4 teaspoon baking soda
1/2 teaspoon salt
3/4 cup semisweet chocolate chips
1/3 cup finely chopped crystallized ginger
2 large eggs
1 1/2 cups mashed banana (from about 3 large ripe bananas)
1/4 cup well-stirred whole-milk plain yogurt (not low or nonfat)
1 teaspoon vanilla extract
Directions.
Set a rack in the center of the oven, and preheat to 350F. Grease a standard-sized (about 9 by 5 inches) loaf pan with cooking spray or butter.
In a large bowl, whisk together the flour, sugar, baking soda, and salt. Add the chocolate chips and crystallized ginger and whisk well to combine. Set aside.
In a medium bowl, lightly beat the eggs with a fork. Add the mashed banana, yogurt, melted butter, and vanilla and stir to mix well. (The same fork works fine for this.)
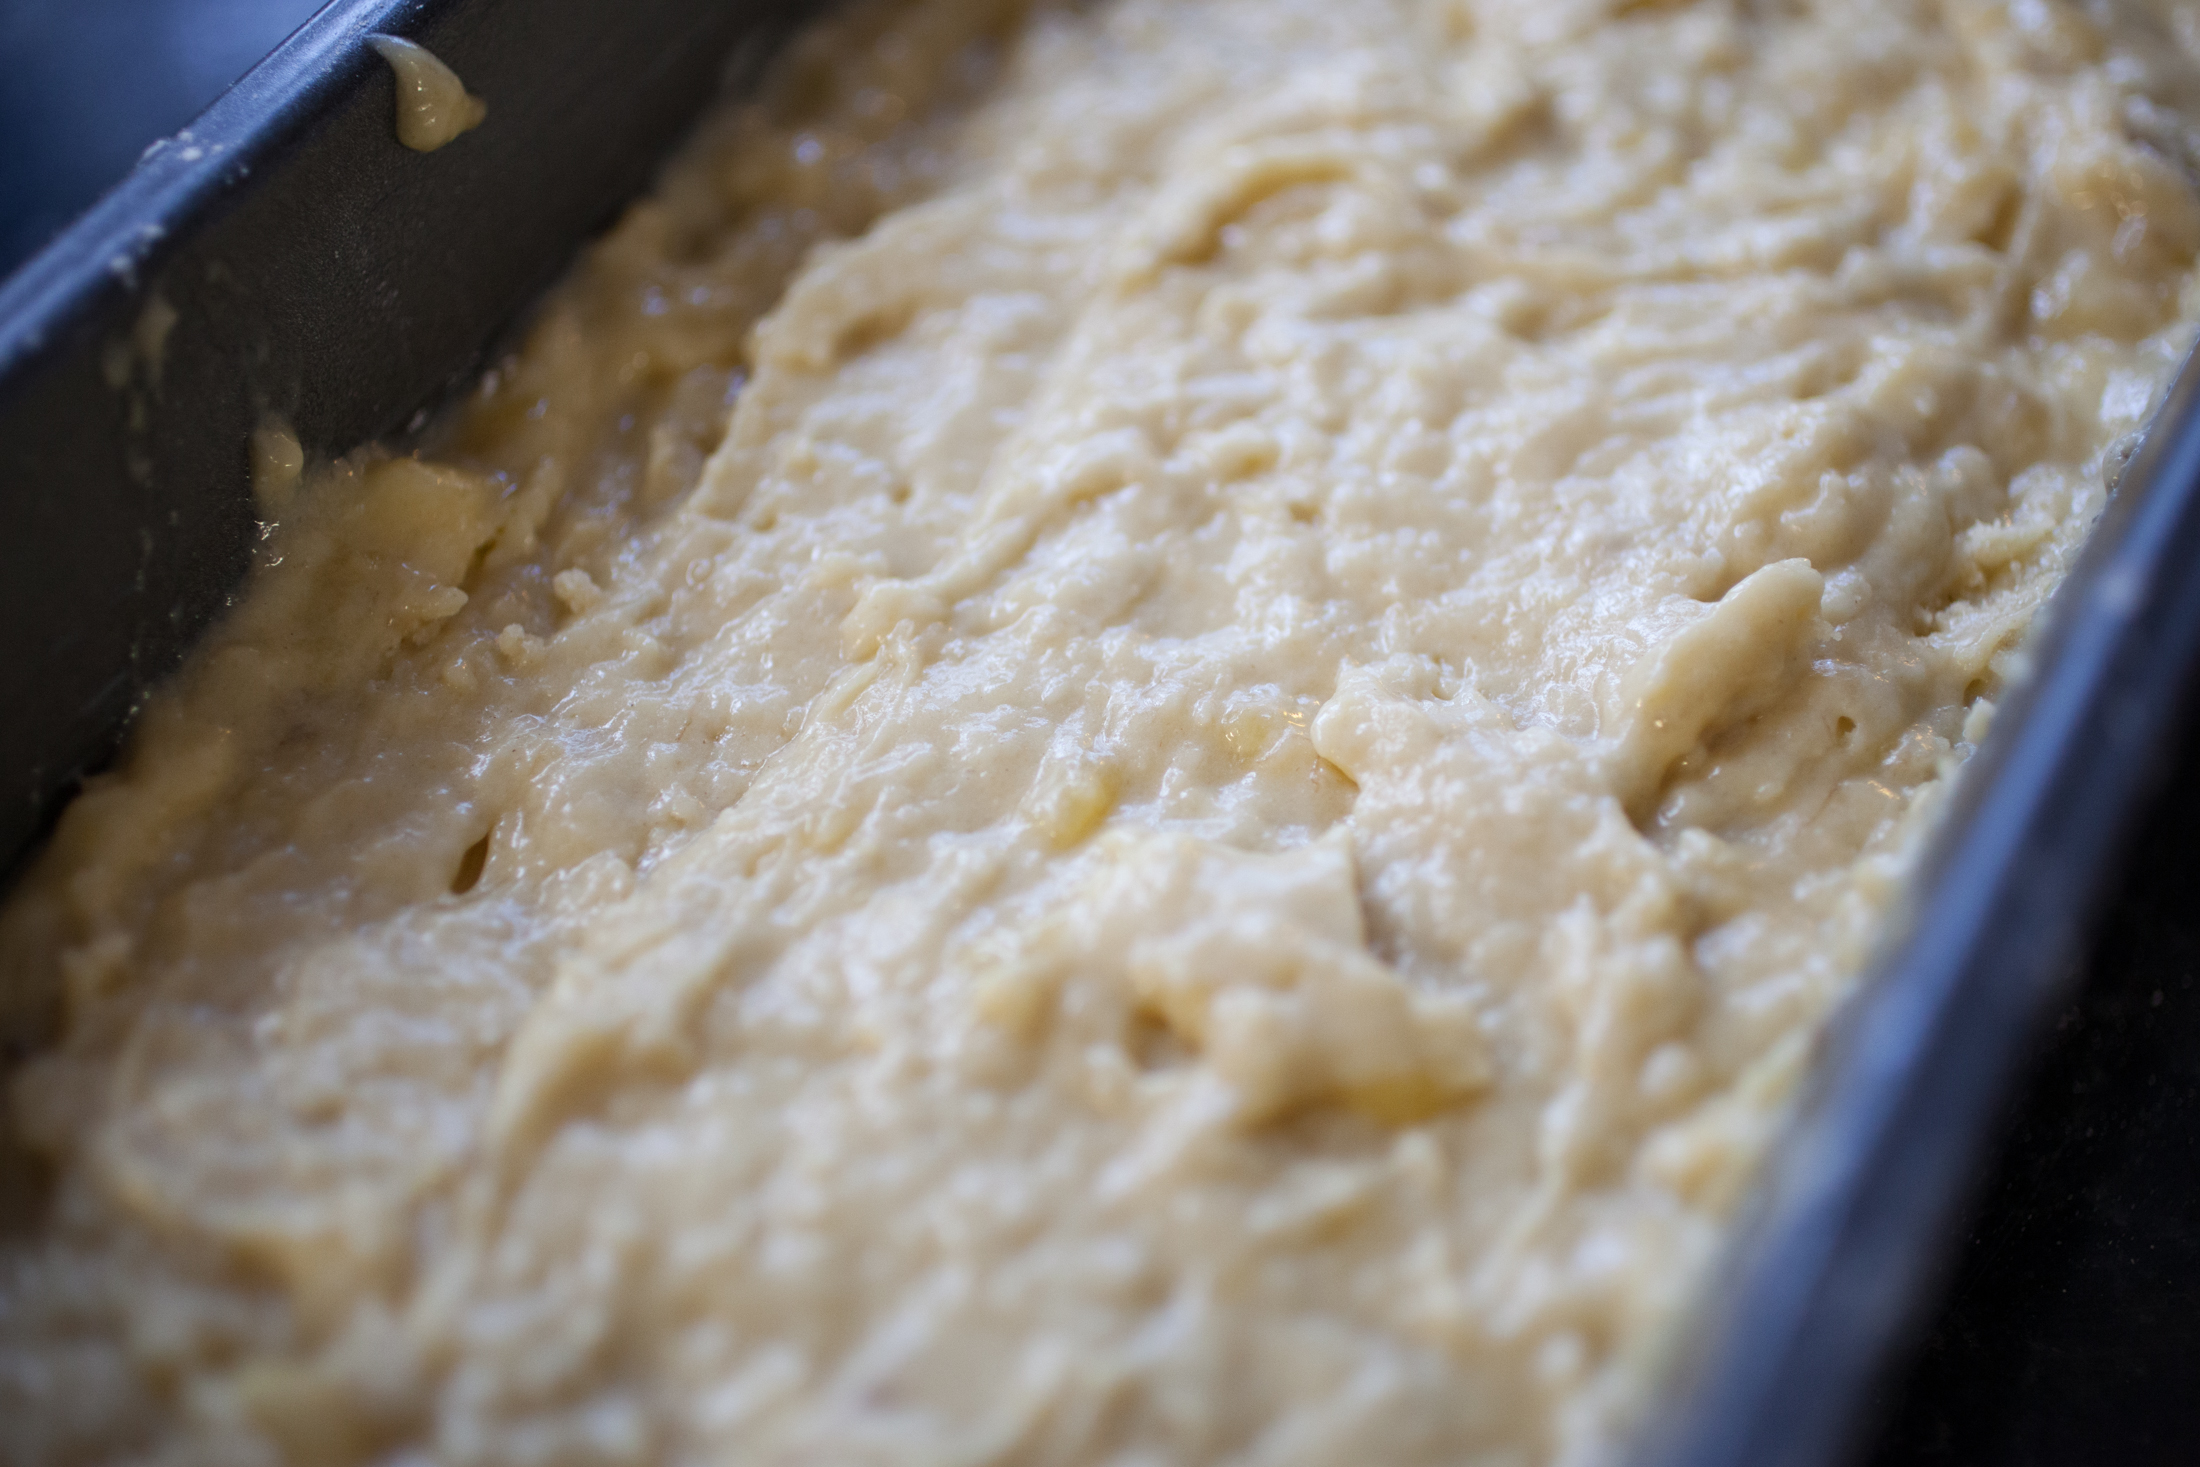
Pour the banana mixture into the dry ingredients, and stir gently with a rubber spatula, scraping down the sides as needed, until just combined. Do not overmix. The batter with be thick and somewhat lumpy, but there should be no unincorporated flour. Scrape the batter into the loaf pan and smooth the top.
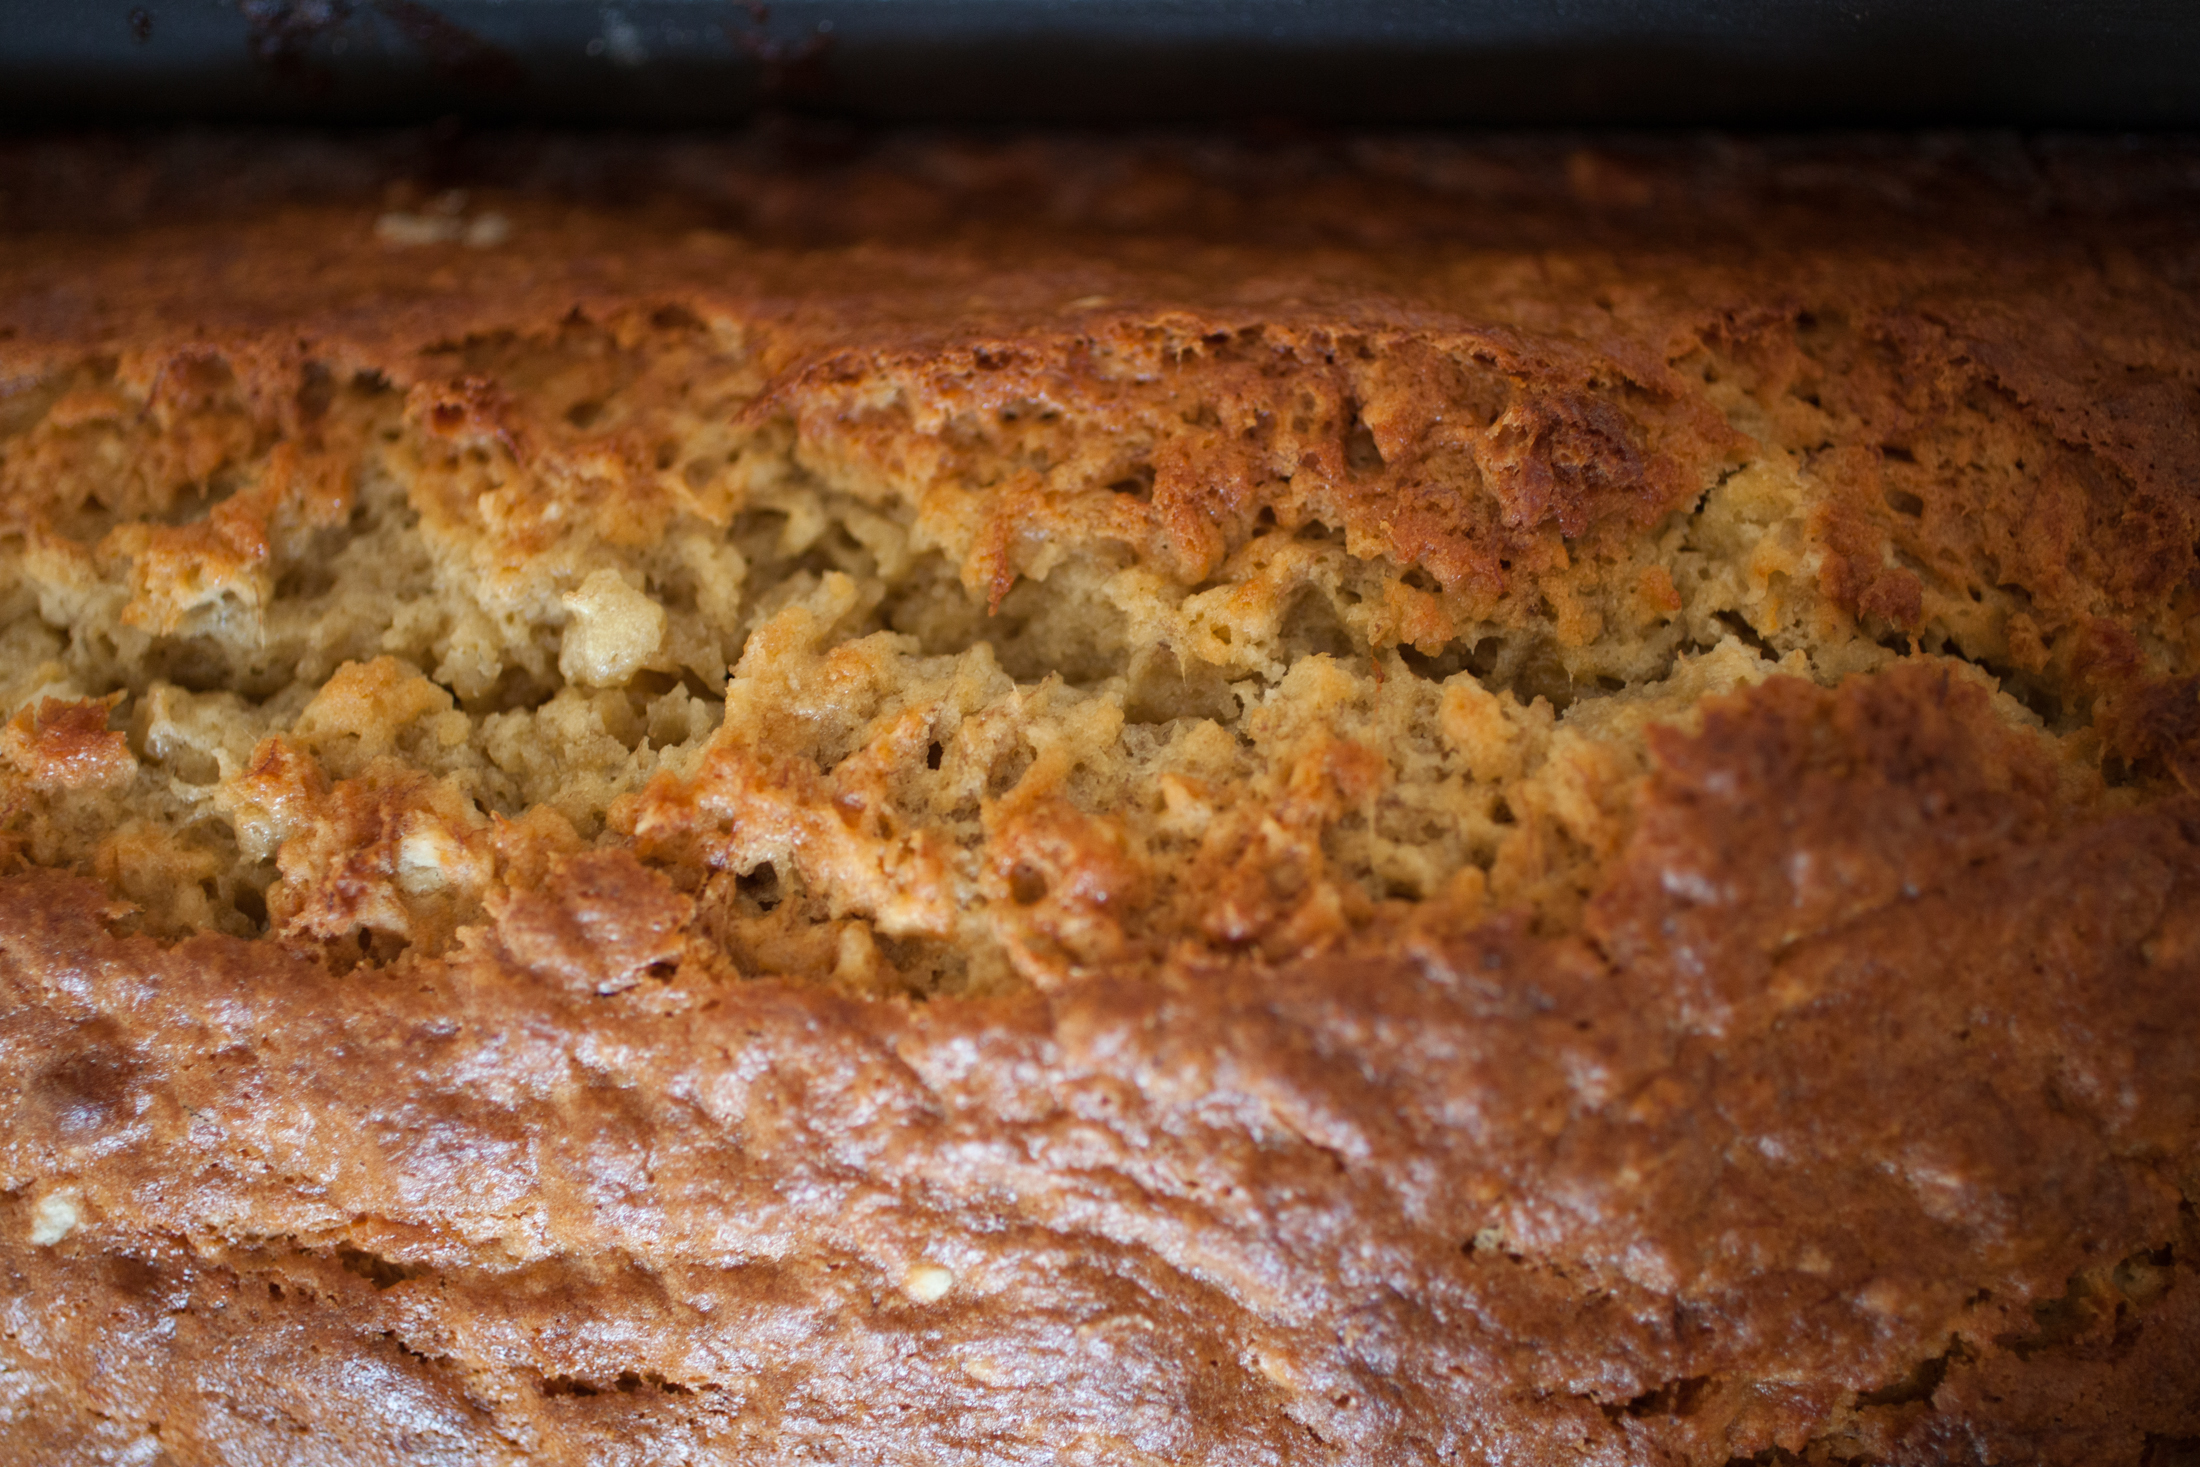
Bake into the loaf is a deep shade of golden brown and a toothpick inserted into the center comes out clean, 50 mins to 1 hour. If the loaf seems to be browning too quickly, tent with aluminum foil.
Cool the loaf in the pan on a wire rack for 5 minutes. Then tip out onto the rack, and let it cool completely before slicing – unless you absolutely can’t help yourself, in which case, dig in.
PRINTABLE RECIPE.
MOLLY WIZENBERG’S BANANA BREAD
Save
Save
Save
Save
Save
Save
Save
Save
Save
Save
Save
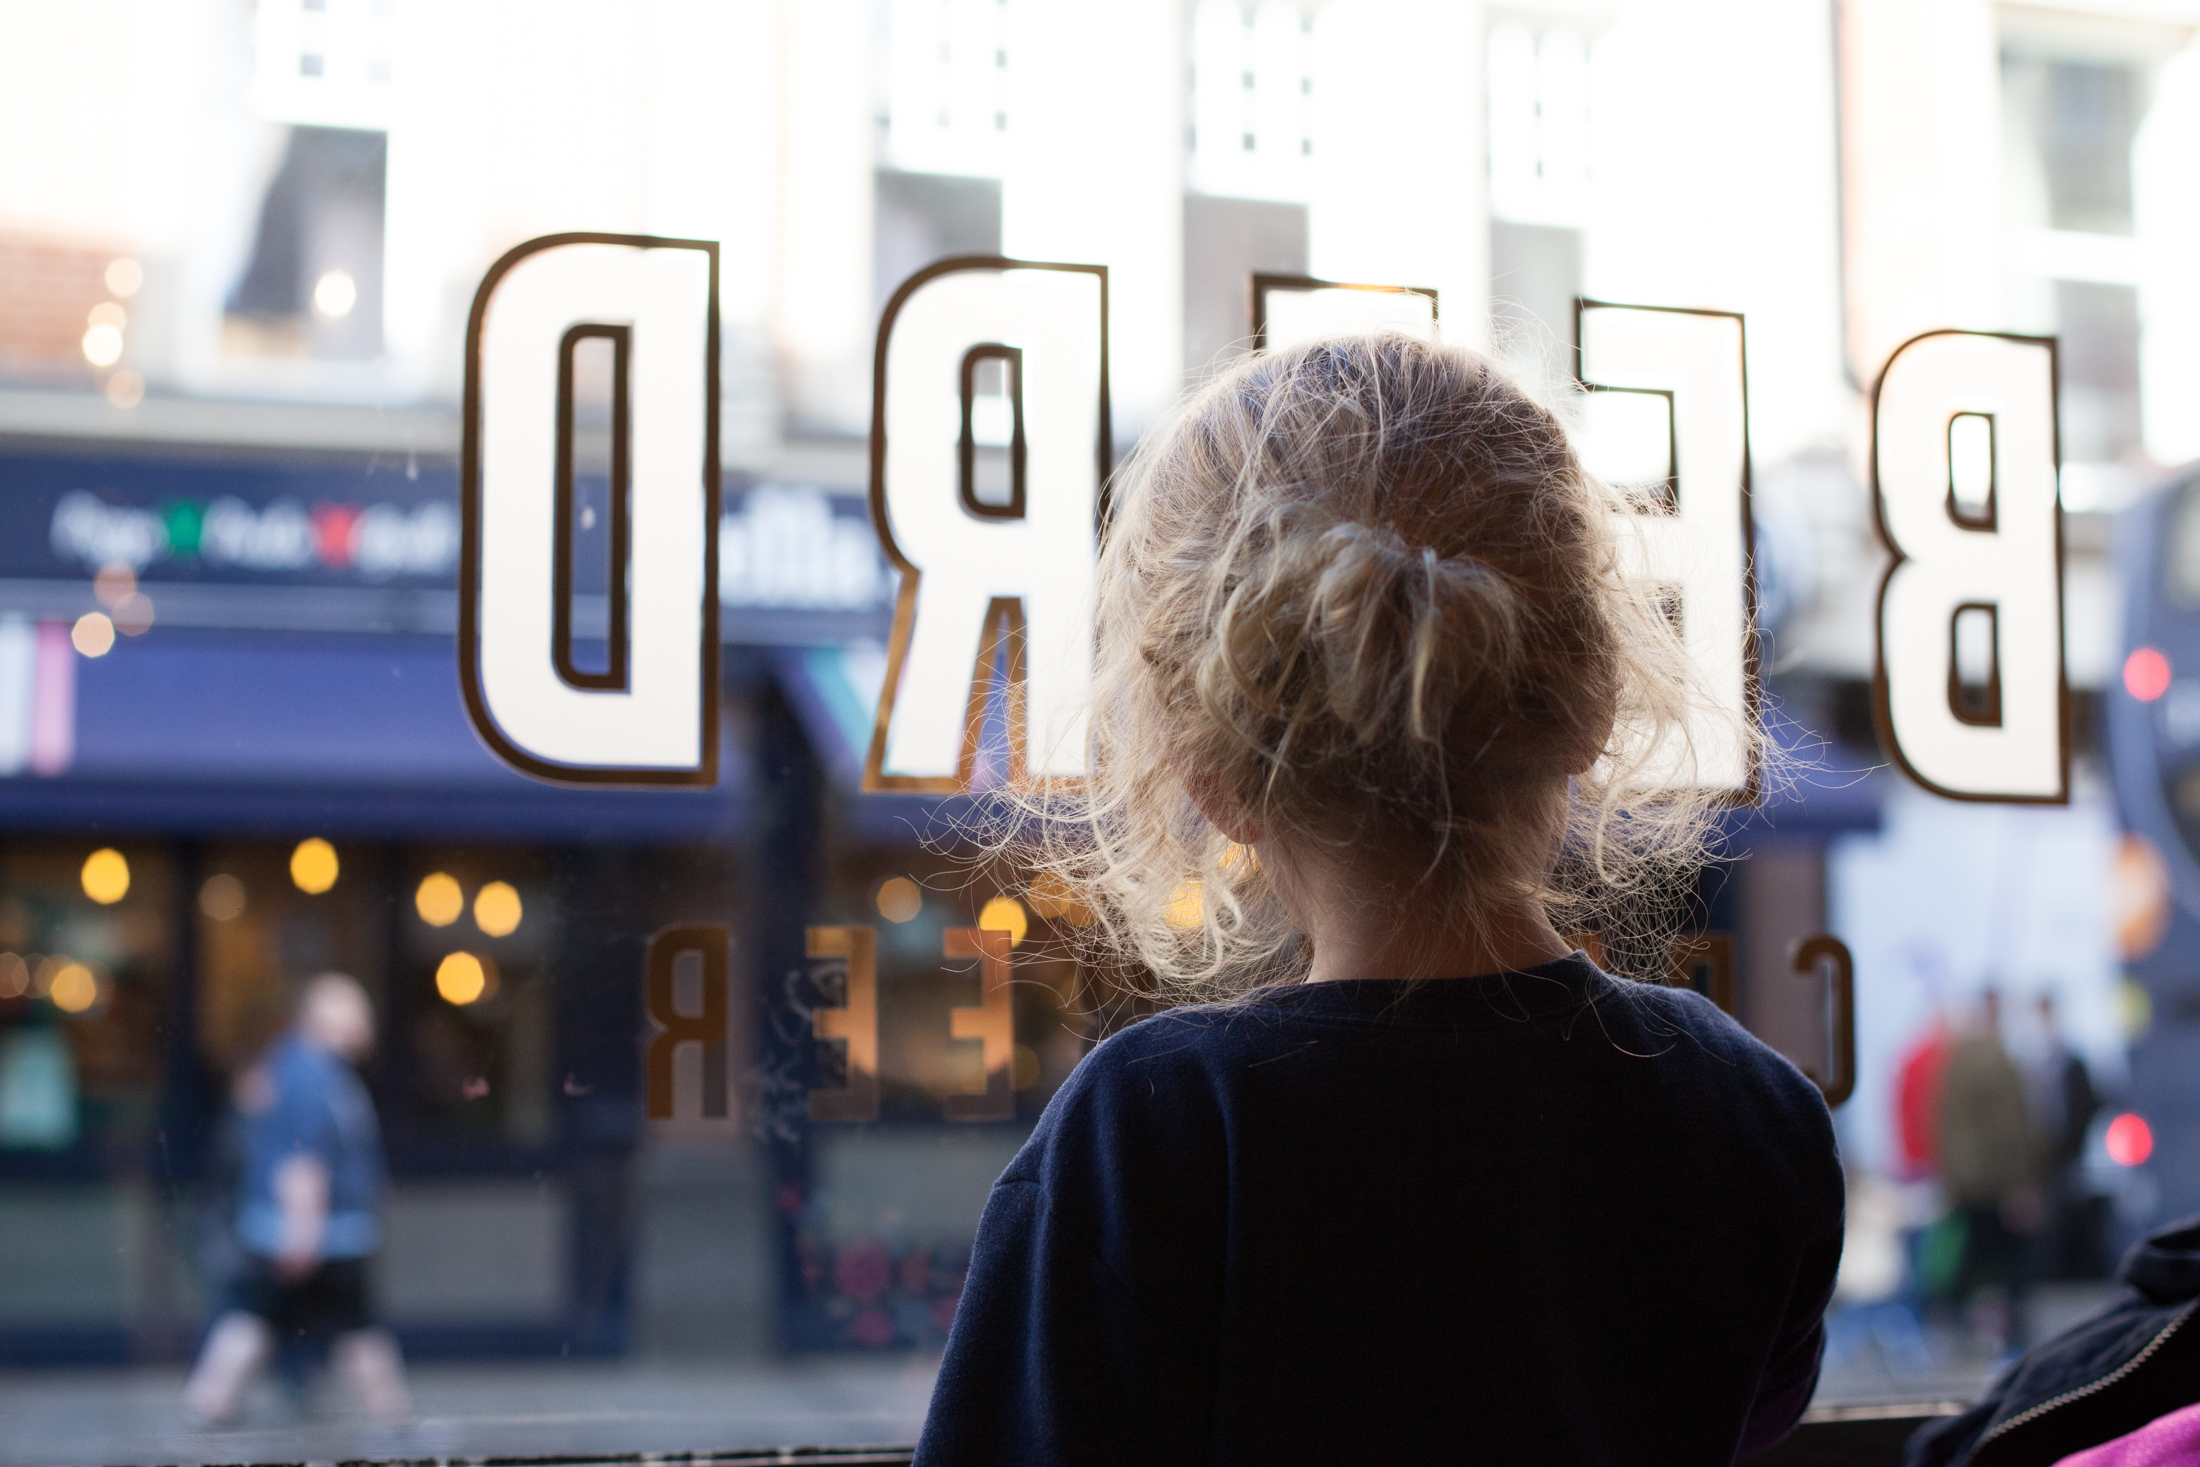
The weekend before last we took a trip to Oxford to visit and stay with new friends for a night. We ate delicious food at their house, wandered through the streets of Oxford, visited the Oxford University Museum of Natural History, played at the park, and ate pizza (and those who aren’t pregnant (everyone but me) drank beer) at Beerd. Twenty four hours in Oxford was definitely not enough, and I’m looking forward to going back to see and experience more; it’s a city with so much history and character.
PINPINPINPINPINPINOver the weekend in Oxford, Lulu kept asking me where we were going, “Are we going home? Are we going to Grandma and Grandpa’s house – the one with the swimming pool? I want to go home to our blue house!” When we did get home here to our house, Lulu climbed out of the taxi and wailed, “Nooooooo. I said not this house! I’m tooooo saaaaaad!” Then she attempted to force herself back into the taxi, presumably to be driven her back across the Atlantic ocean, and across the entirety of the United States to “Grandma and Grandpa’s house – the one with the swimming pool” in Seattle.
There are moments like that all the time, but last week was better than the one before, and this week is better than last. We are doing our best to make things feel cozier at the house, make some friends, and to get everyone’s needs met. The kids need a lot these days, some of it in the form of extra snuggles; some of it in the form of space; some of it in the form of crisp toast smeared with Nutella. Although Kyle and I can’t provide them with every thing they need to get through this ongoing transition, we are the only people who can make this move, this adventure, a positive experience for them – both by example of our own attitudes and efforts, and also by extending ourselves beyond what we think we’re capable of in terms of parenting, partnering, and everything in-between.
We can’t take away the fact that they miss their friends and community so much more deeply and profoundly than we could have anticipated, nor can we make every moment exciting and magical, but we can take opportunities to waltz with them while we wait for delayed trains, do our best to navigate the varied emotions they’re experiencing, and to provide them with comfort and a restorative day to day routine.
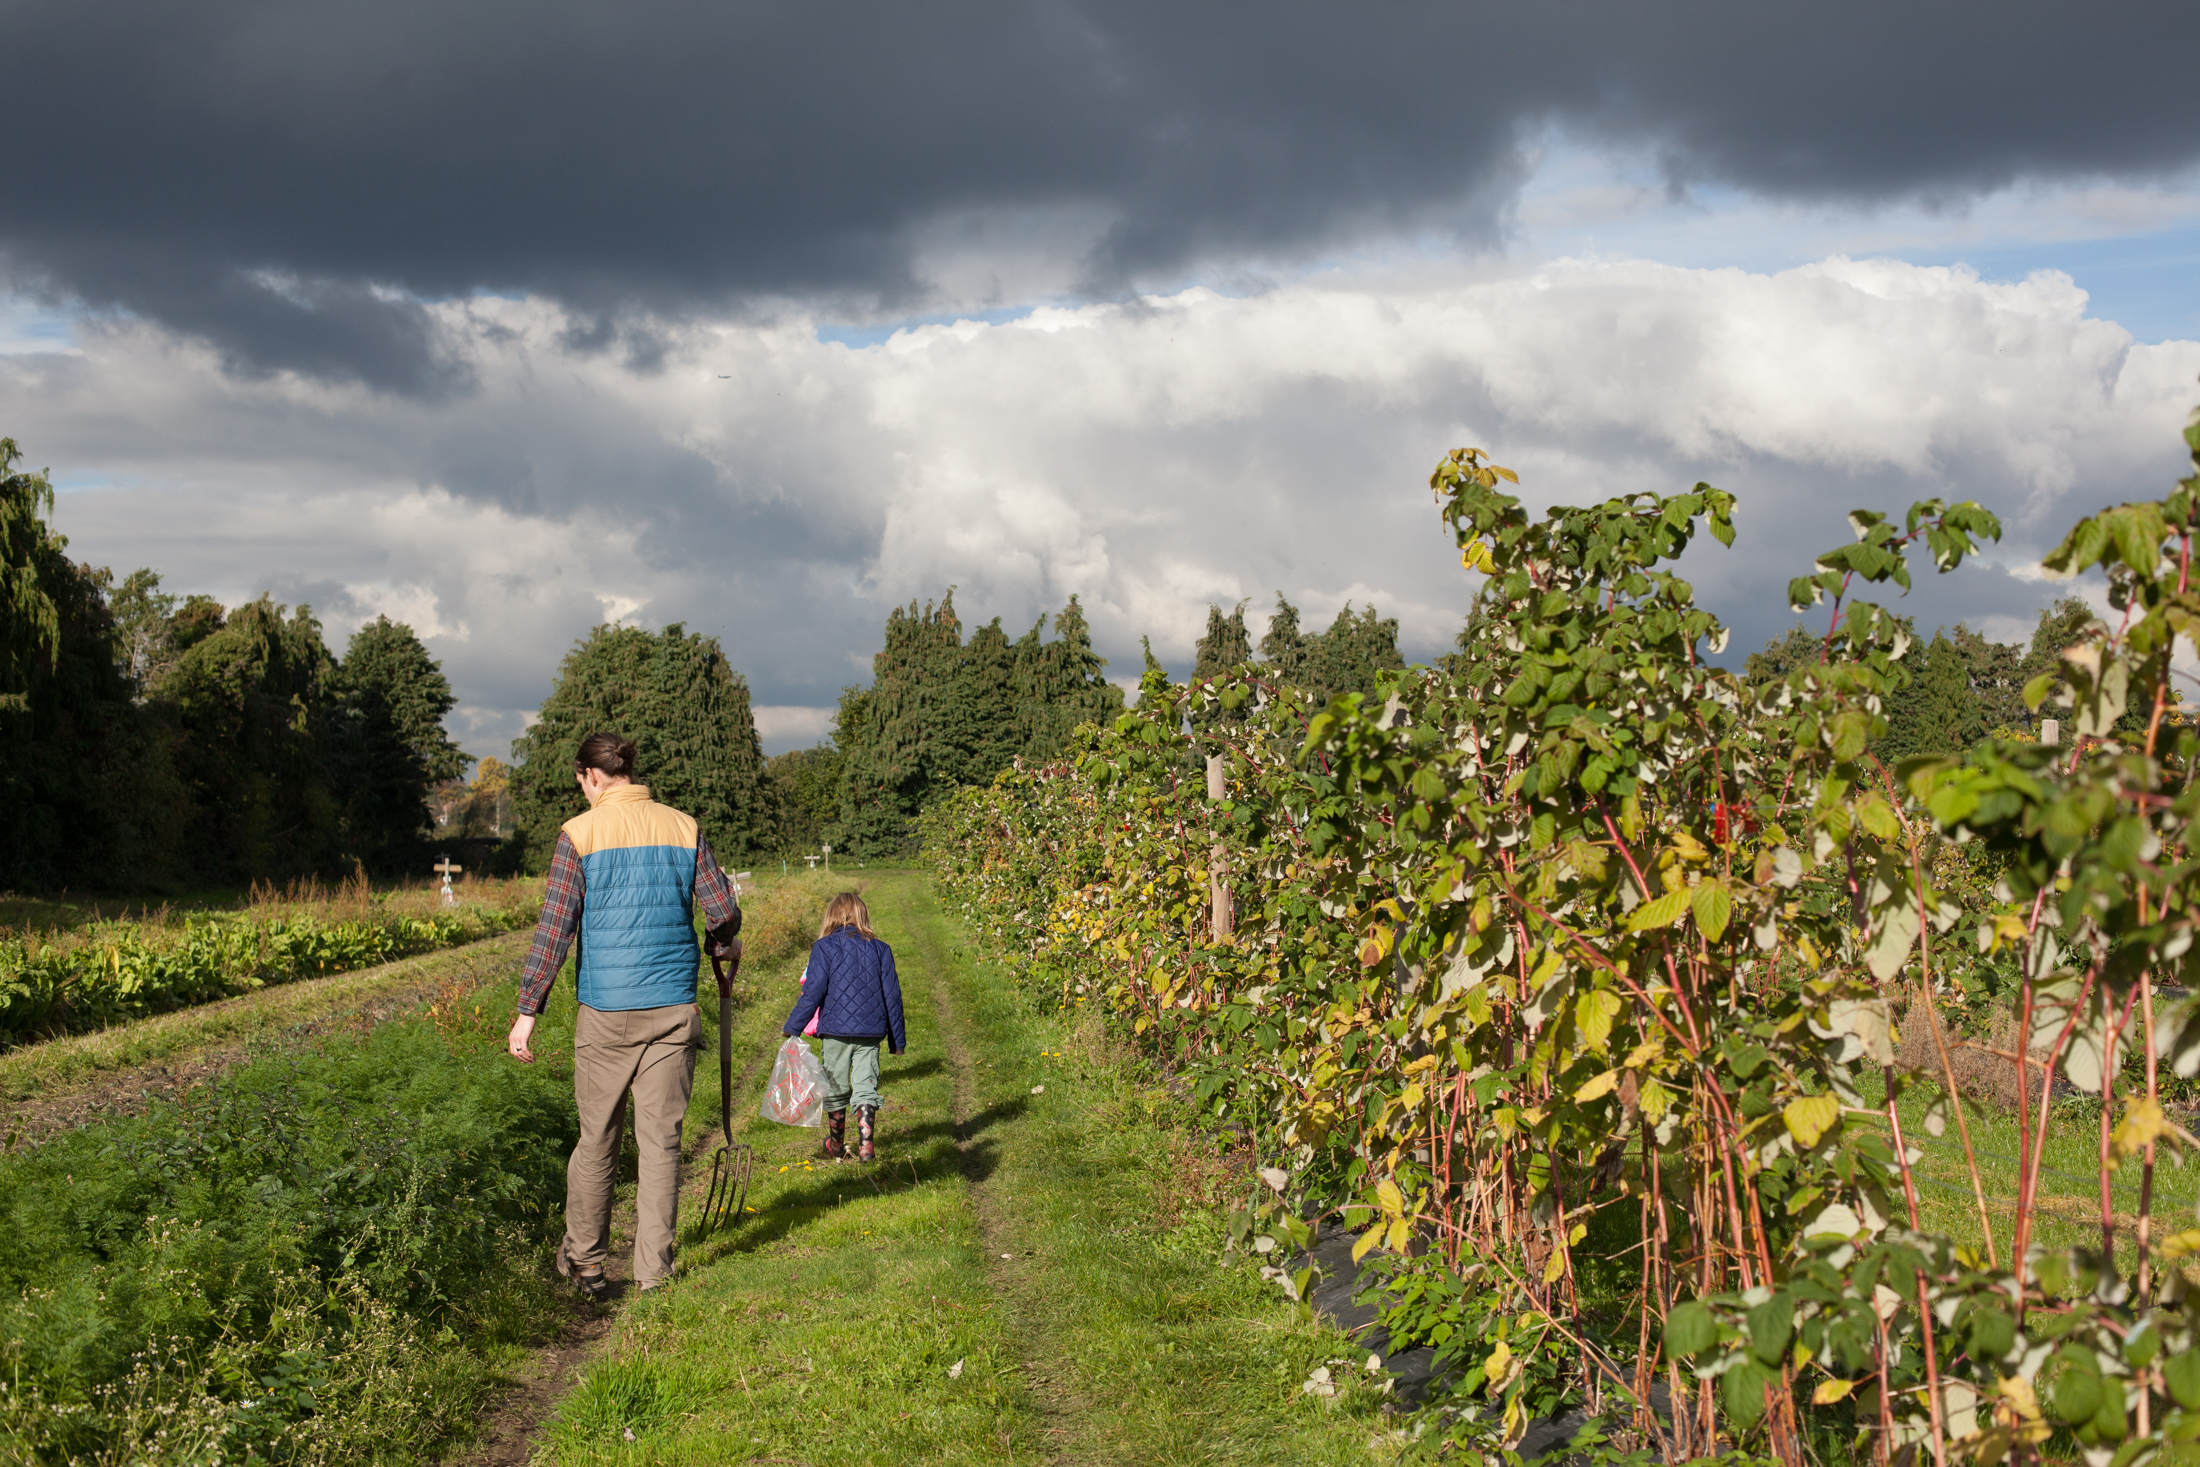
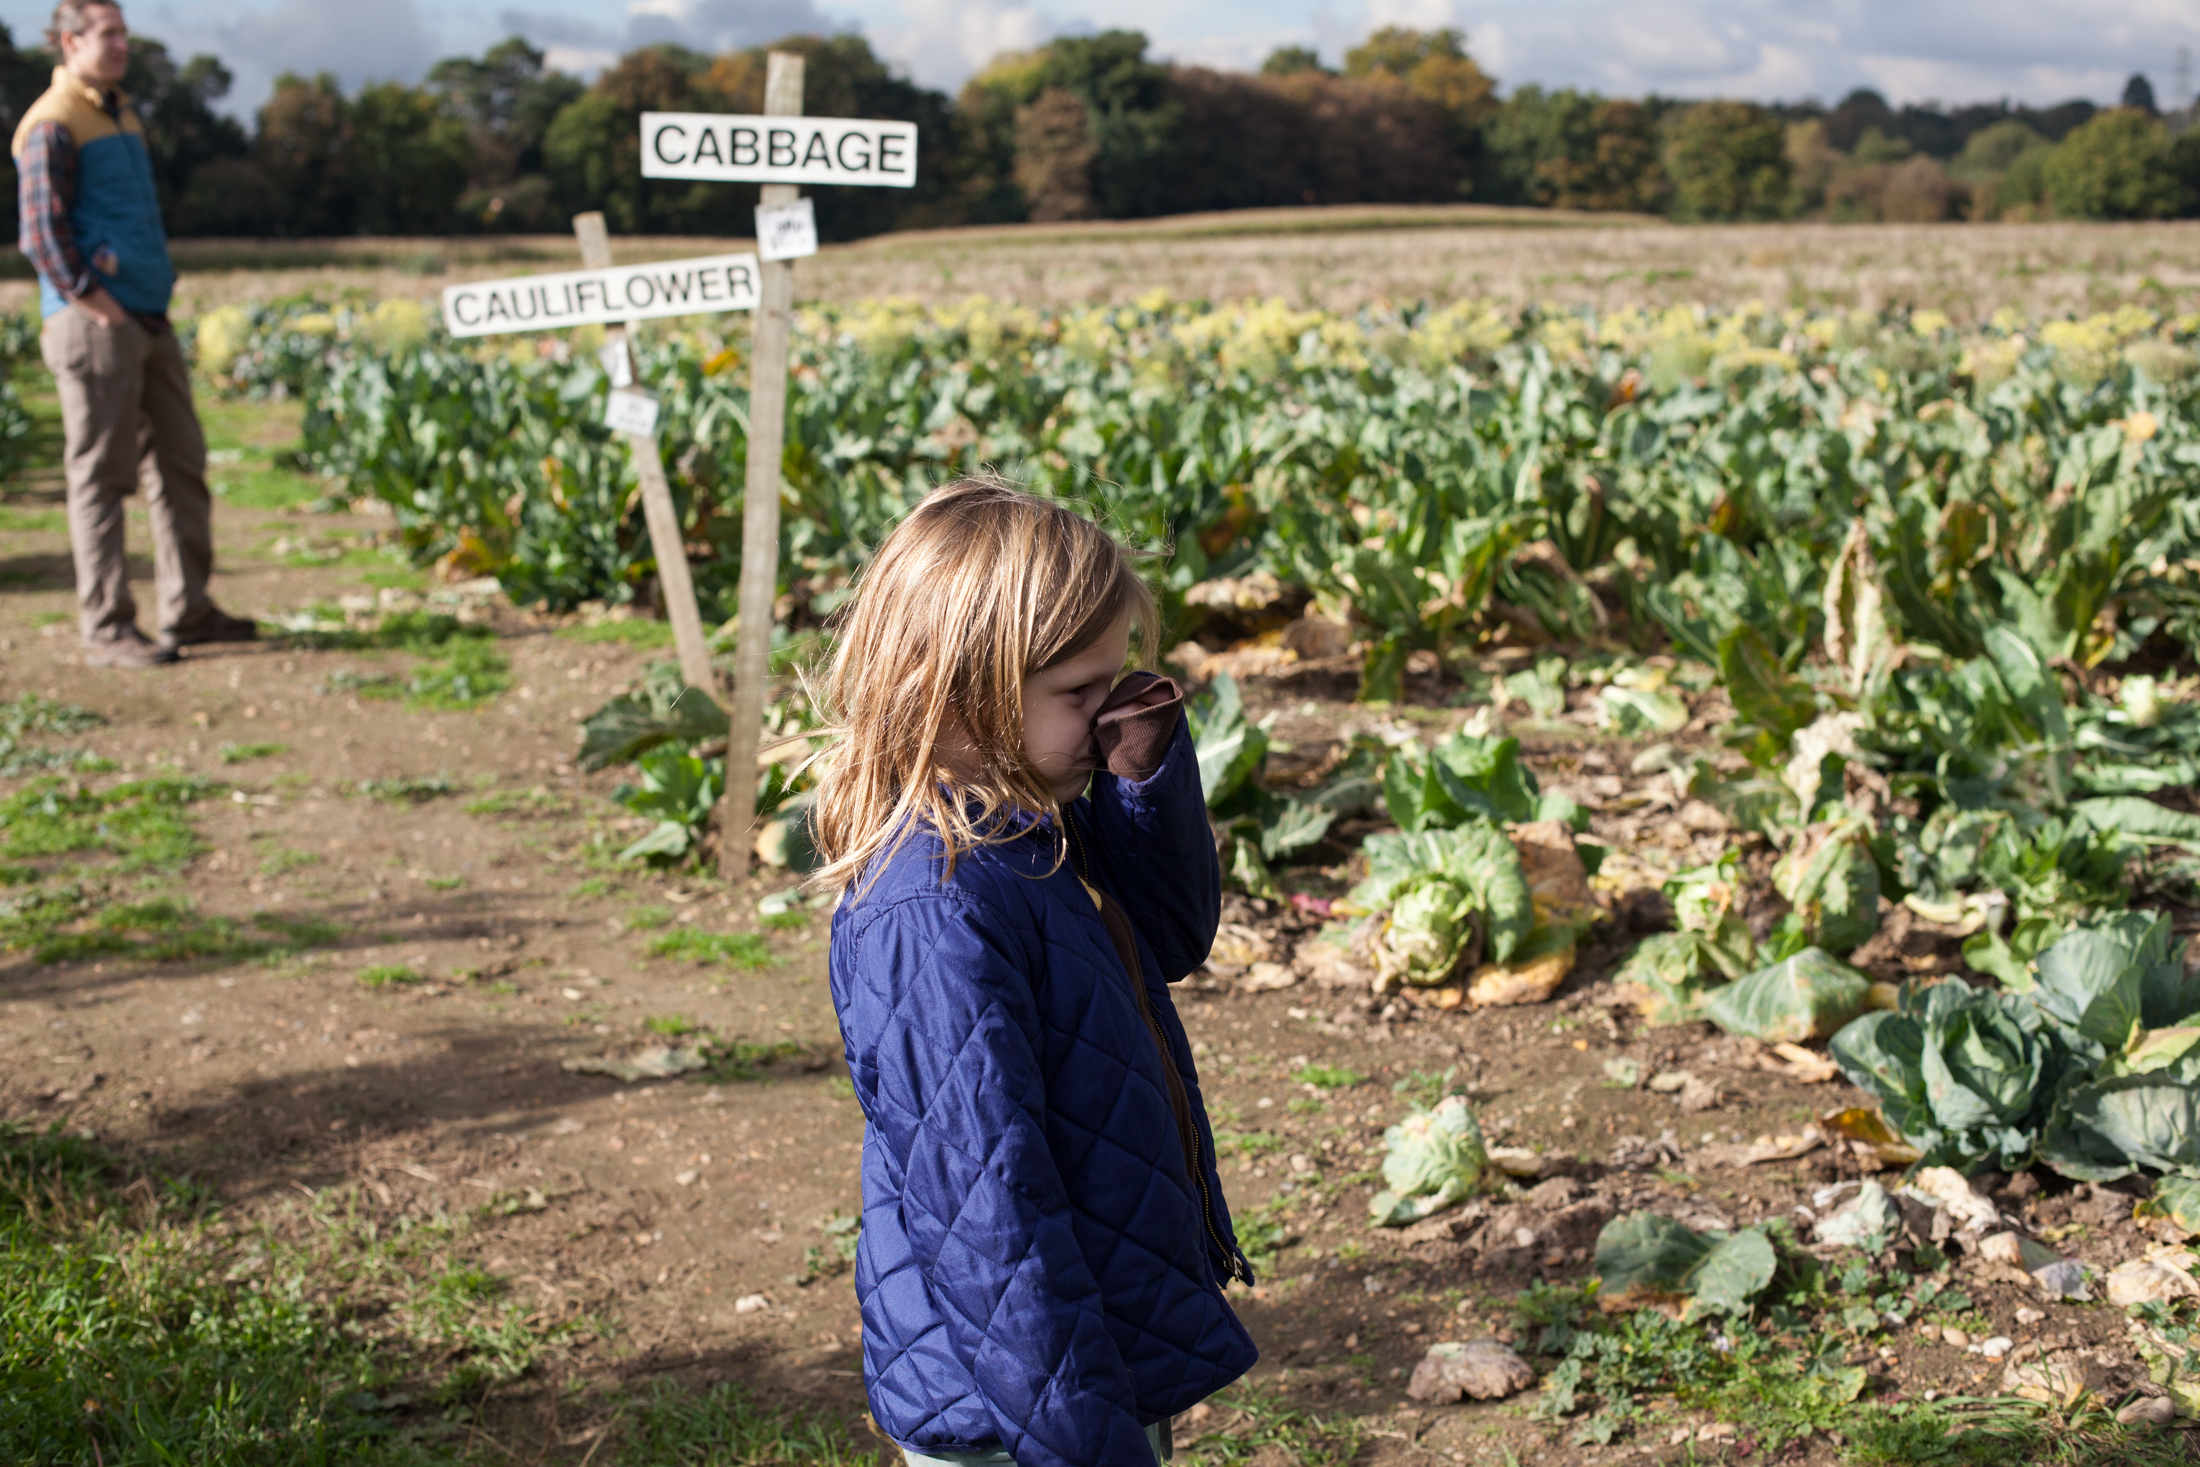
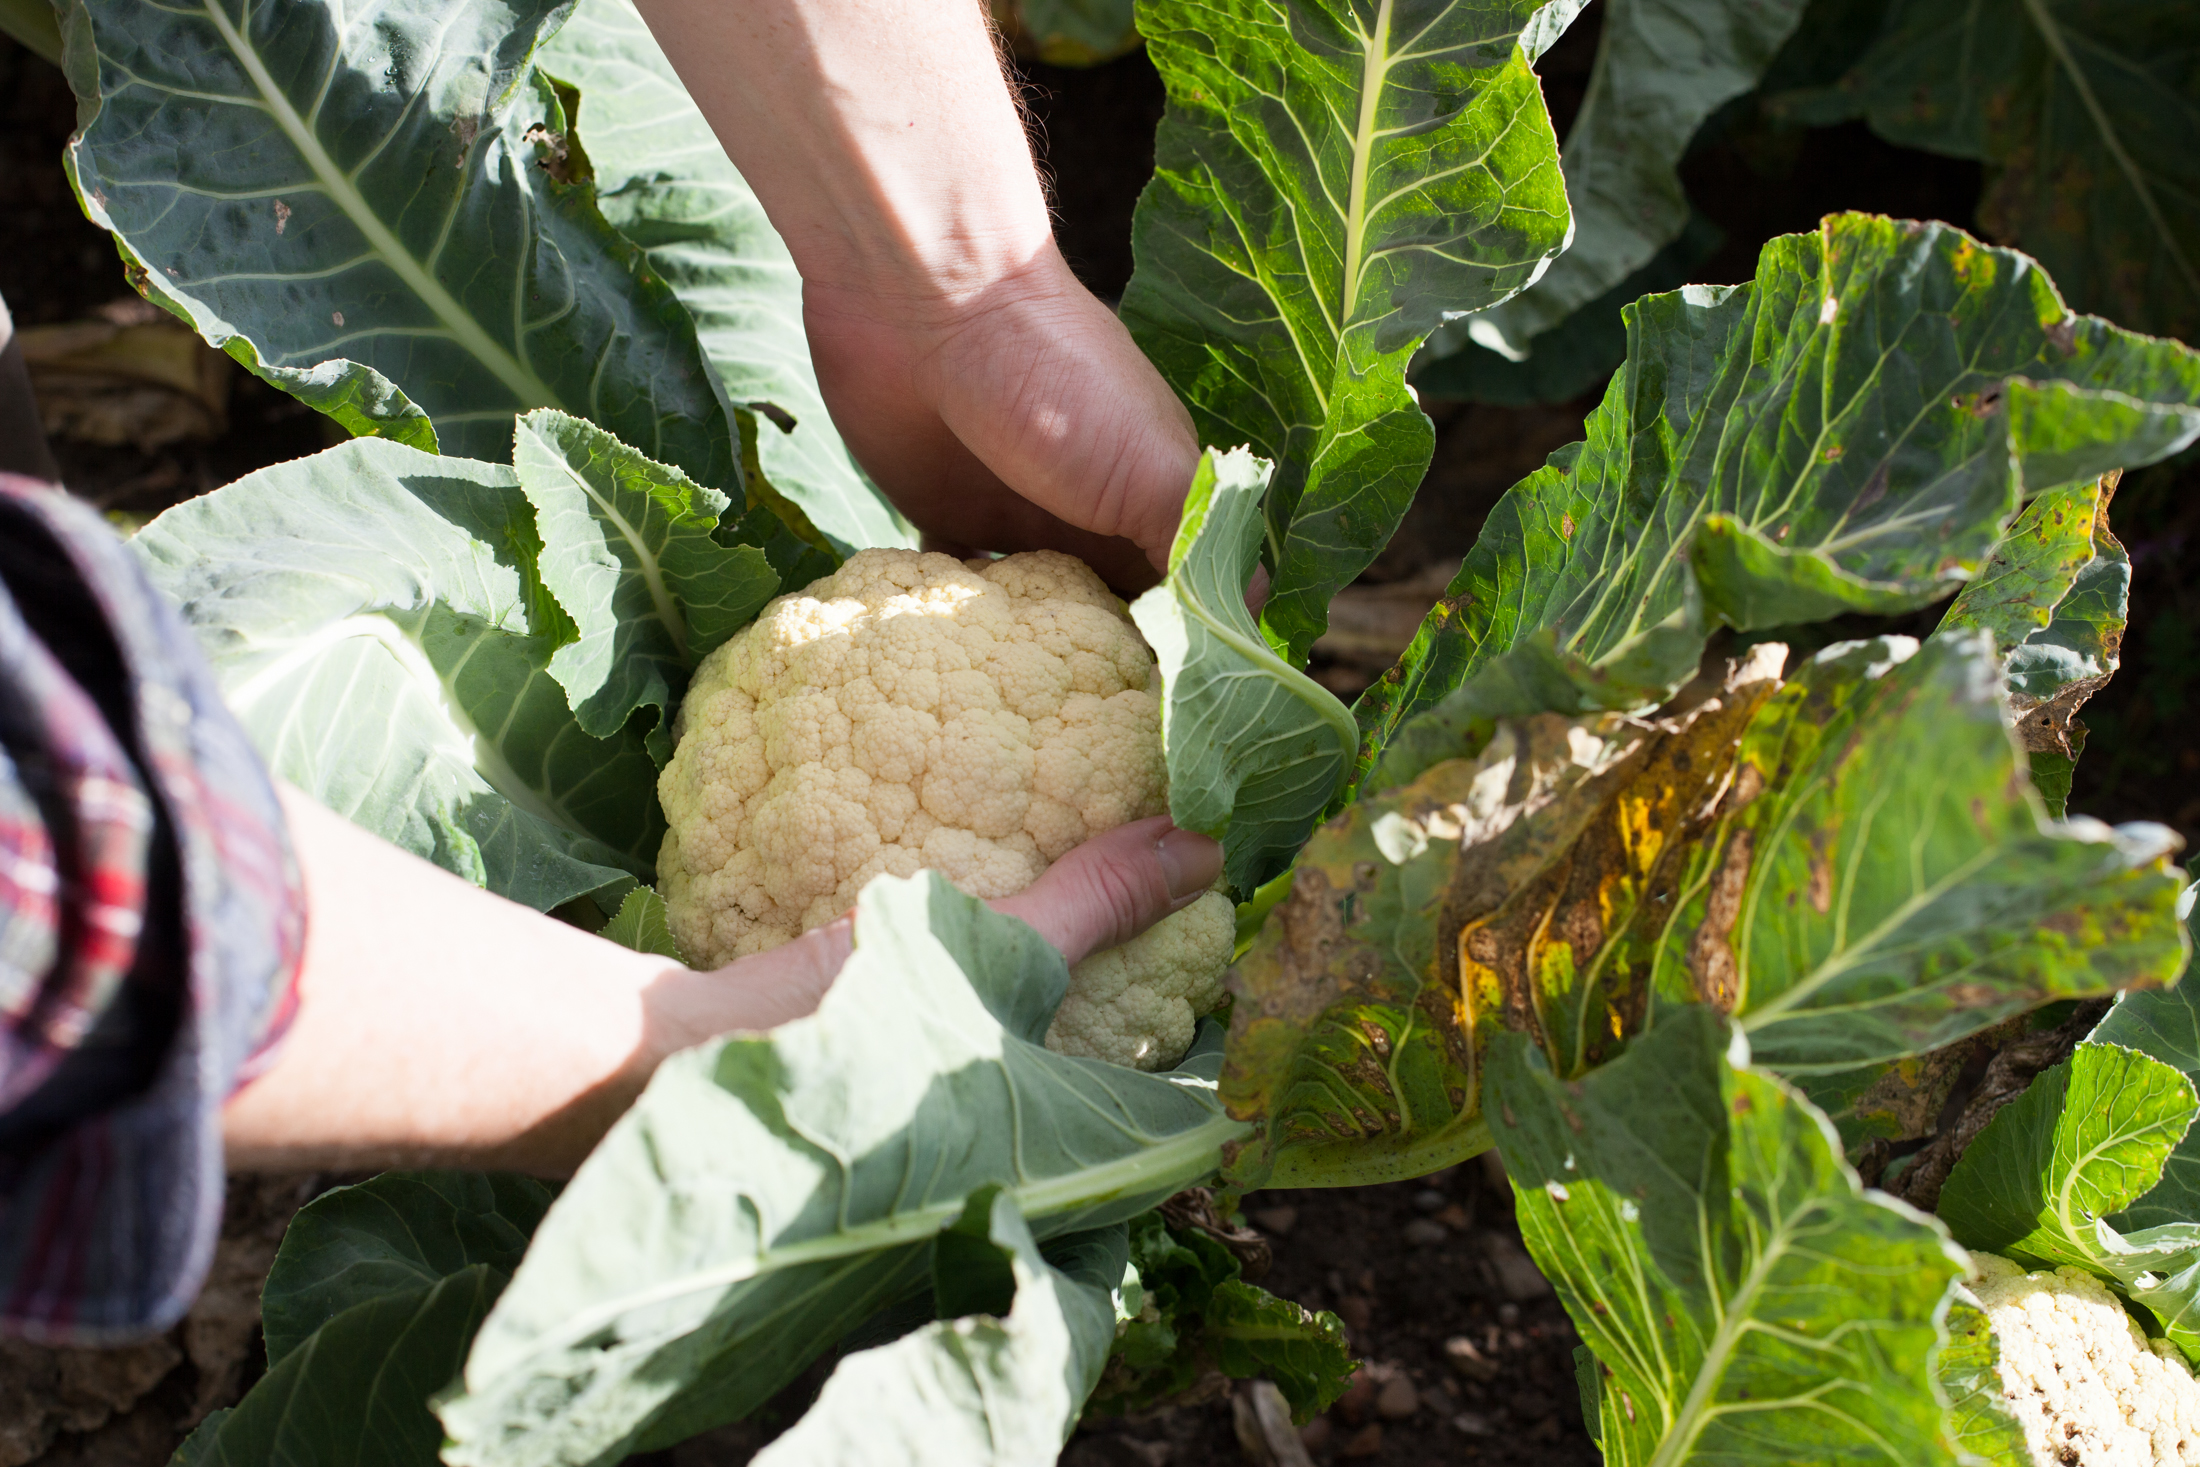
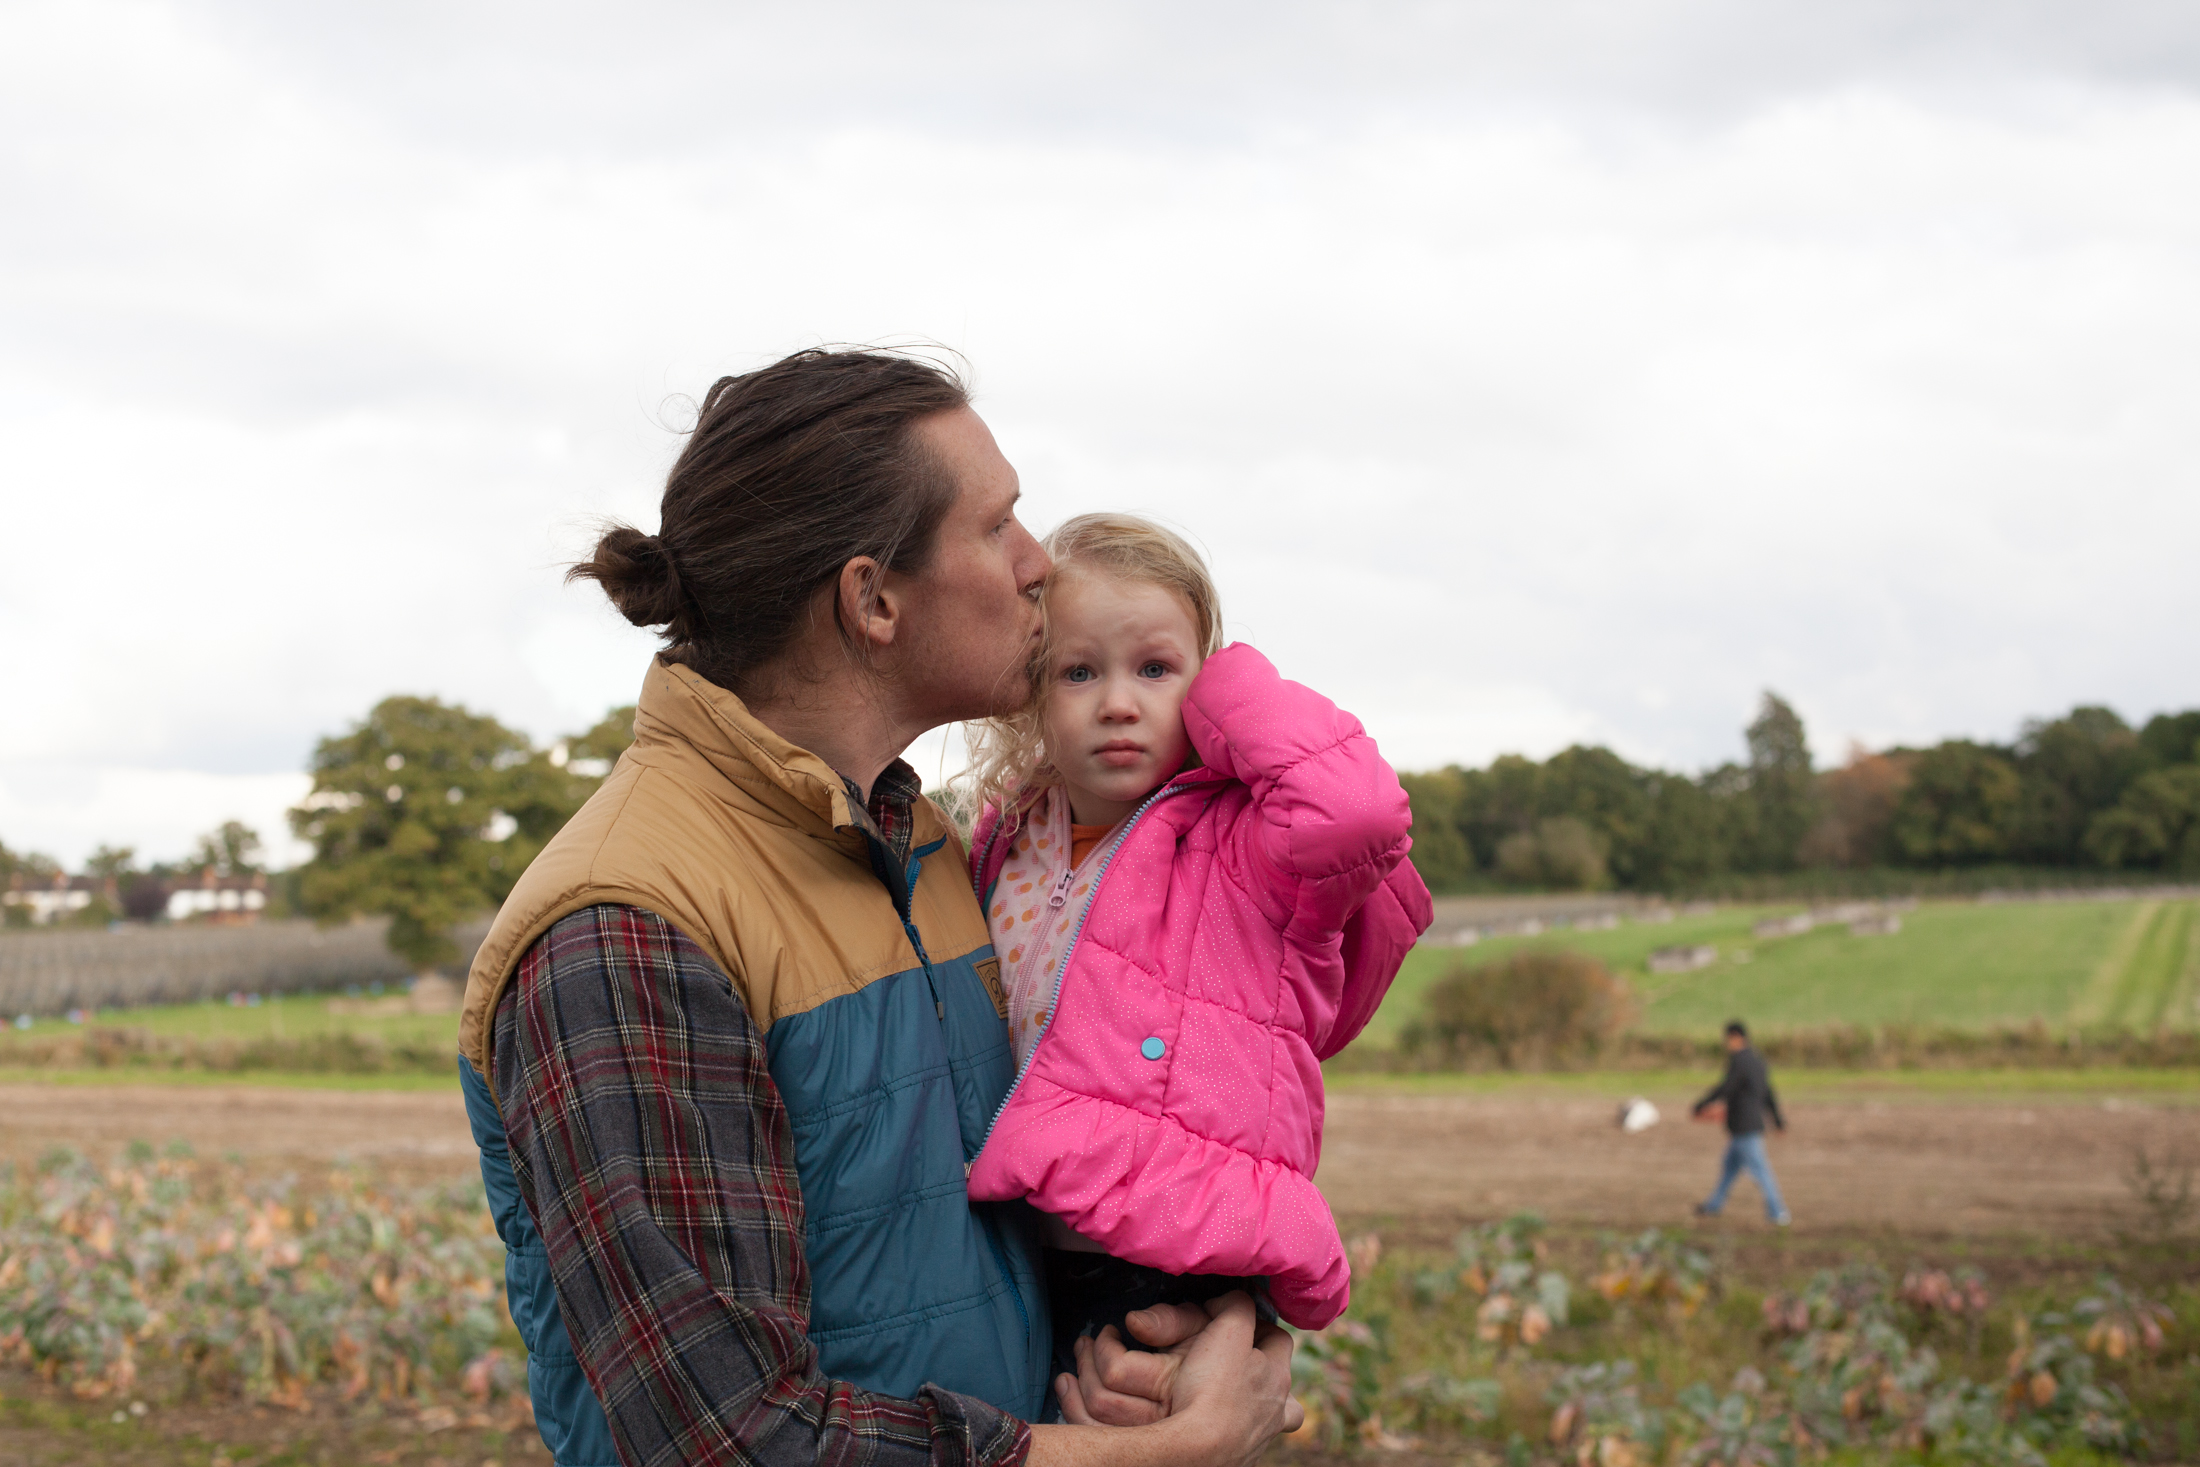
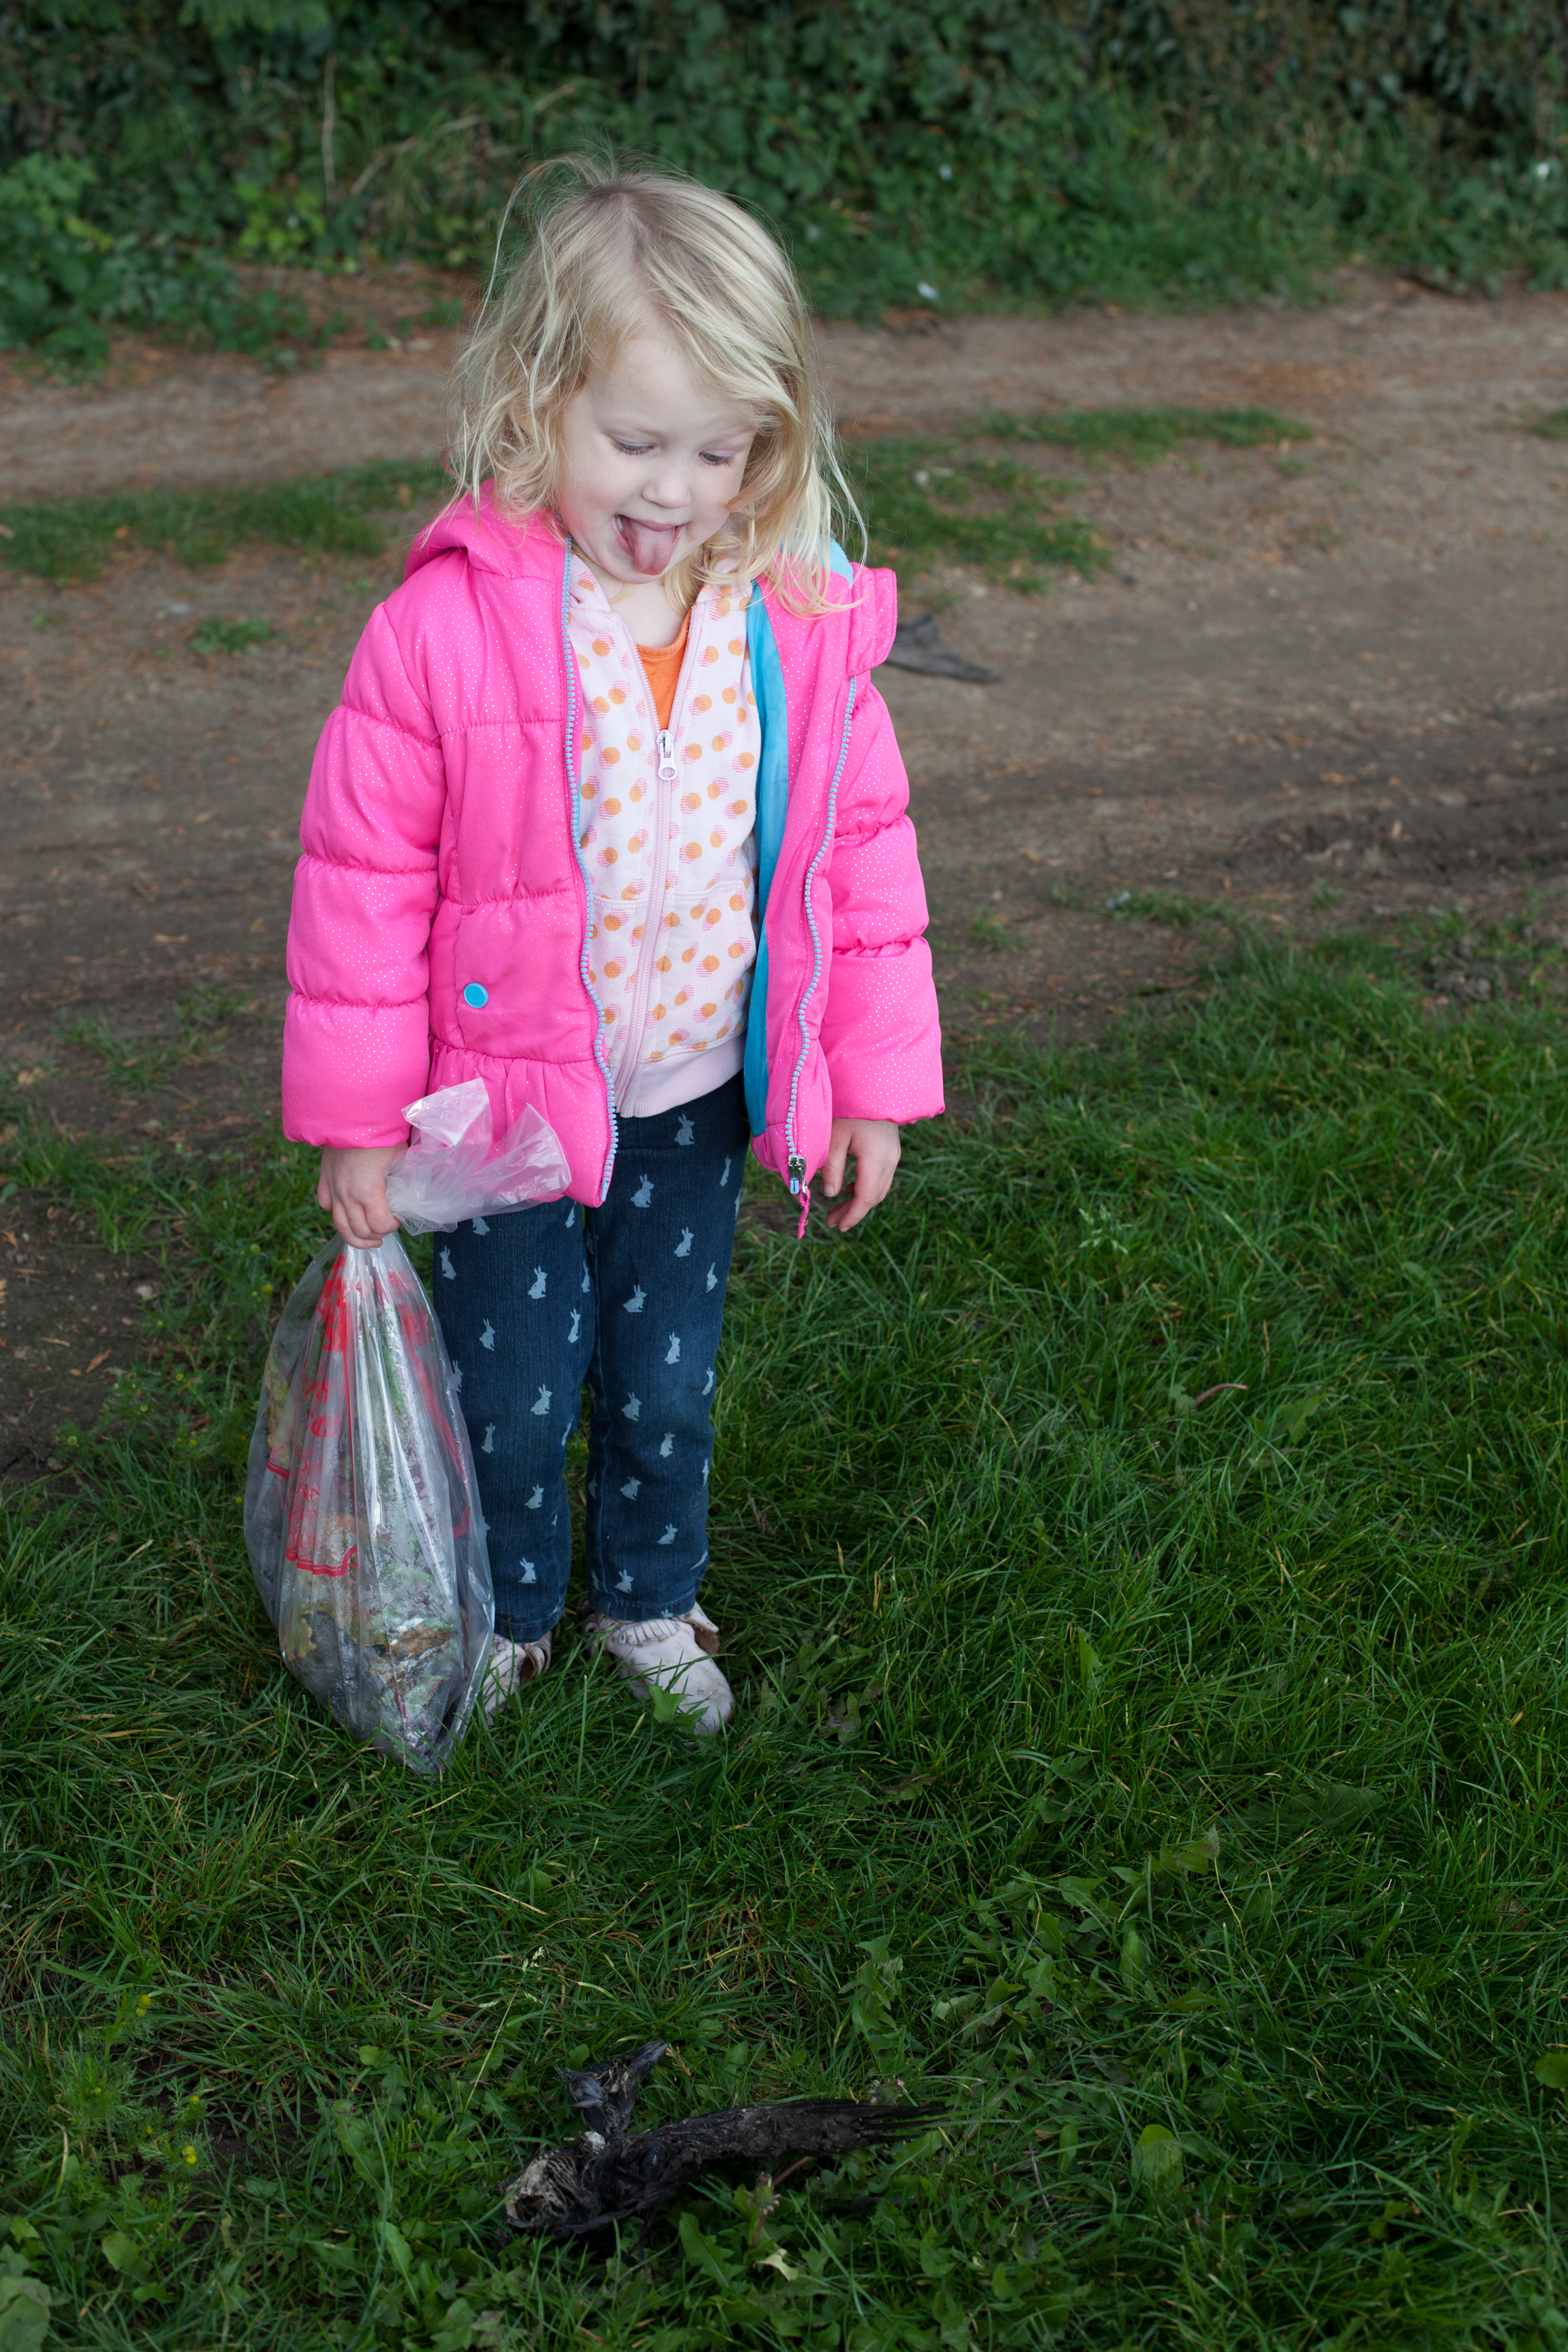
We bought a used car this week, which will make a world of difference in the “day to days”. Needless to say, two months without a car has lead to major cabin fever – even for a homebody like me! We are excited to explore the area more, and start planning all those little trips to nearby villages we’ve been dreaming about. This last weekend we all threw on our coats and boots (except for Lulu who insisted on wearing summer-appropriate footwear) and headed to a local farm shop. The opportunity to get out and see a bit of the surrounding area lifted all of our spirits… even if Gigi found the near-the-end-of-season cabbage and cauliflower patches to be a bit pungent, and Lulu discovered her first dead bird (with a mix of fascination and disgust).
PINPINPINPINPINPINI came across this quote recently that I keep reflecting on…
“Life is amazing. And then it’s awful. And then it’s amazing again. And in between the amazing and awful it’s ordinary and mundane and routine. Breathe in the amazing, hold on through the awful, and relax and exhale during the ordinary. That’s just living heartbreaking, soul-healing, amazing, awful, ordinary life. And it’s breathtakingly beautiful.” -L.R. Knost
Since we’ve moved most things have seemed to either be amazing or awful. It gives a lot of value to the importance of the “ordinary, mundane, and routine”. In our case, during this particular season, that means attempting to cultivate a daily routine with grace and gratitude. A routine that includes homeschool lessons, laundry to be washed and then systematically strewn across radiators and drying racks (we don’t have a dryer), rainy afternoon baths, and planning and cooking our daily meals.
PINPINPINCooking, the kind of cooking I like to do, requires a bit of planning and forethought: remembering to soak the beans overnight for soup, making something from nothing when we have a nearly empty fridge, or jotting down a menu that I know the kids will love. In some moments it’s true excitement to cook, in others it’s my road map to getting through the days and a way of punctuating the week ahead.
One of my favorite things to cook here this fall has been soups. The ingredients are easy to come by, I love making stock on drizzly days when we’re stuck at home, and soup is one of the ultimate comfort foods. When piping hot soup is ladled into bowls, topped with wisps of Parmesan that practically disintegrate as they hit the broth, and often has a plate of golden, fragrant garlic bread to accompany it, everything seems like it’s going to be okay.
White Bean Soup isn’t something I made often back in the States. At “home” I gravitated towards soups like Posole and Ramen, but I’ve had a hard time finding the ingredients for those here, so I started dreaming about soups that felt more… European. French Onion Soup is a favorite, but I haven’t yet found a good bakery! Butternut Squash Soup sounds wonderful, but I don’t have a blender or food processor! Slowly, my culinary imagination found its way to White Bean Soup in an effort to make something hearty, healthy-ish, and comforting, but also wanting to make a dinner that was easy, inexpensive, and rustic (and one that requires very little in the way of kitchen equipment).
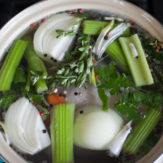
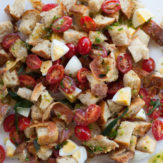
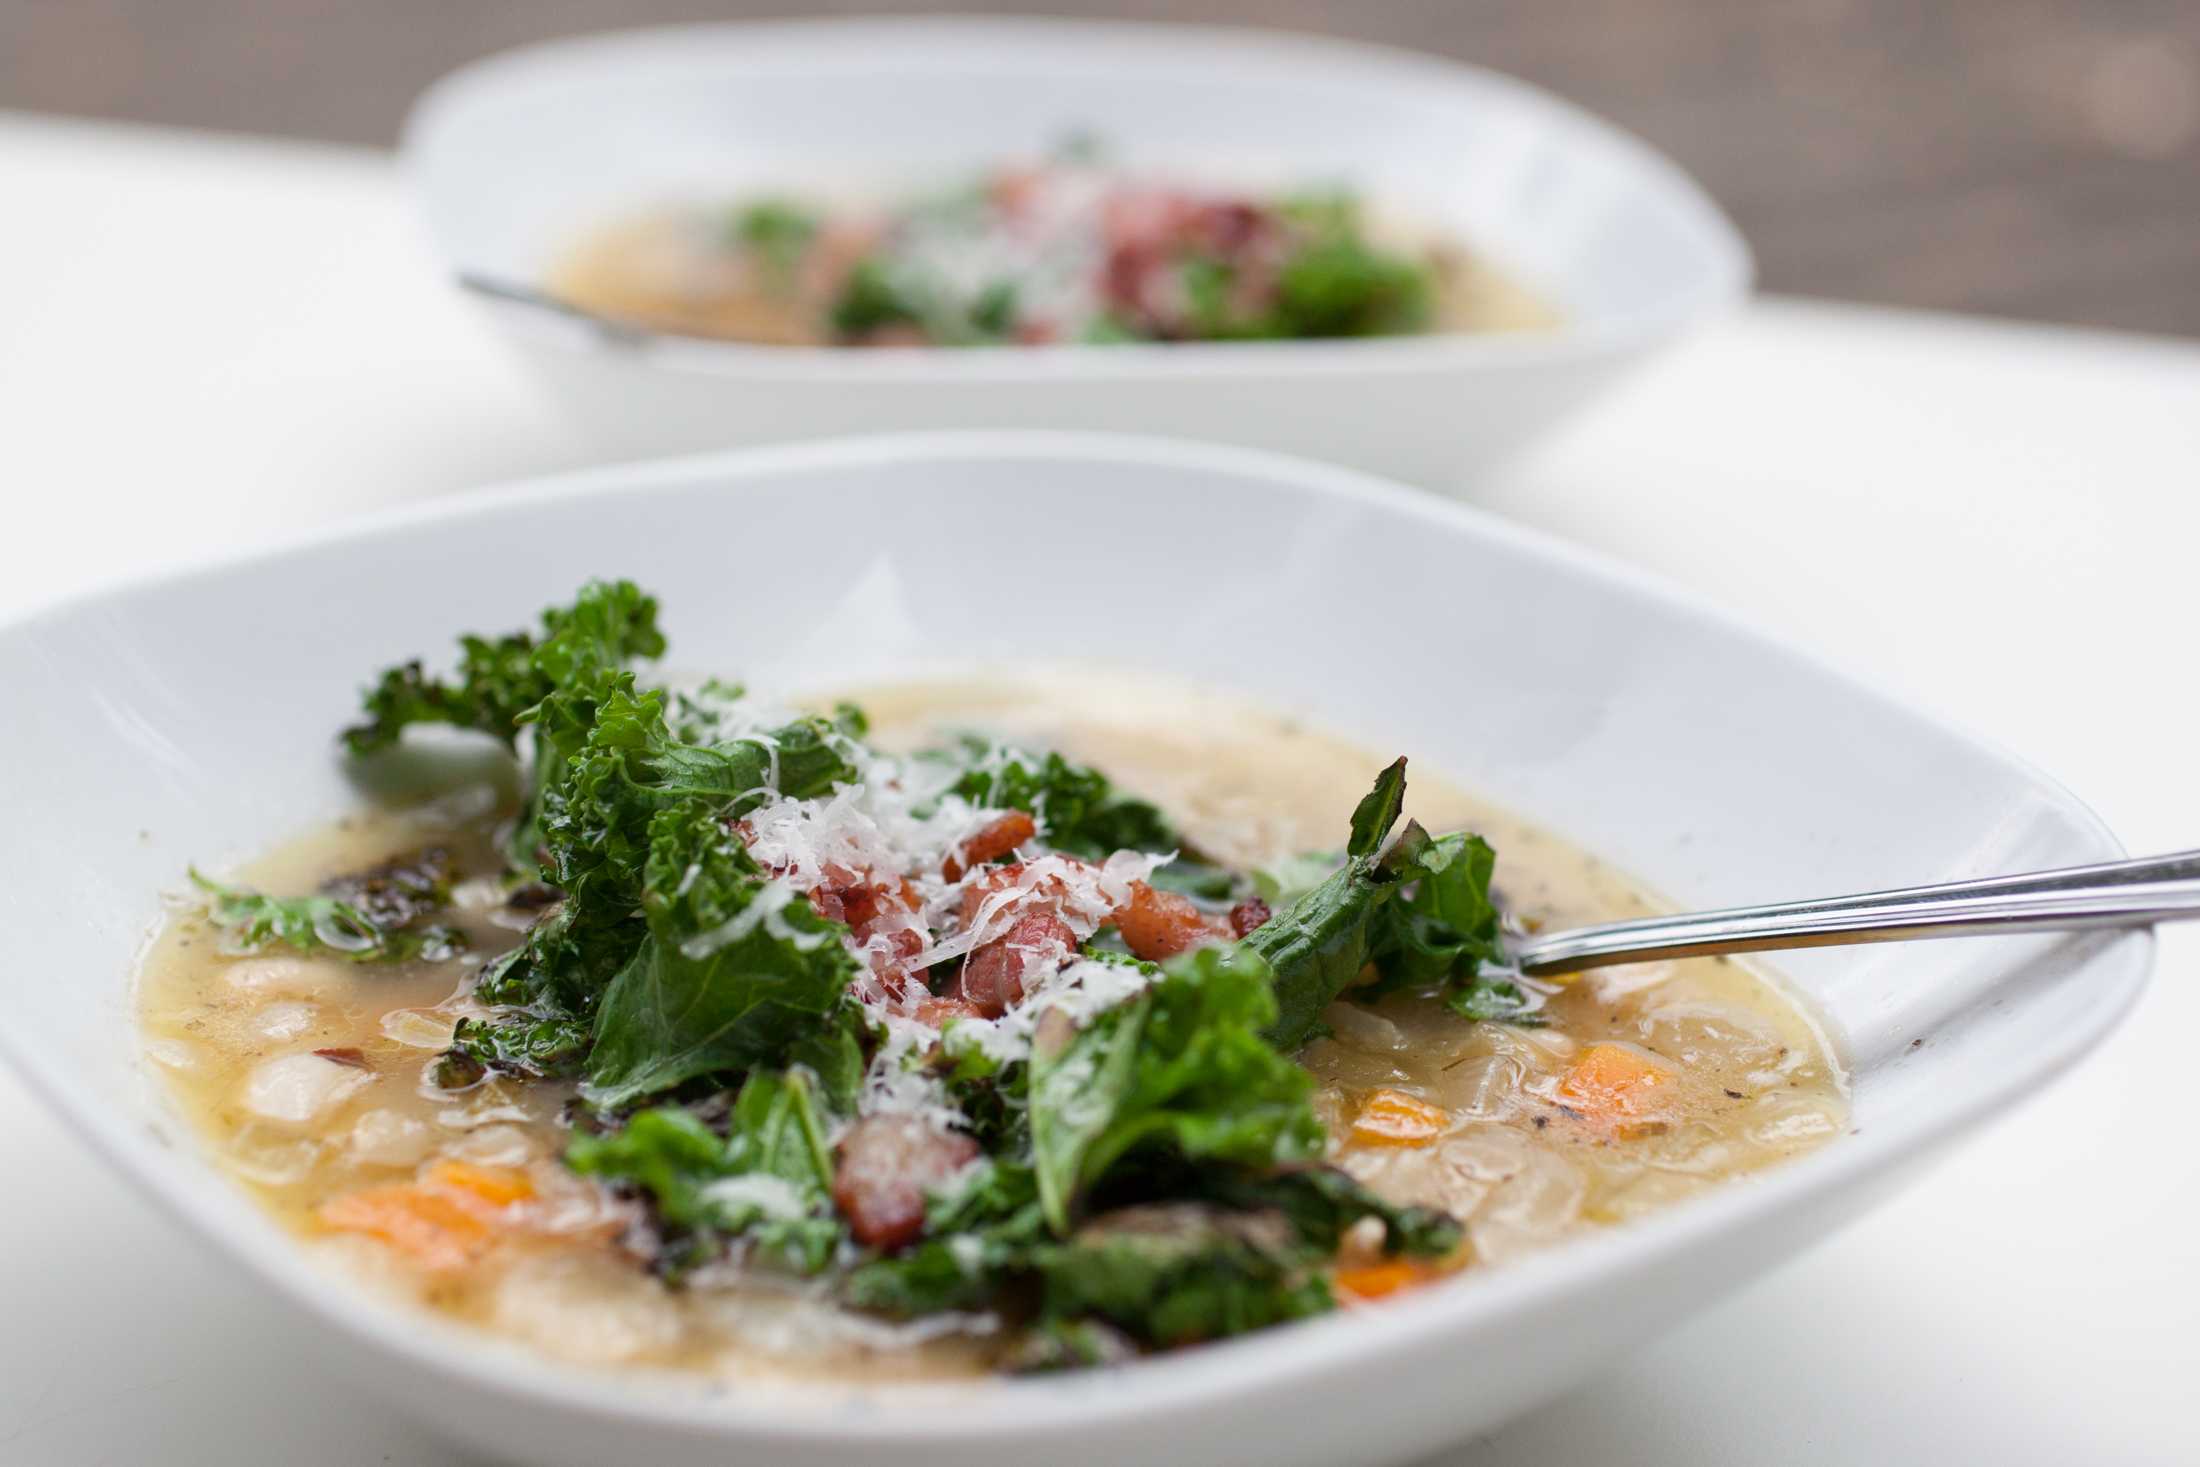
PINThis soup begins, as so many good things do, with bacon. Lardons aren’t something you can always find easily in the States, but here they take the place of sliced bacon. The fat is rendered from the bacon and they are cooked most of the way through before being set aside; a bit of the bacon fat and a bit of olive oil are an inviting pool for the onion, garlic, carrots, celery to sauté in. Herbs, homemade broth, and creamy Cannellini beans round out this basic base. A Parmesan rind can be added too if you have one on hand in your refrigerator or freezer – a Parmesan rind adds an astonishing amount of flavor and depth!
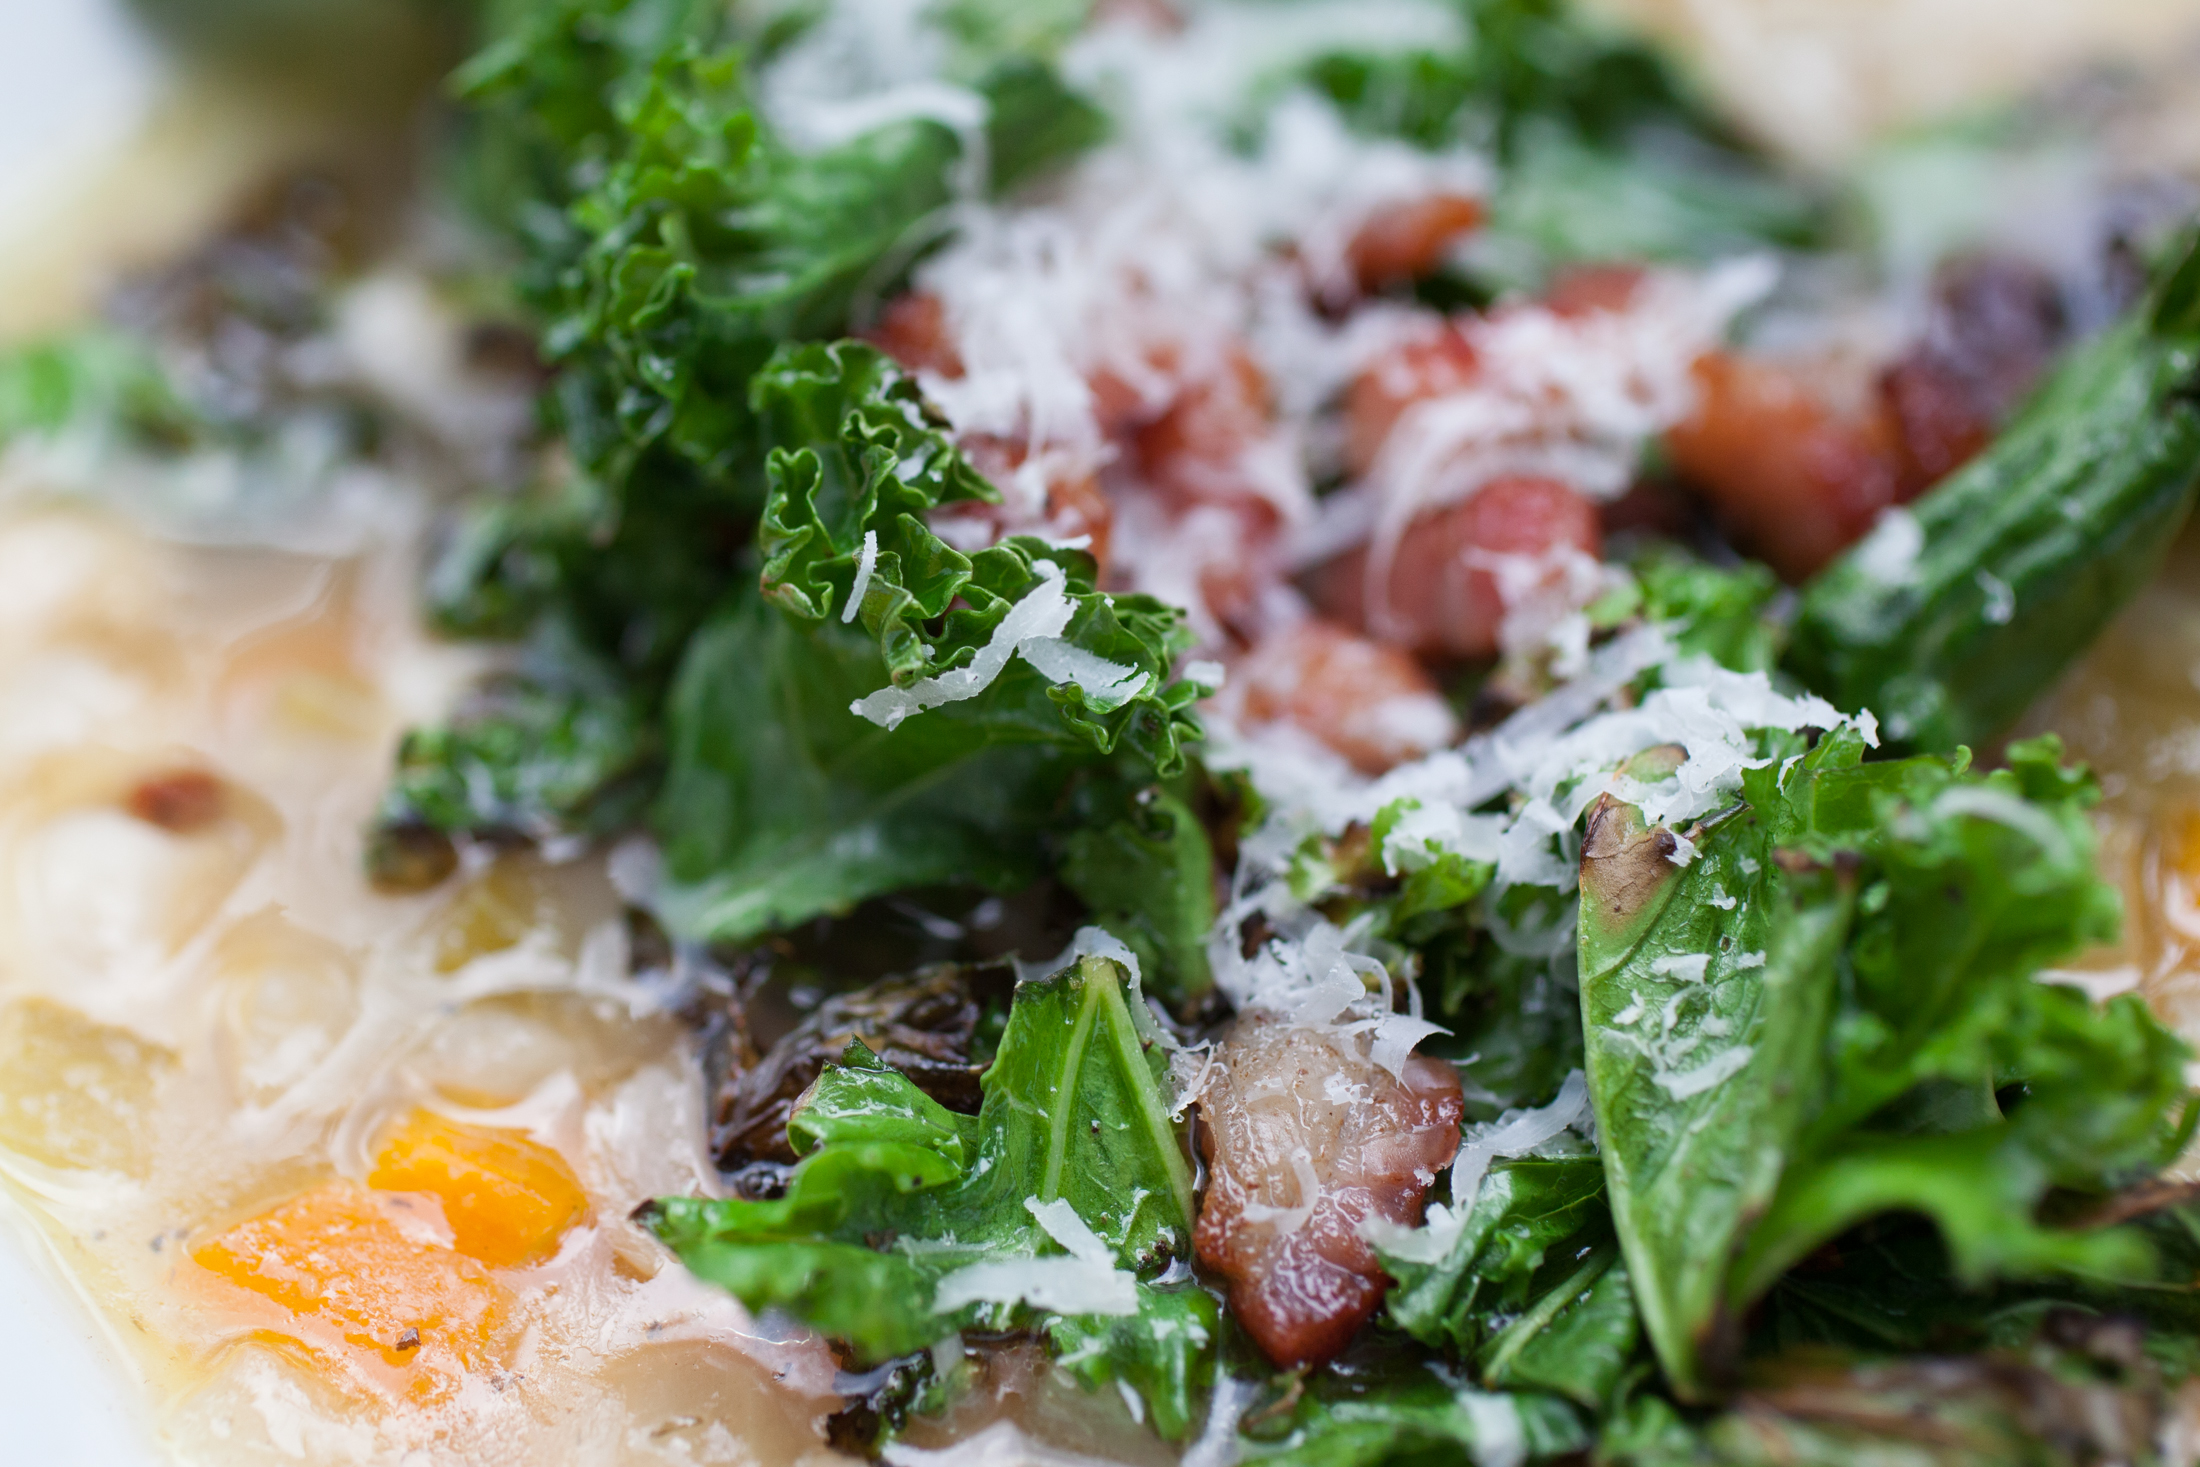
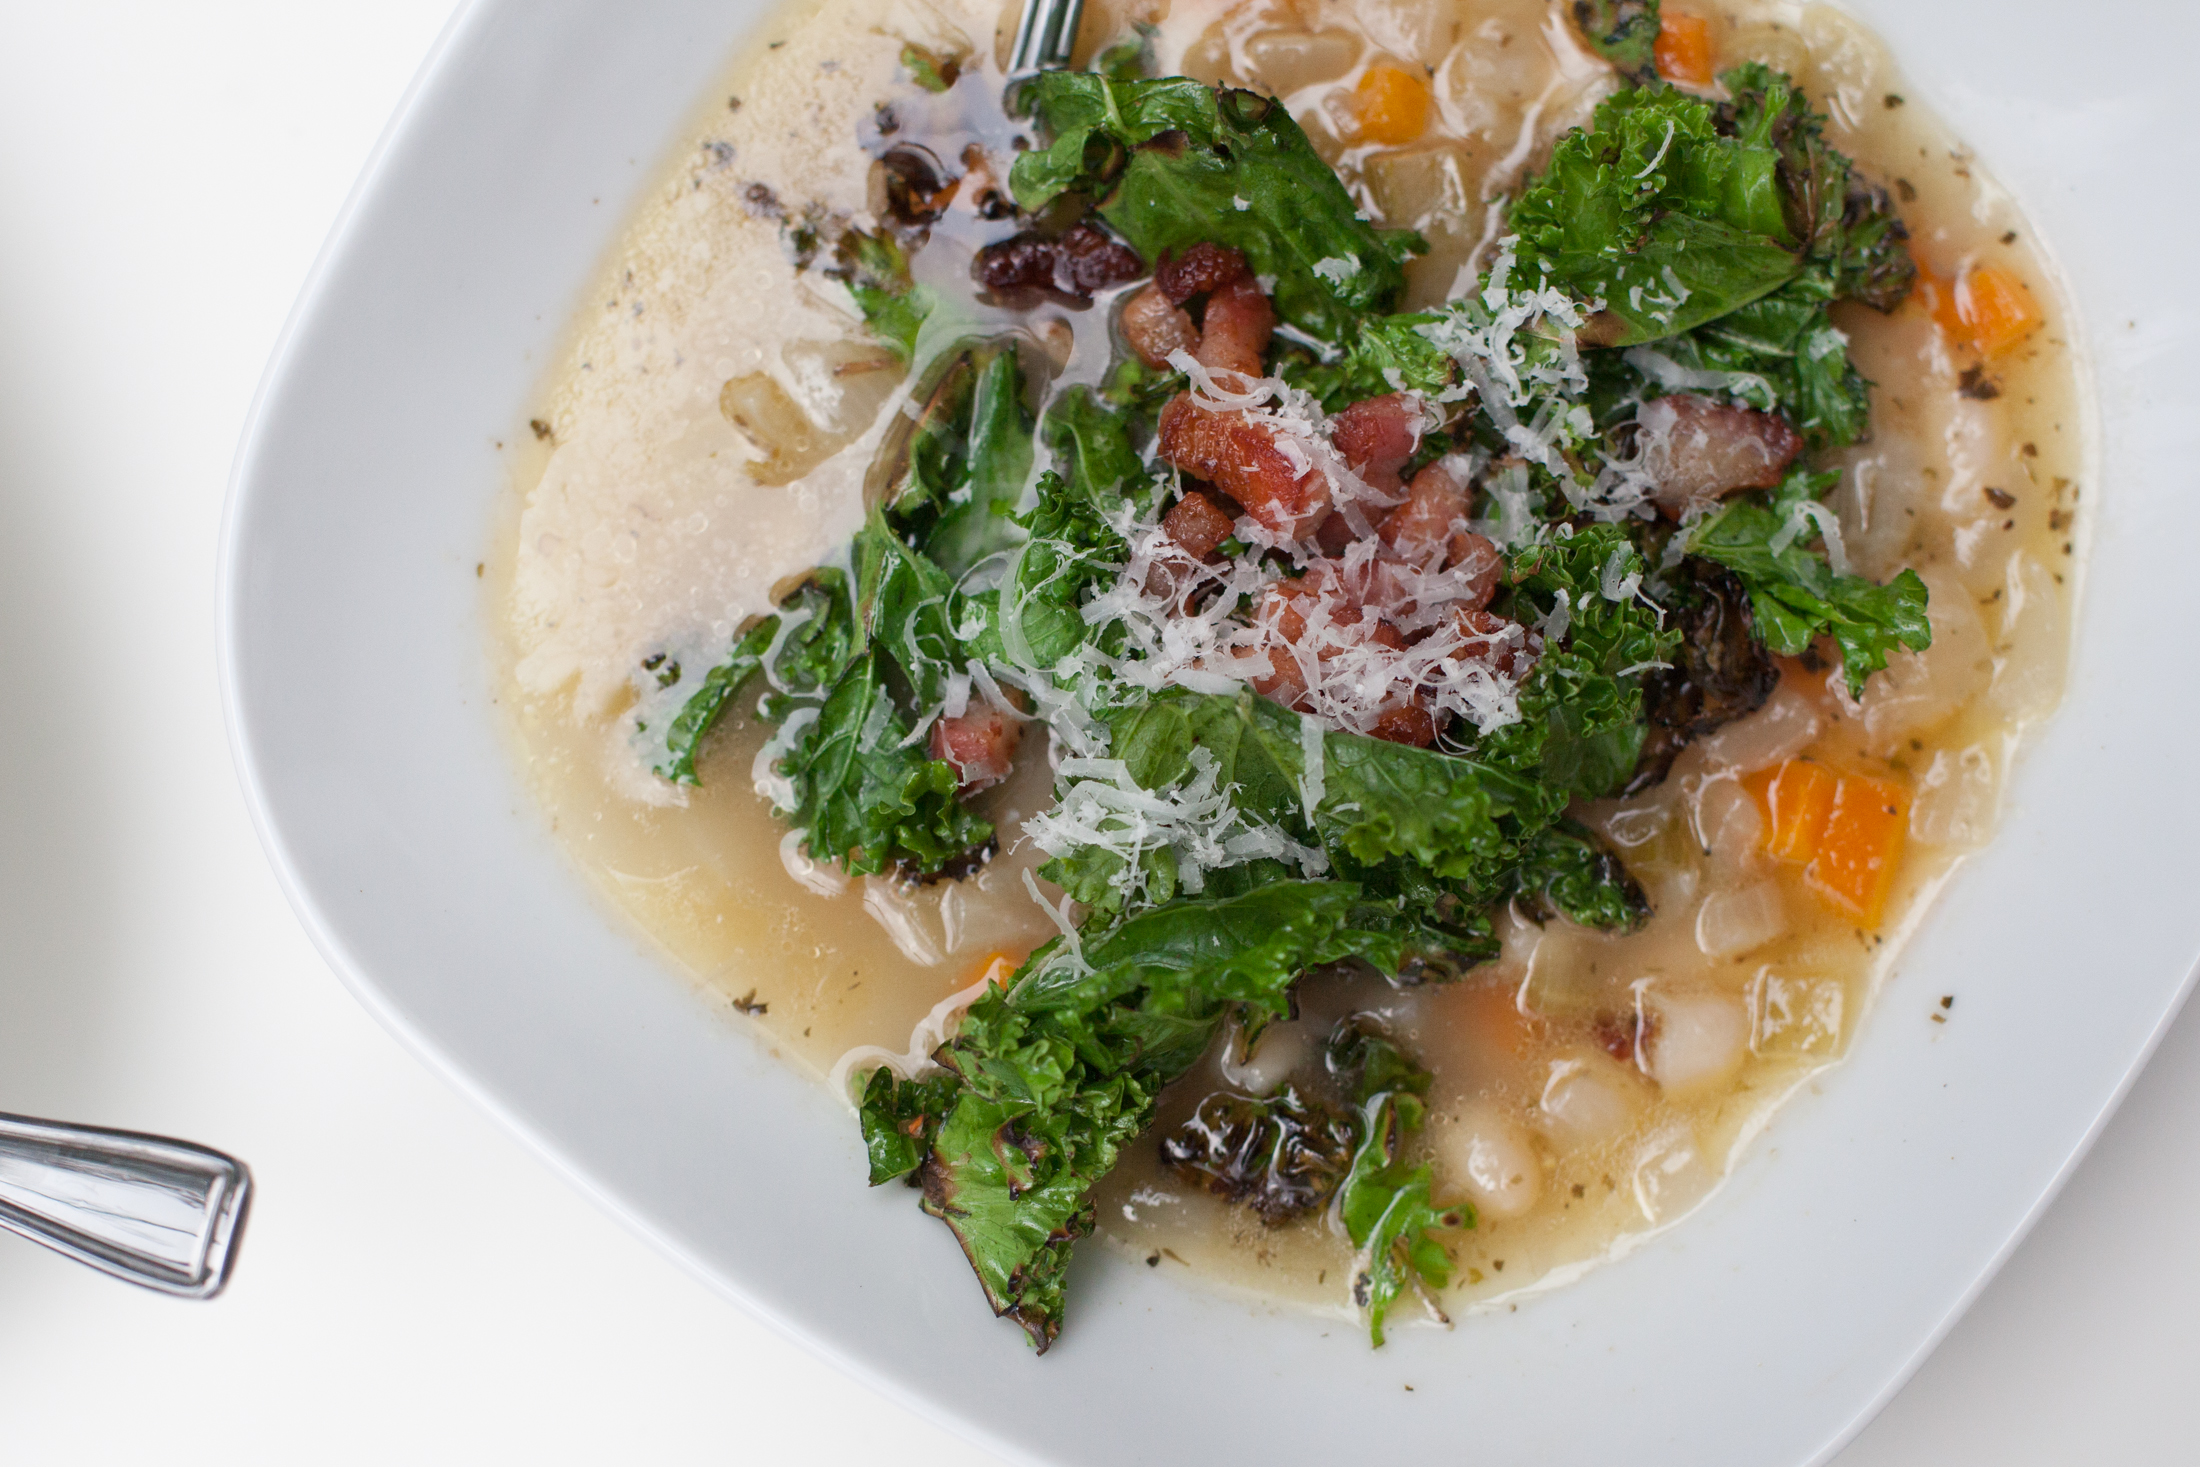
PINPINPINThe soup bubbles slowly away for an hour or so until the beans give way and are tender, but still al dente. Just before it heads to the table, the bacon is heated and crisped up, chopped kale is pan fried until crisp, and these, along with a hearty shaving of Parmesan and a few turns of fresh pepper, top the soup. At the end of any day, whether it be an amazing, awful, or mundane one, this soup is certain to warm you through, and hopefully provide a bit of both nourishment and comfort on a chilly evening.
WHITE BEAN SOUP WITH CRISP BACON AND KALE
Ingredients.
1/2 lb. lardons, or bacon roughly chopped
2-3 cloves garlic, minced
1 large yellow onion, diced
1 large carrot, peeled and diced
2 ribs celery, diced
1 dried bay leaf
pinch nutmeg
1/2 teaspoon onion powder
1/2 teaspoon dried herbs de provence
6 cups chicken stock, plus an additional 2 cups as needed
3/4 lb. dried Cannellini beans (or 3 14.5oz cans, drained and rinsed)
6 cups coarsely chopped kale
grated Parmesan
Parmesan rind (optional)
extra virgin olive oil
kosher salt
freshly ground black pepper
Directions.
In a non-stick skillet par-cook the bacon – removing it just before it’s completely crisp. Use a slotted spoon to remove the bacon, setting it on a paper towel lined plate to drain.
Pour about 1 tablespoon of the bacon grease into a large soup pot, adding an addition splash of olive oil. Discard the remainder of the bacon grease, and set the skillet aside for use later.
With the heat at medium, add the onion to the pot and sauté for 7-8 minutes, until the onion is translucent and just beginning to color around the edges. Season with a pinch of salt and fresh pepper.
Add in the garlic and sauté for about one minute, until the garlic is warm and fragrant. Add in the carrot, celery, herbs, onion powder, nutmeg, a bit of salt and pepper, and sauté for a few minutes until fragrant. Add the beans, Parmesan rind, and stock.
Bring to simmer and allow to cook for an hour or so, until the beans are creamy and tender but still have a little bite. Season the soup to taste with salt and pepper. Discard the bay leaf and the Parmesan rind.
Ladle the soup into serving bowls.
Reheat the non-stick skillet and add in the par-cooked bacon, this time allowing it to crisp completely. Divide the bacon evenly among the bowls of soup. Leave any bacon grease in the pan.
If needed, add a little olive oil to the pan. With the skillet heat on high, toss in the kale, season with a little salt and pepper, and cook until crisp (like kale chips). Divide the crisp kale among the bowls of soup, top with a bit of grated Parmesan, and a few turns of fresh pepper.
Enjoy immediately.
Serves 6 adults.
Save
Save
Save
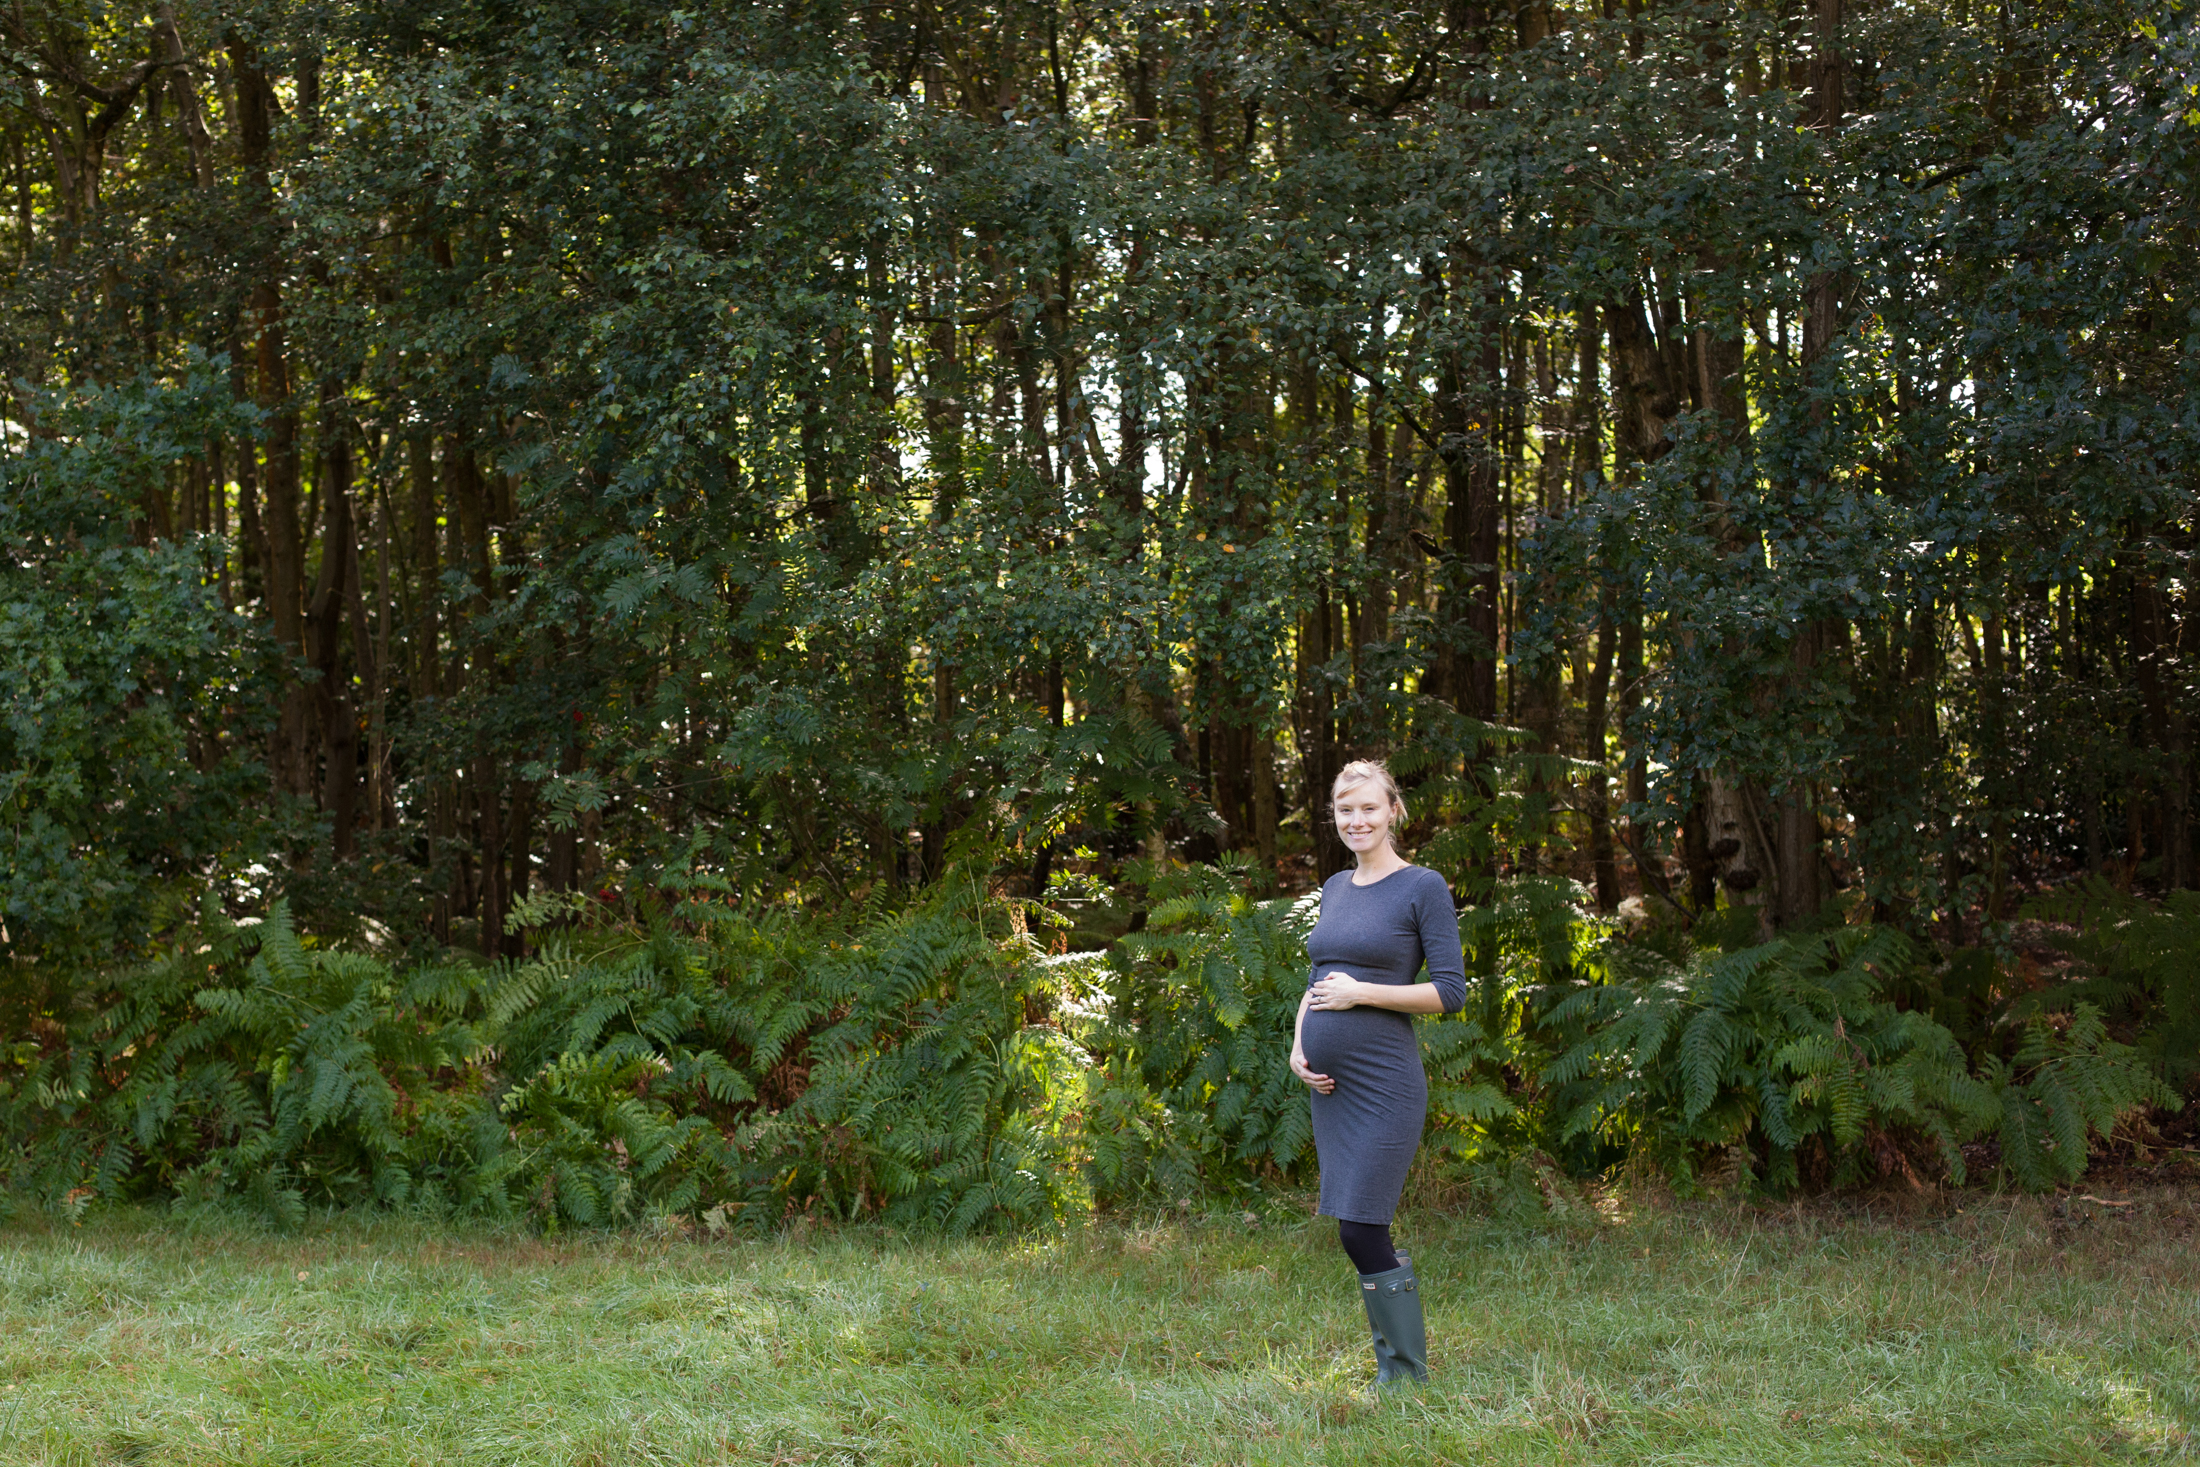
Shortly before we moved, we had my 20 week ultrasound, known to many of you parents and parents-to-be as the anatomy scan. This is the BIG ultrasound. The one where the tech or doctor will ask, “Would you like to know the gender or your baby?” I had been very undecided about finding out – leaning towards not, but Kyle knew he wanted to know. Combined with two votes from the girls, his vote won out and we answered, “Yes.” Within moments the doctor asked, “Do you have a name picked out for him?” HIM! A BOY! To be completely honest, I’m still trying to wrap my head around it, and that was a full month ago! It’s not that I thought it would be a girl, it’s just that having a boy feels very… unreal. For a while there I was coasting along on other people’s excitement, but now I’m getting genuinely excited about having a son!
PINKyle and I had attended the appointment without Gigi and Lulu because, as exciting as finding out the gender can be, the rest of the anatomy scan is rather boring in relation… especially if you’re not the parent of the baby. Seeing the spine, heart, fingers, kidneys, and toes can be intriguing and wonderful when it’s your baby, but this somehow doesn’t translate with it’s your sibling.
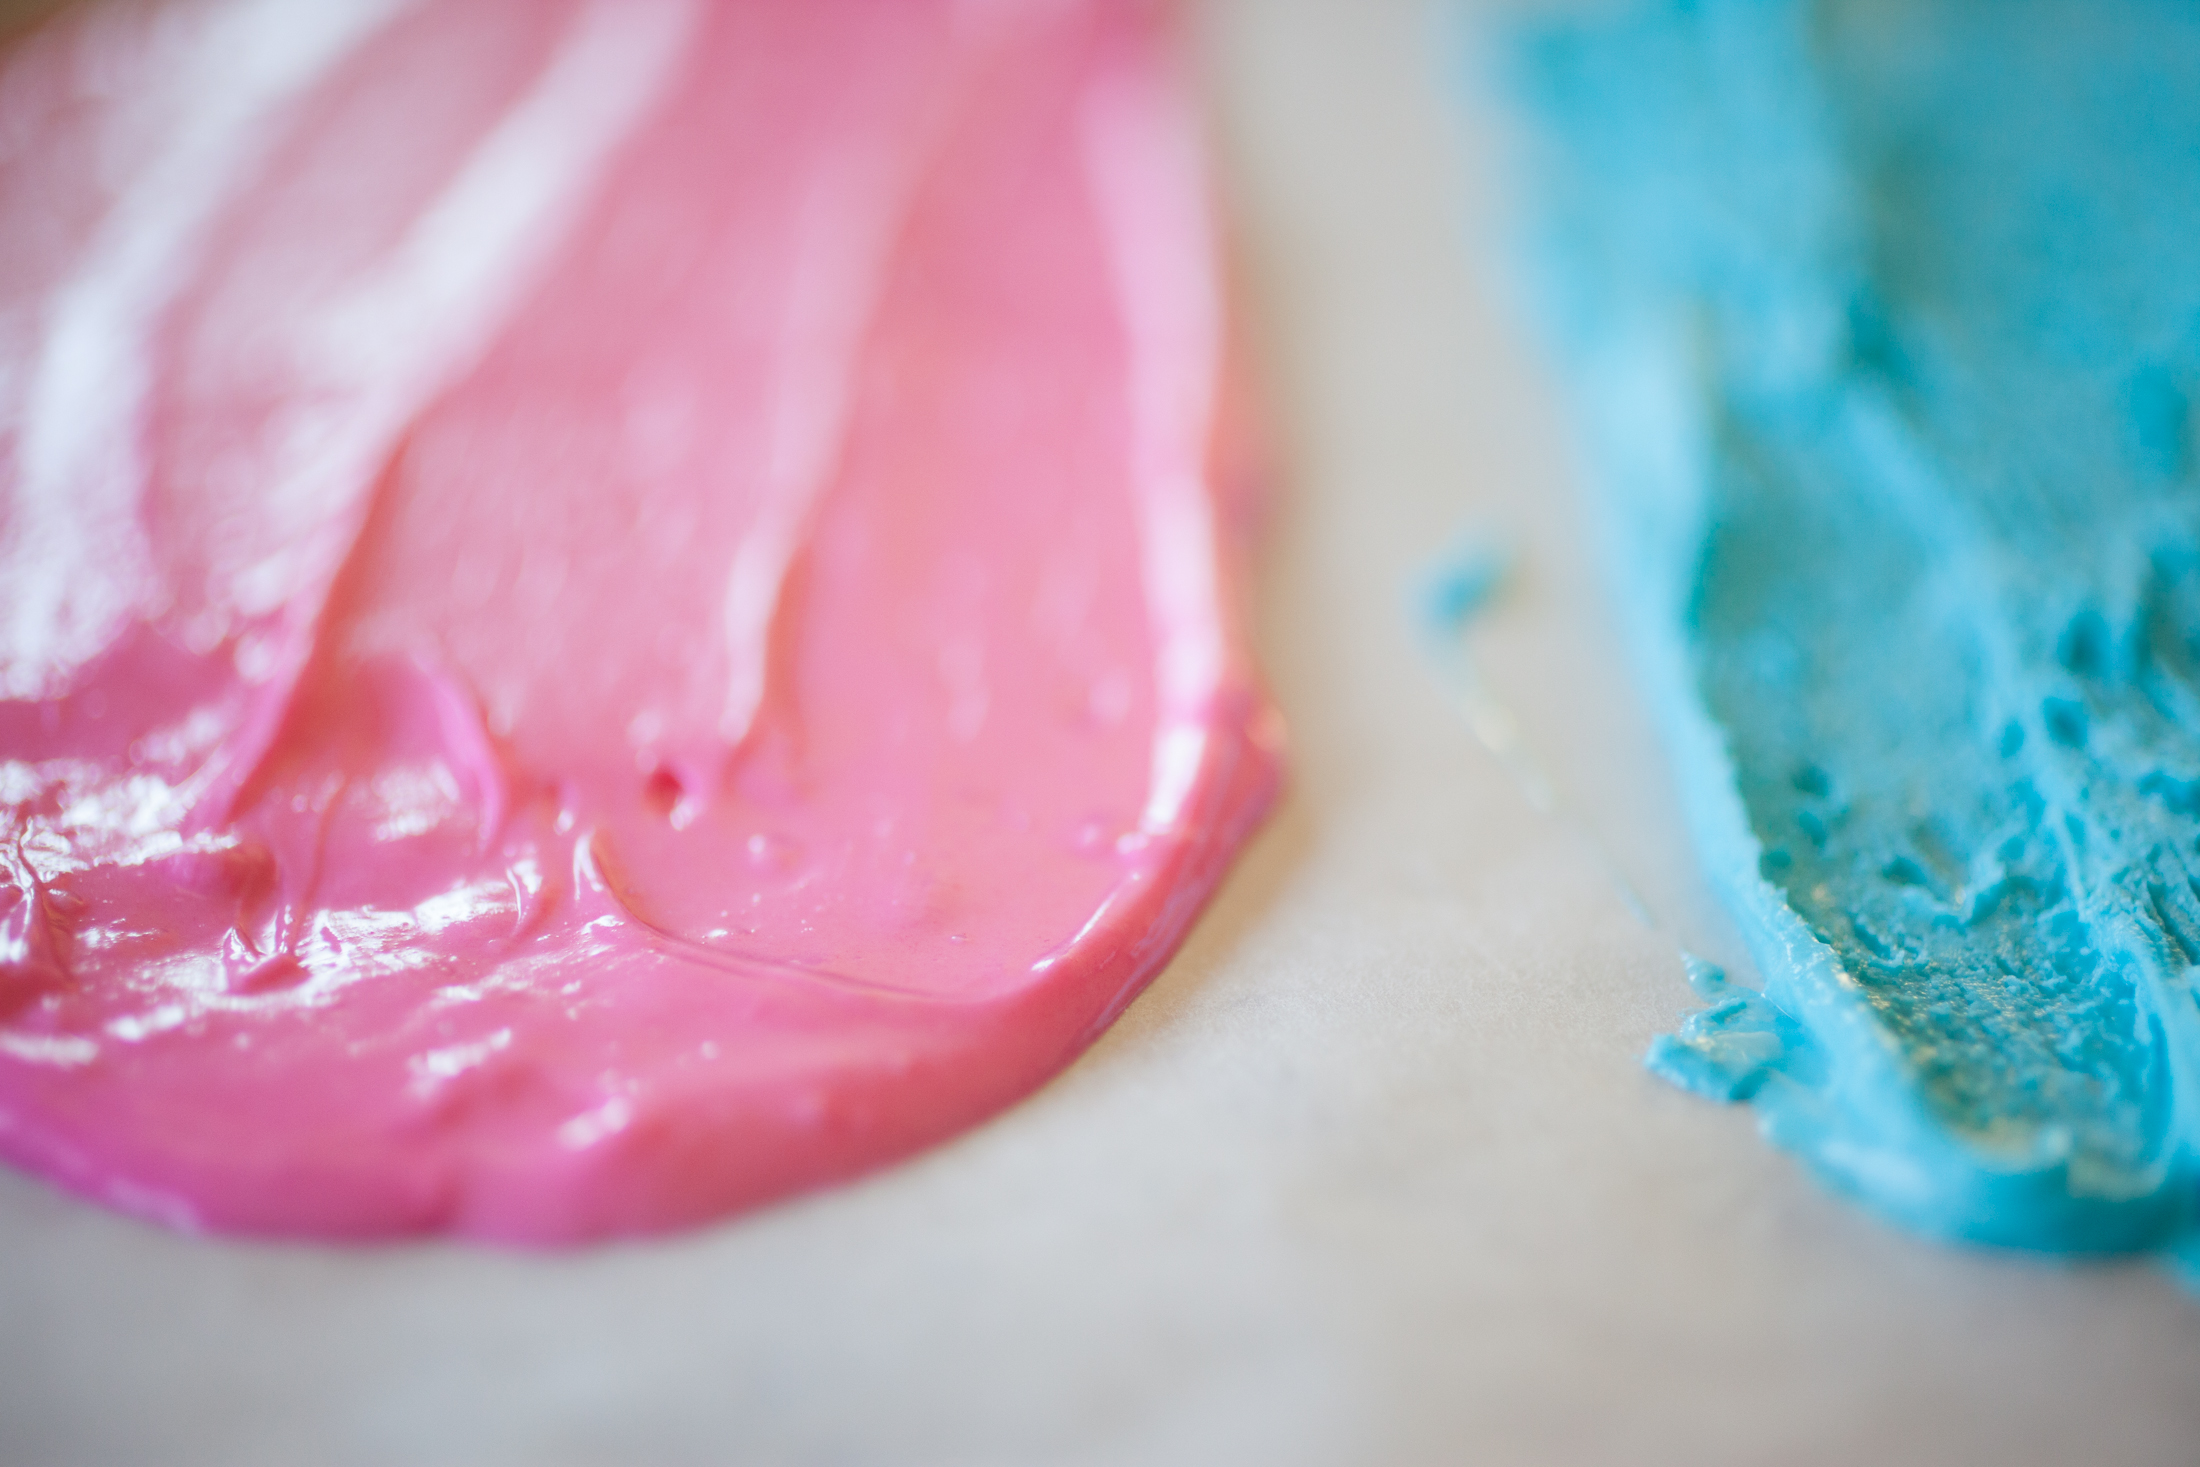
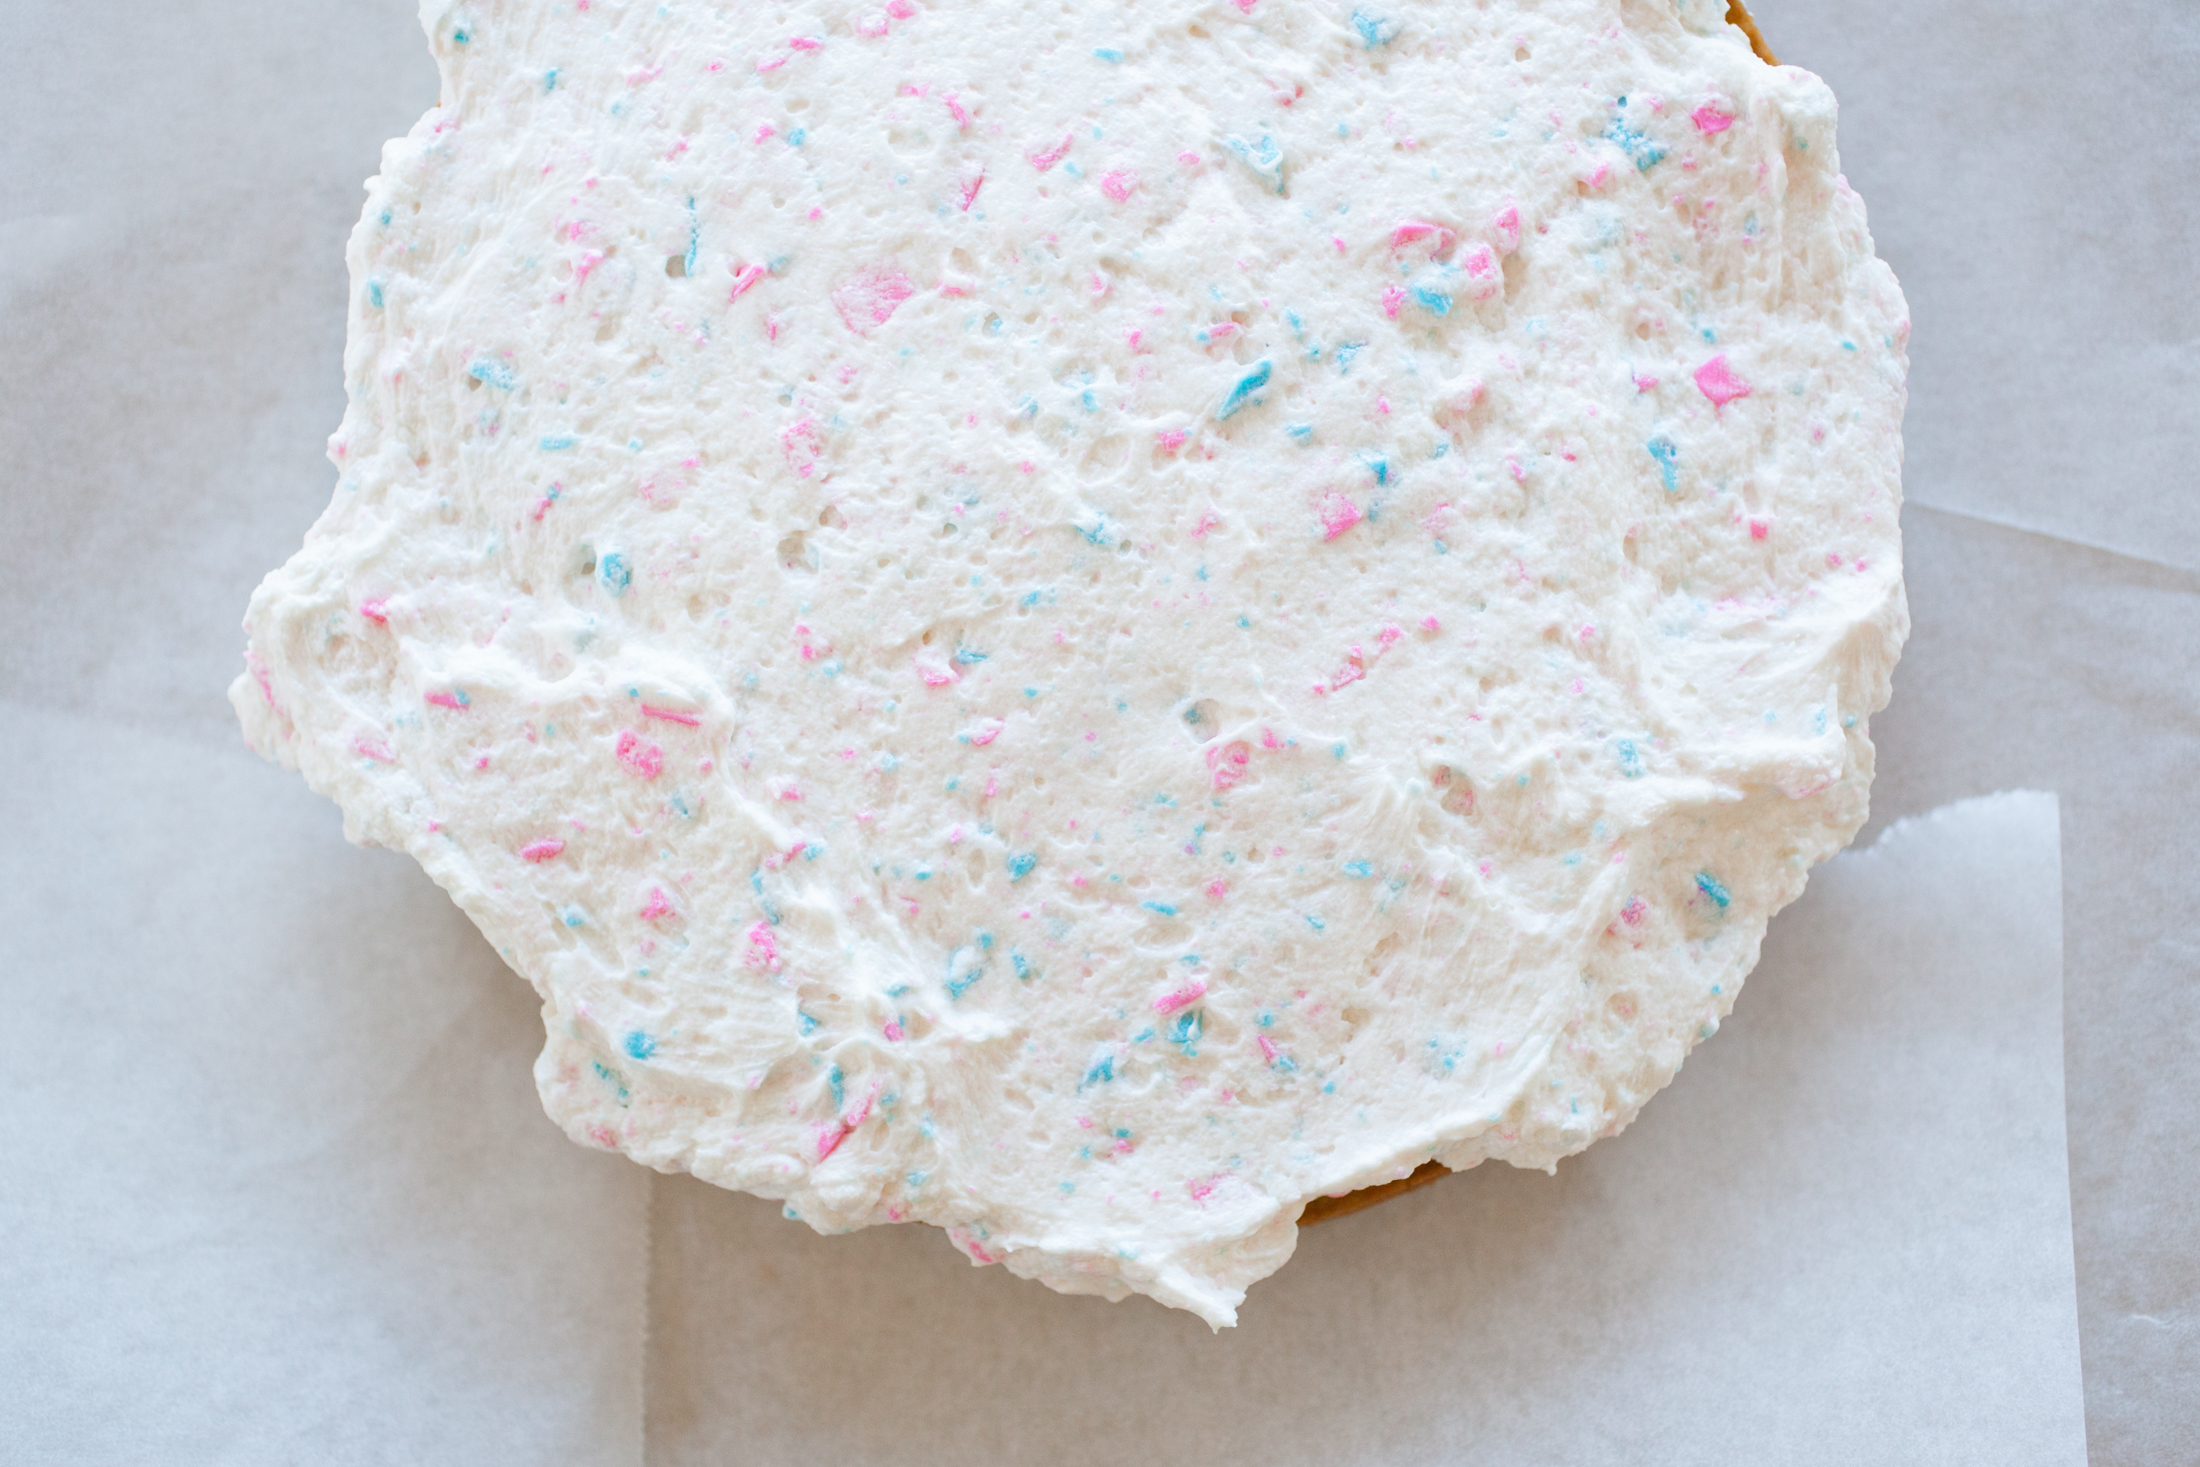
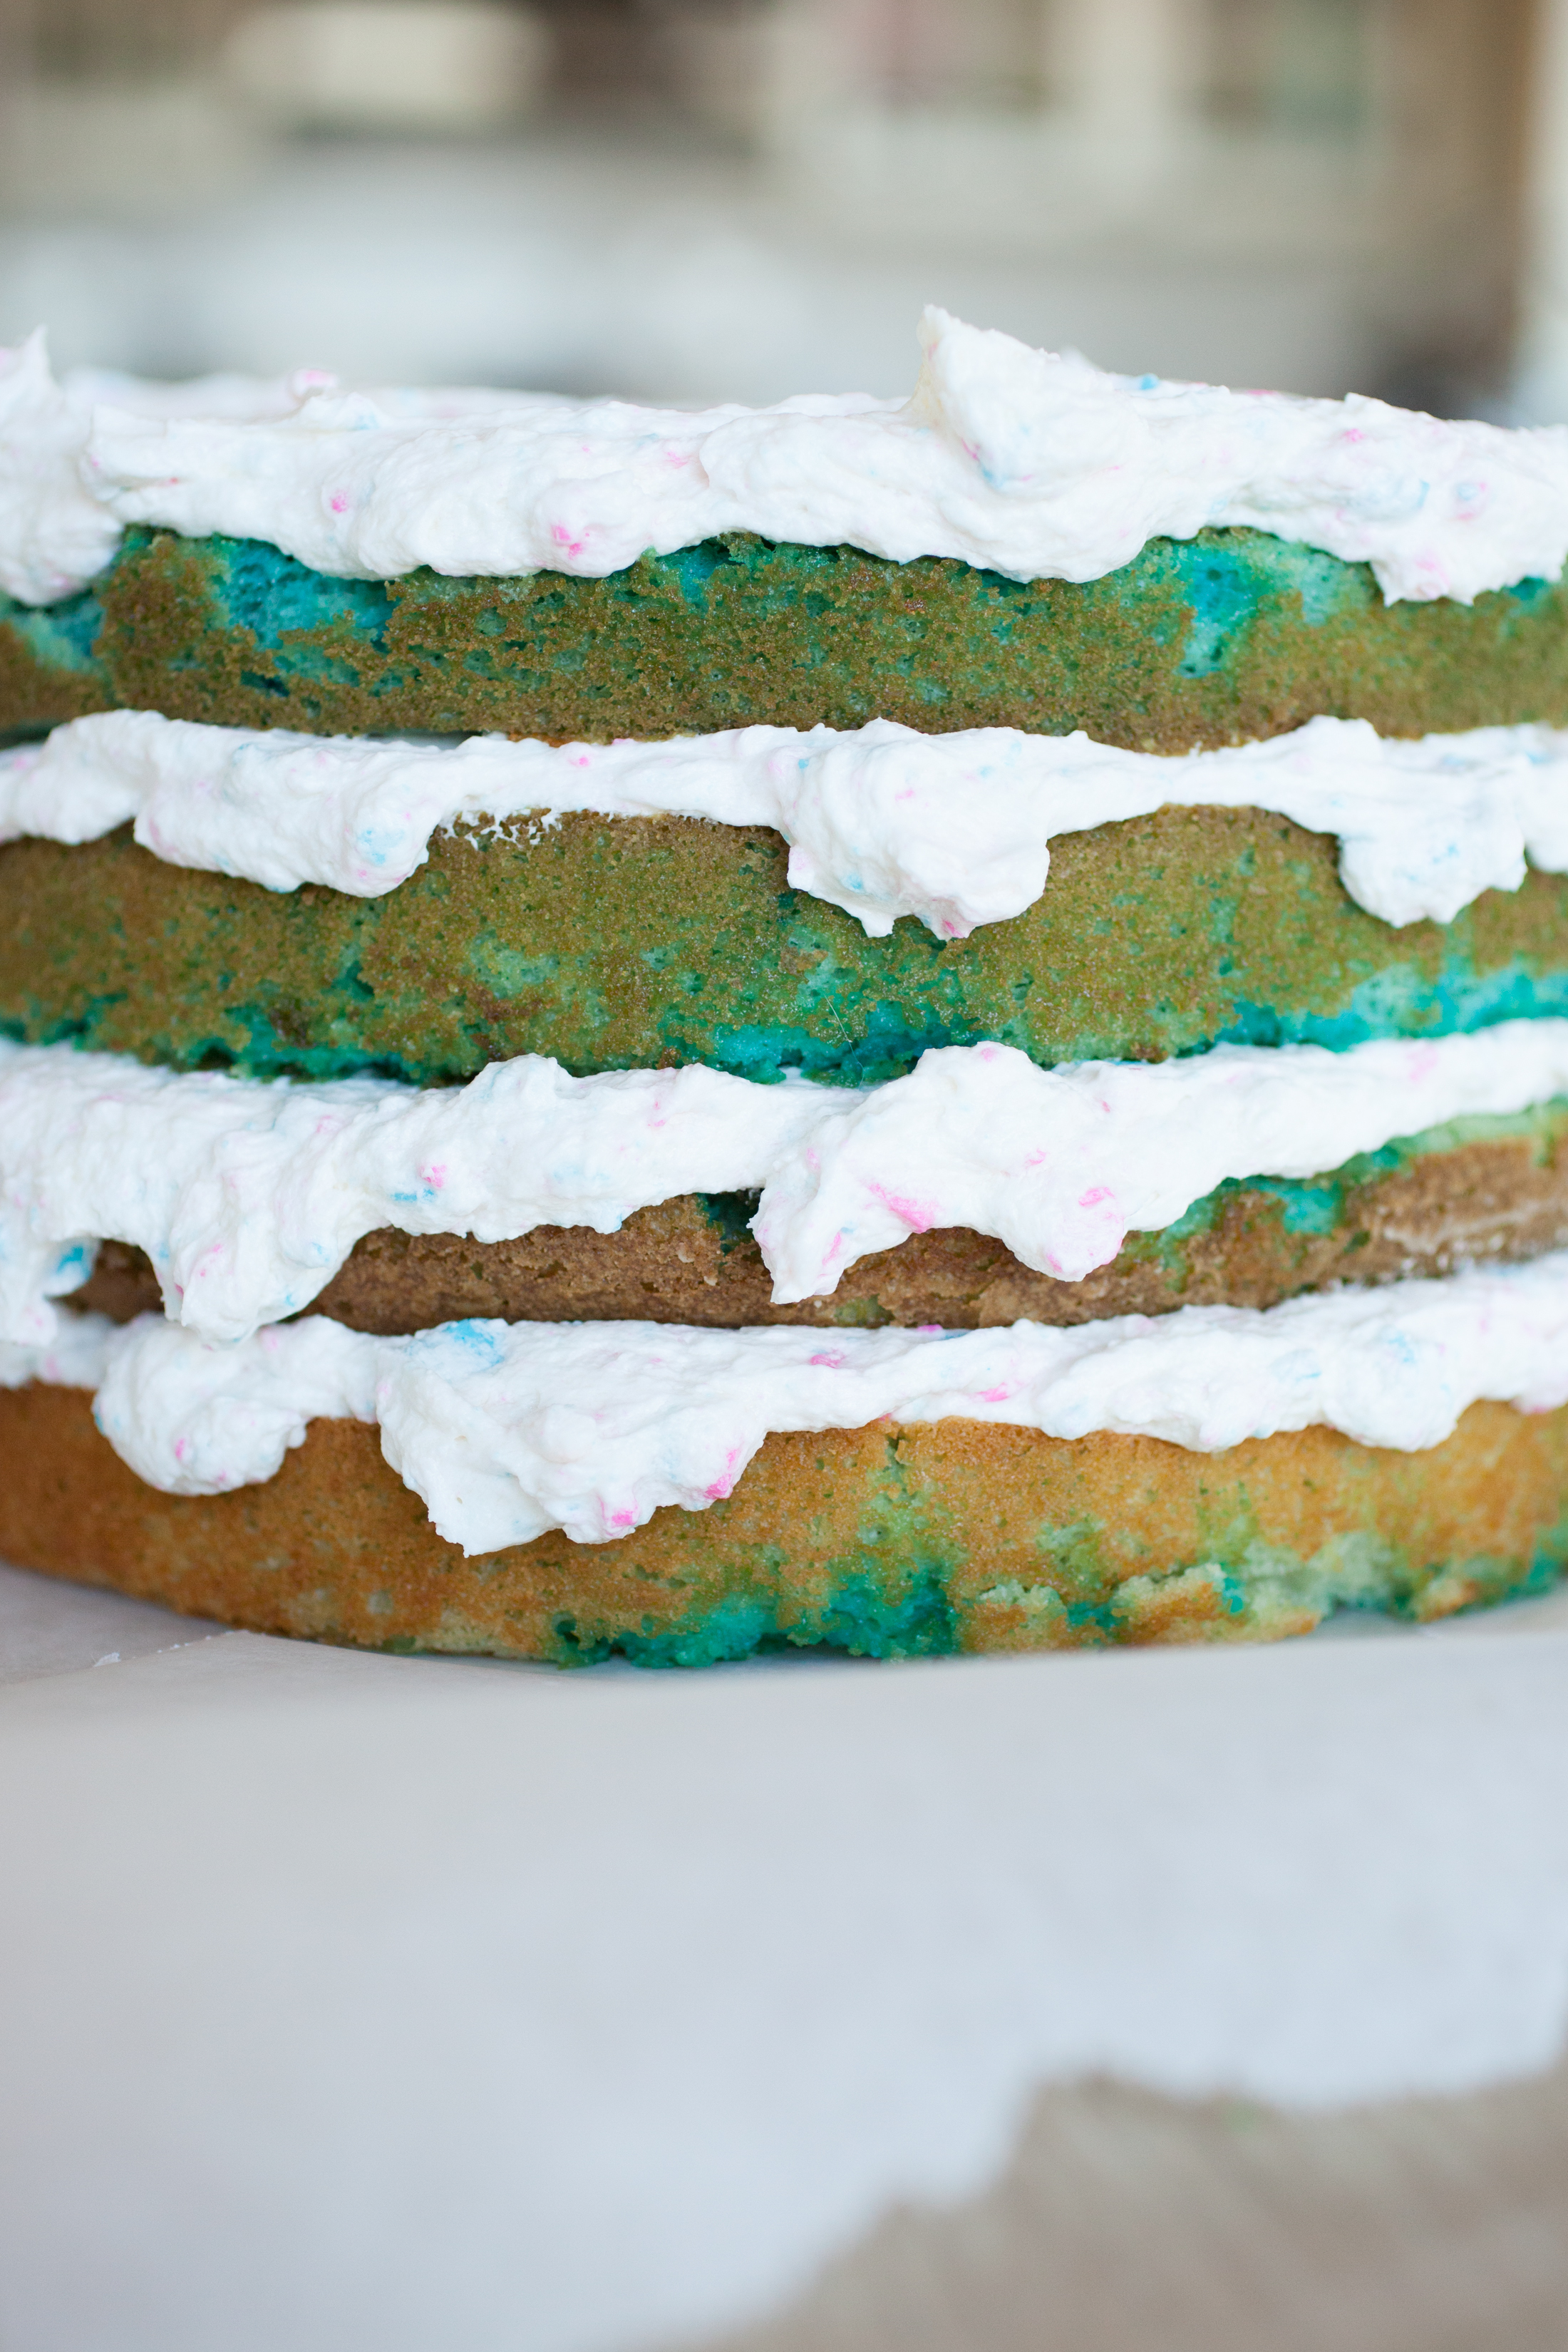
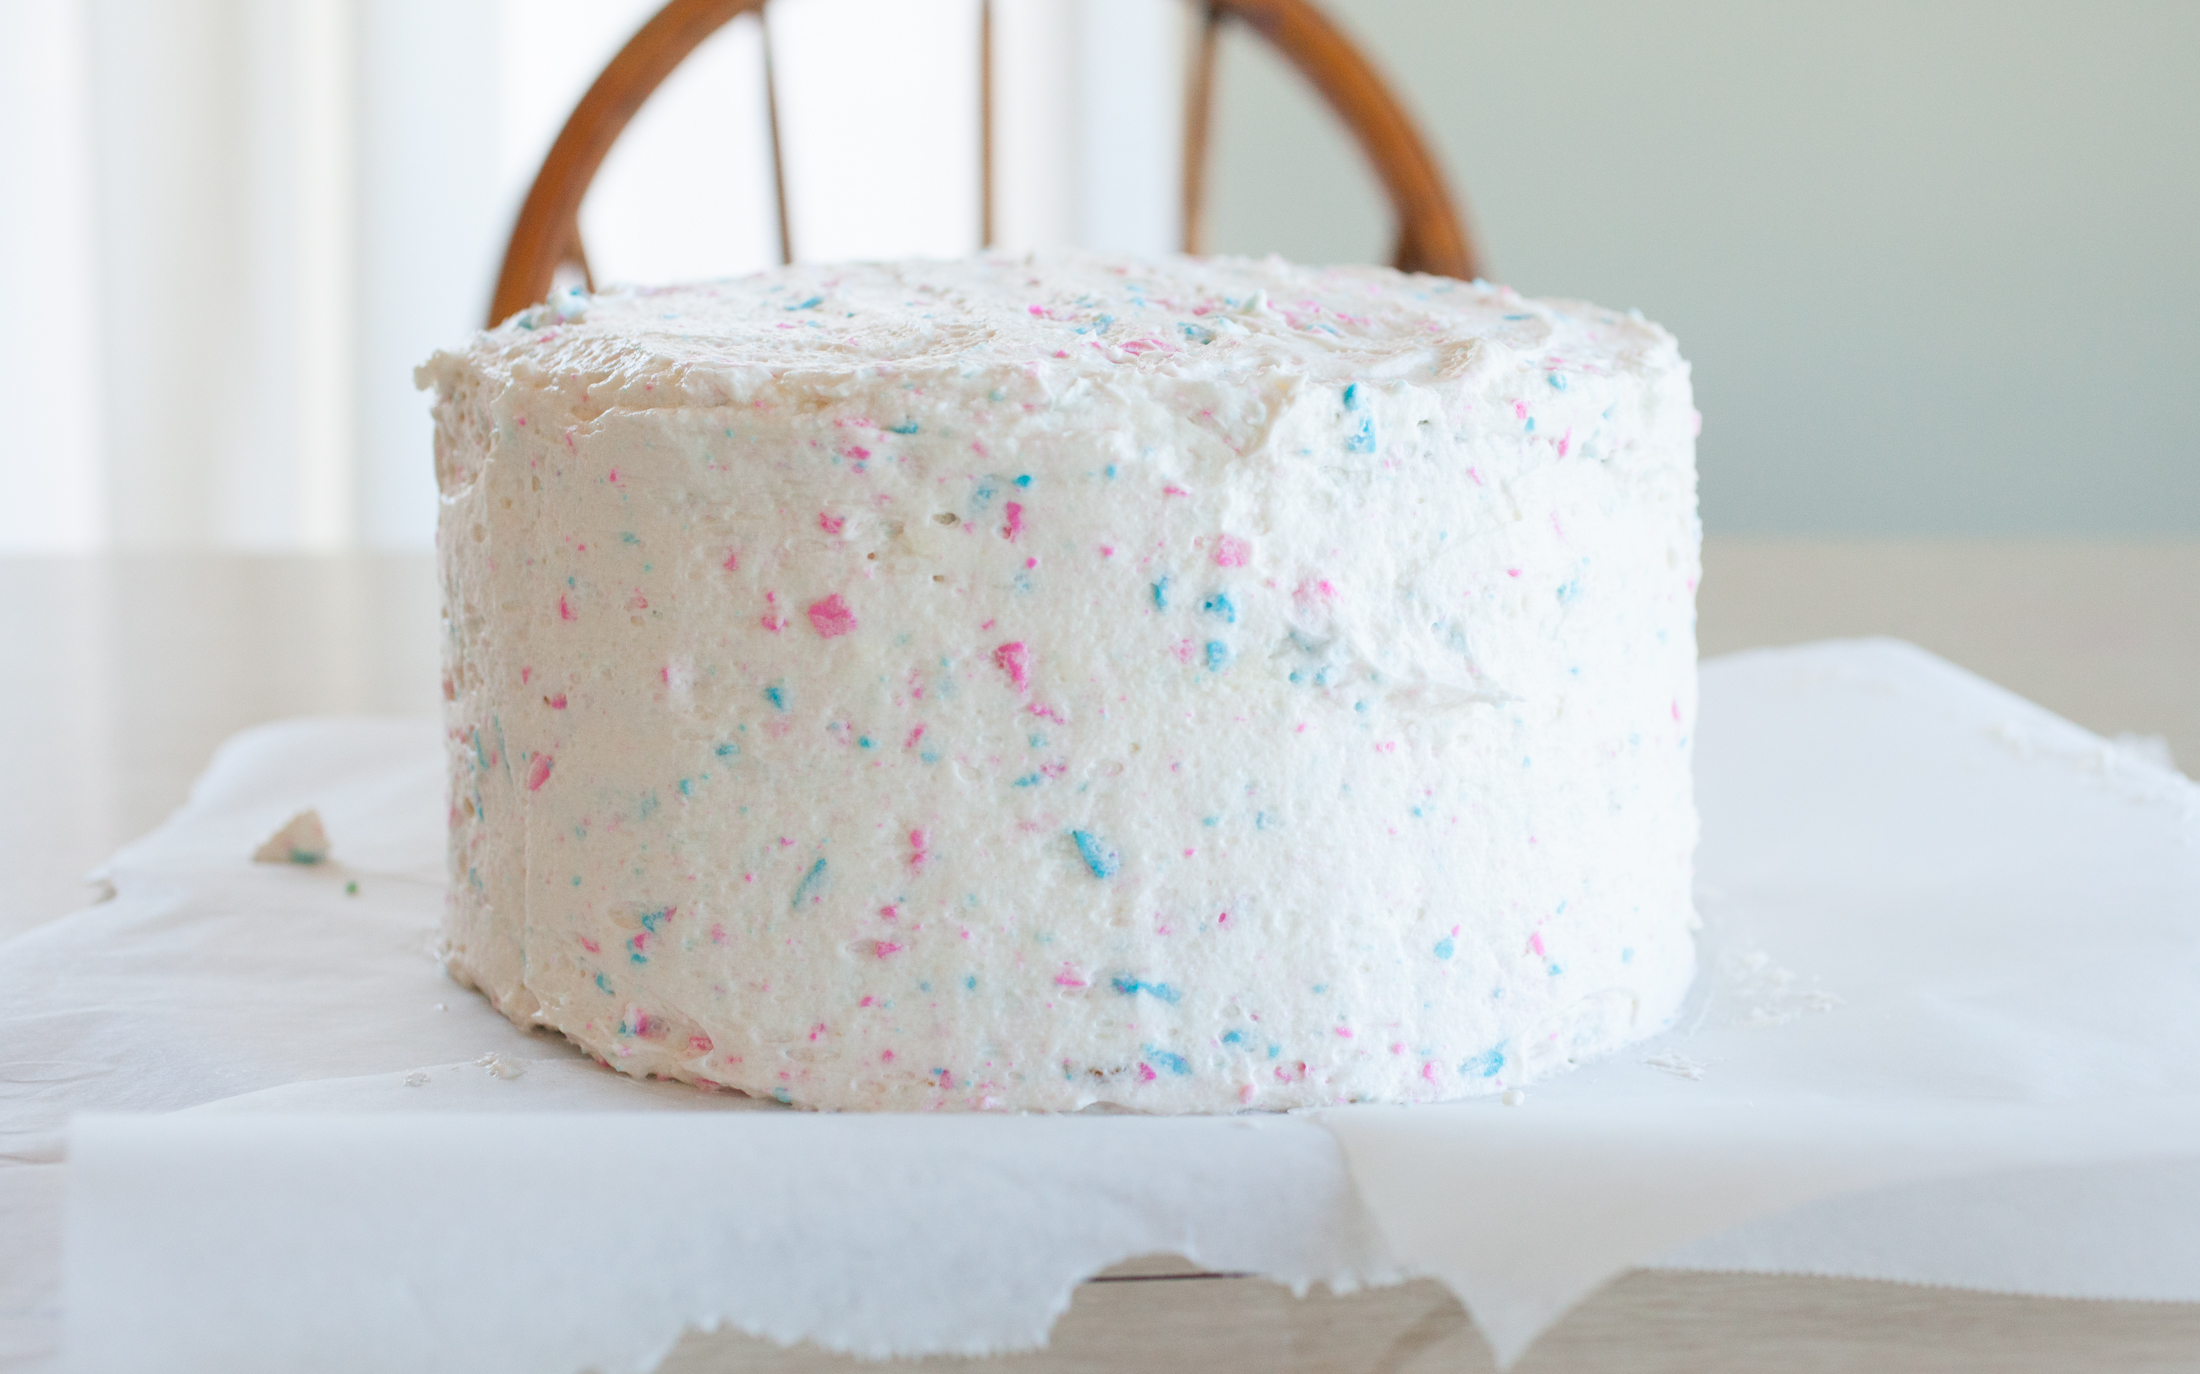
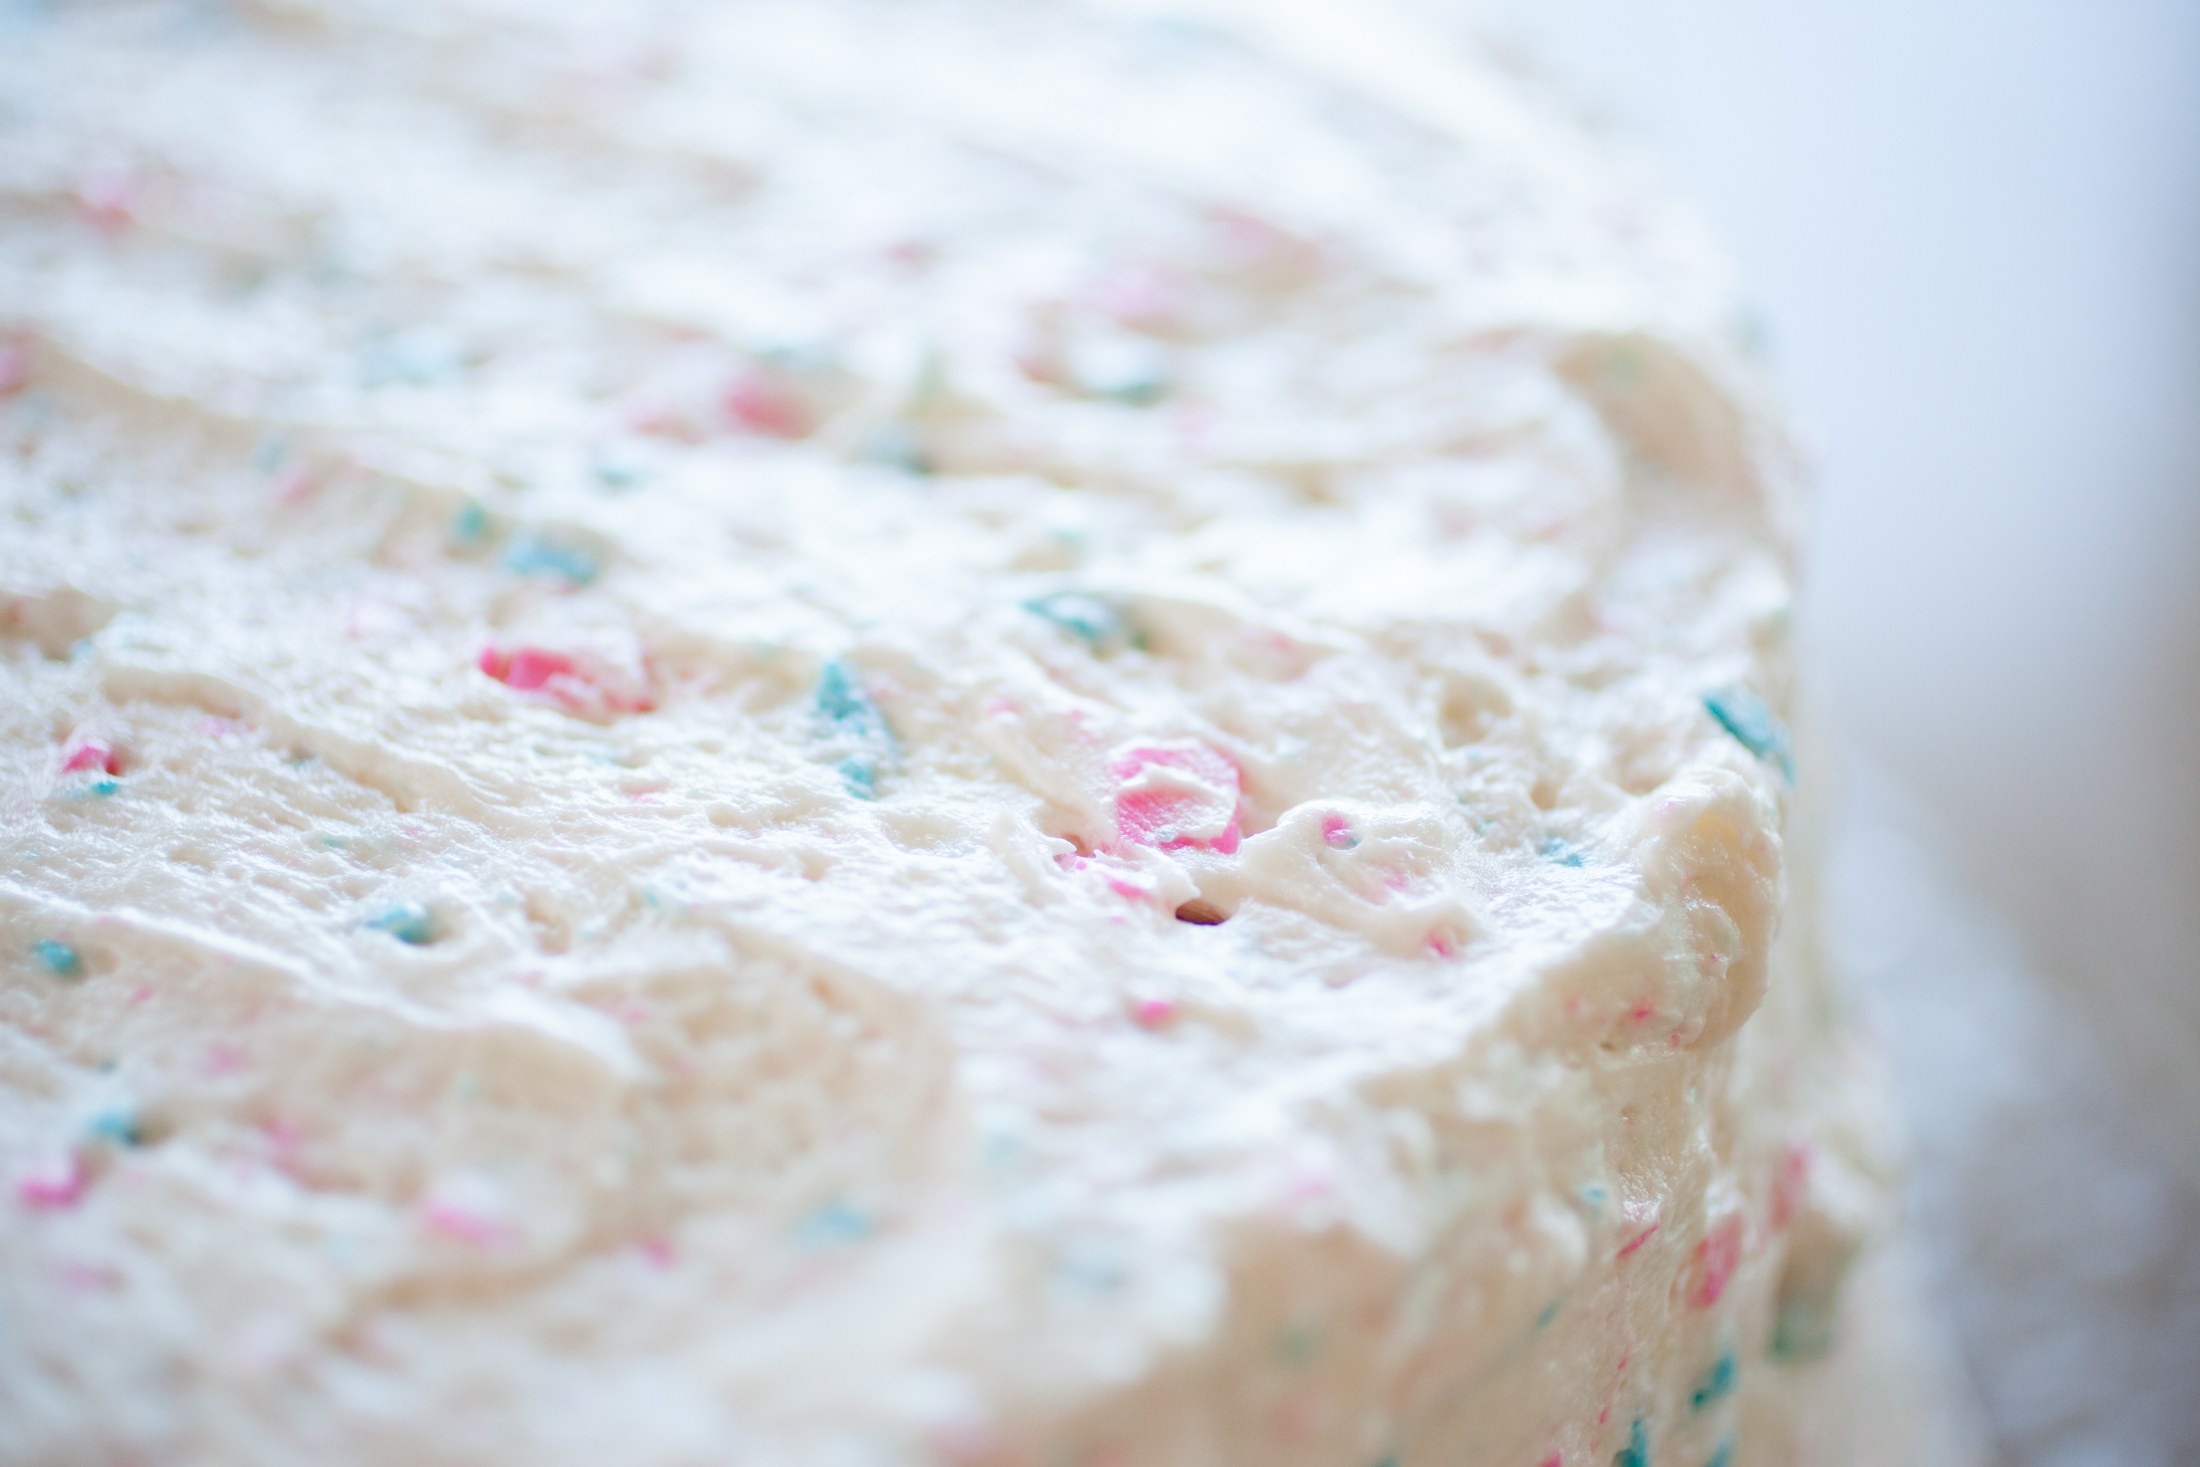
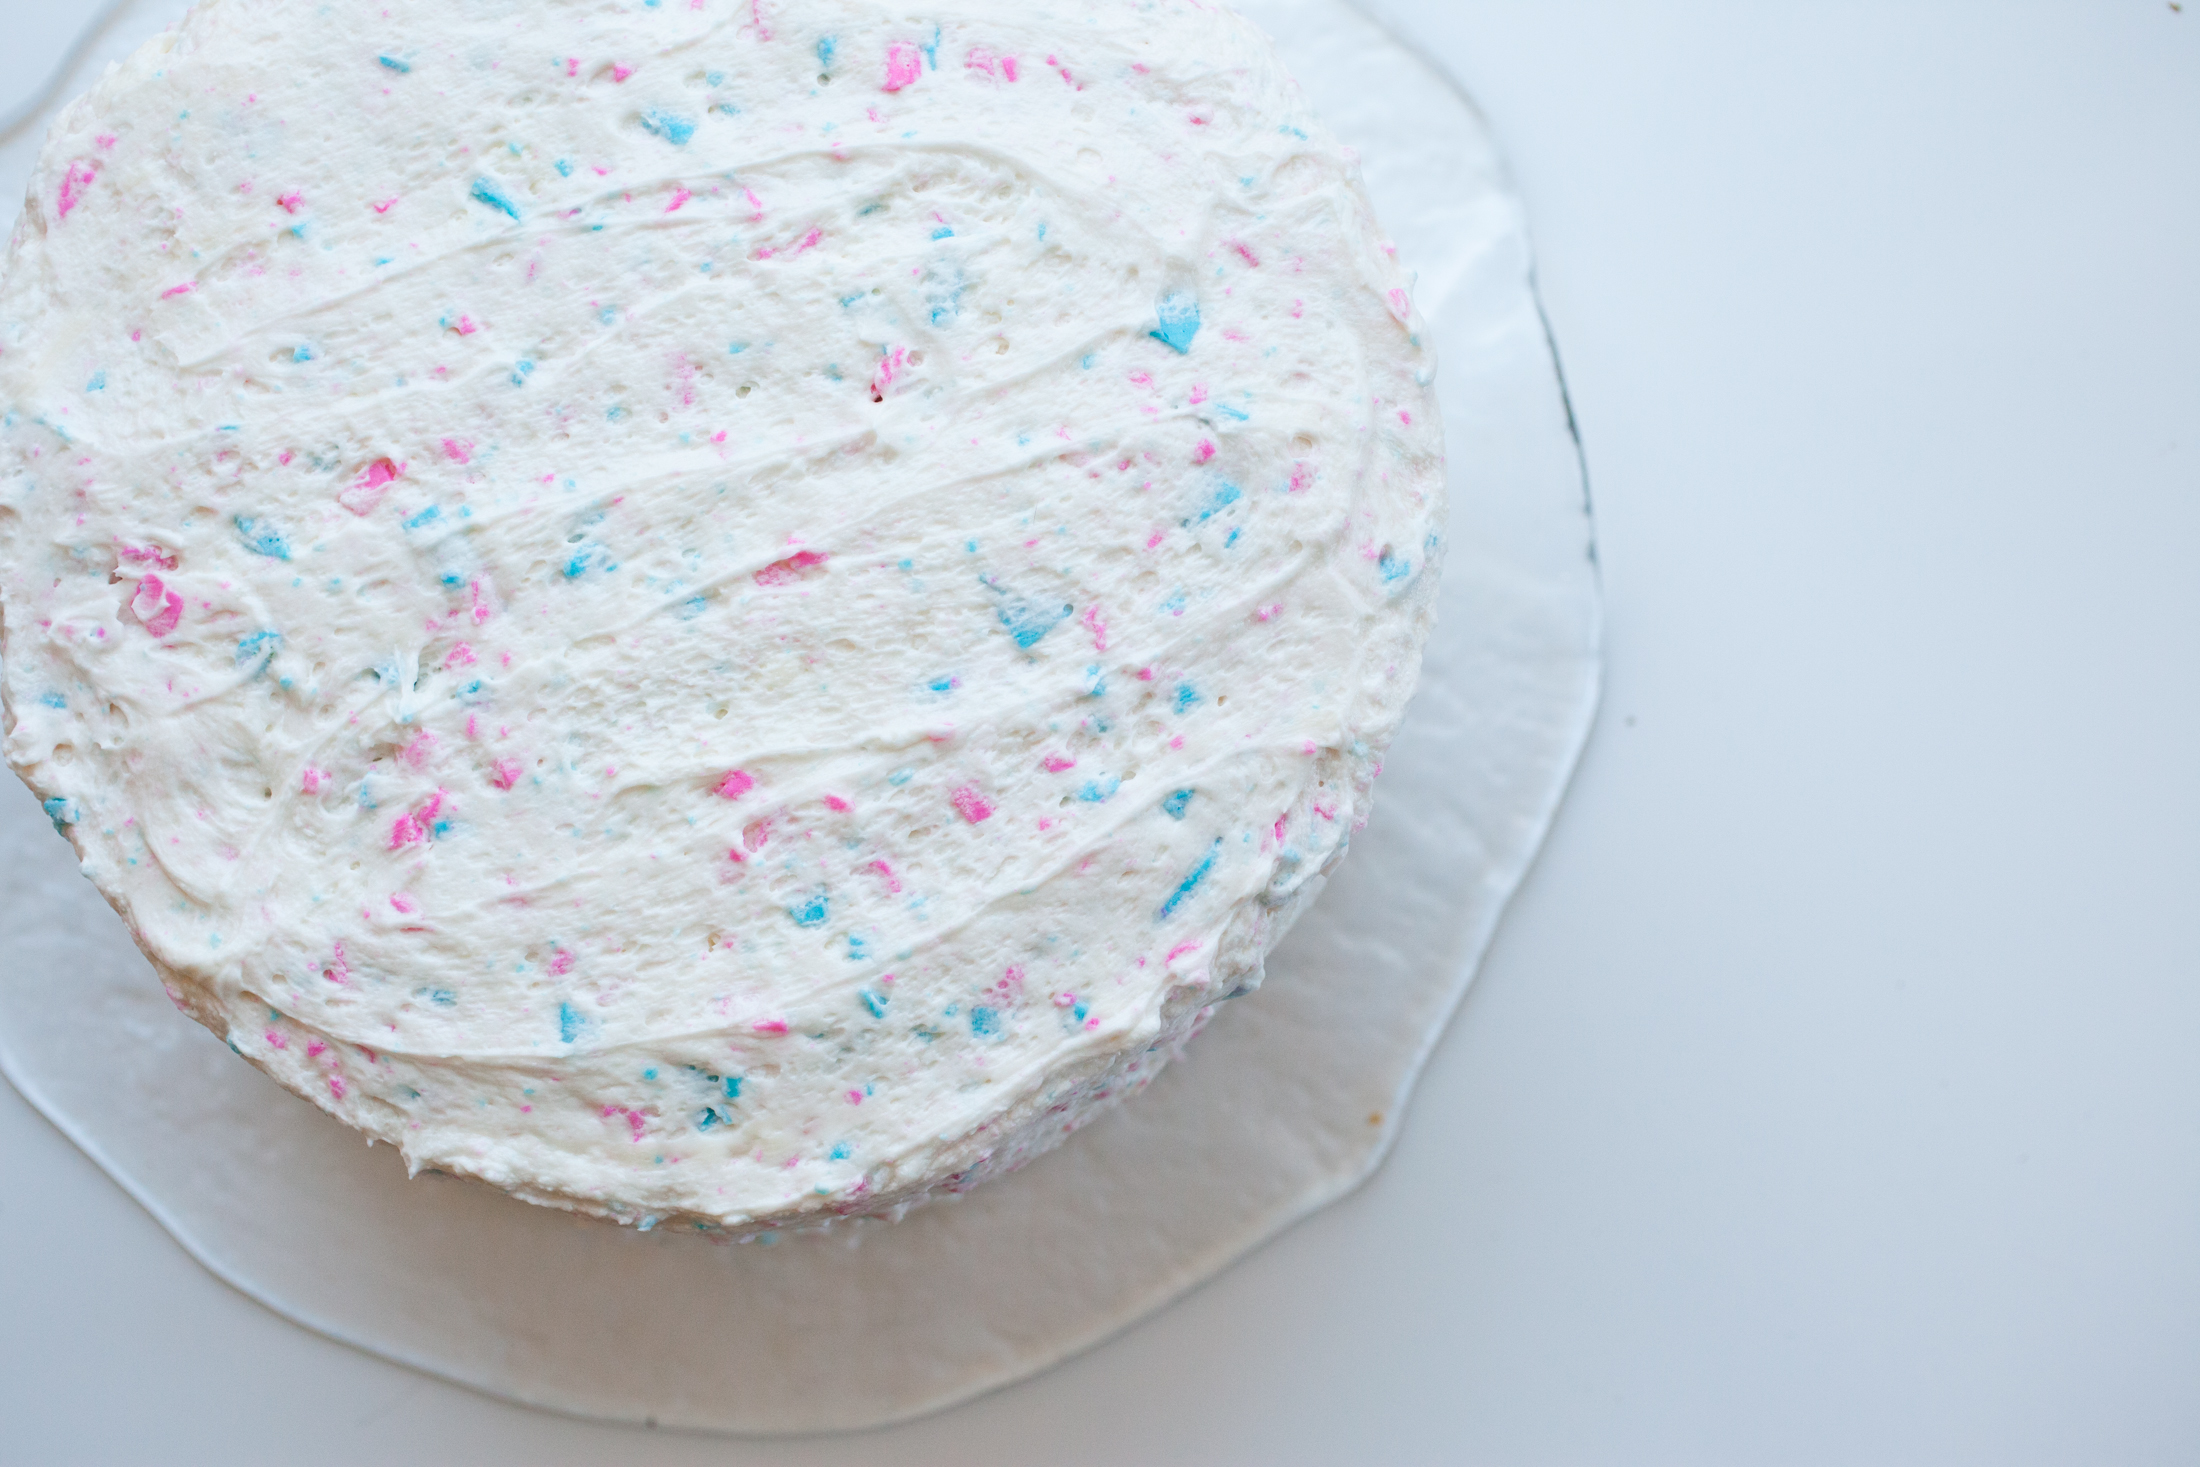
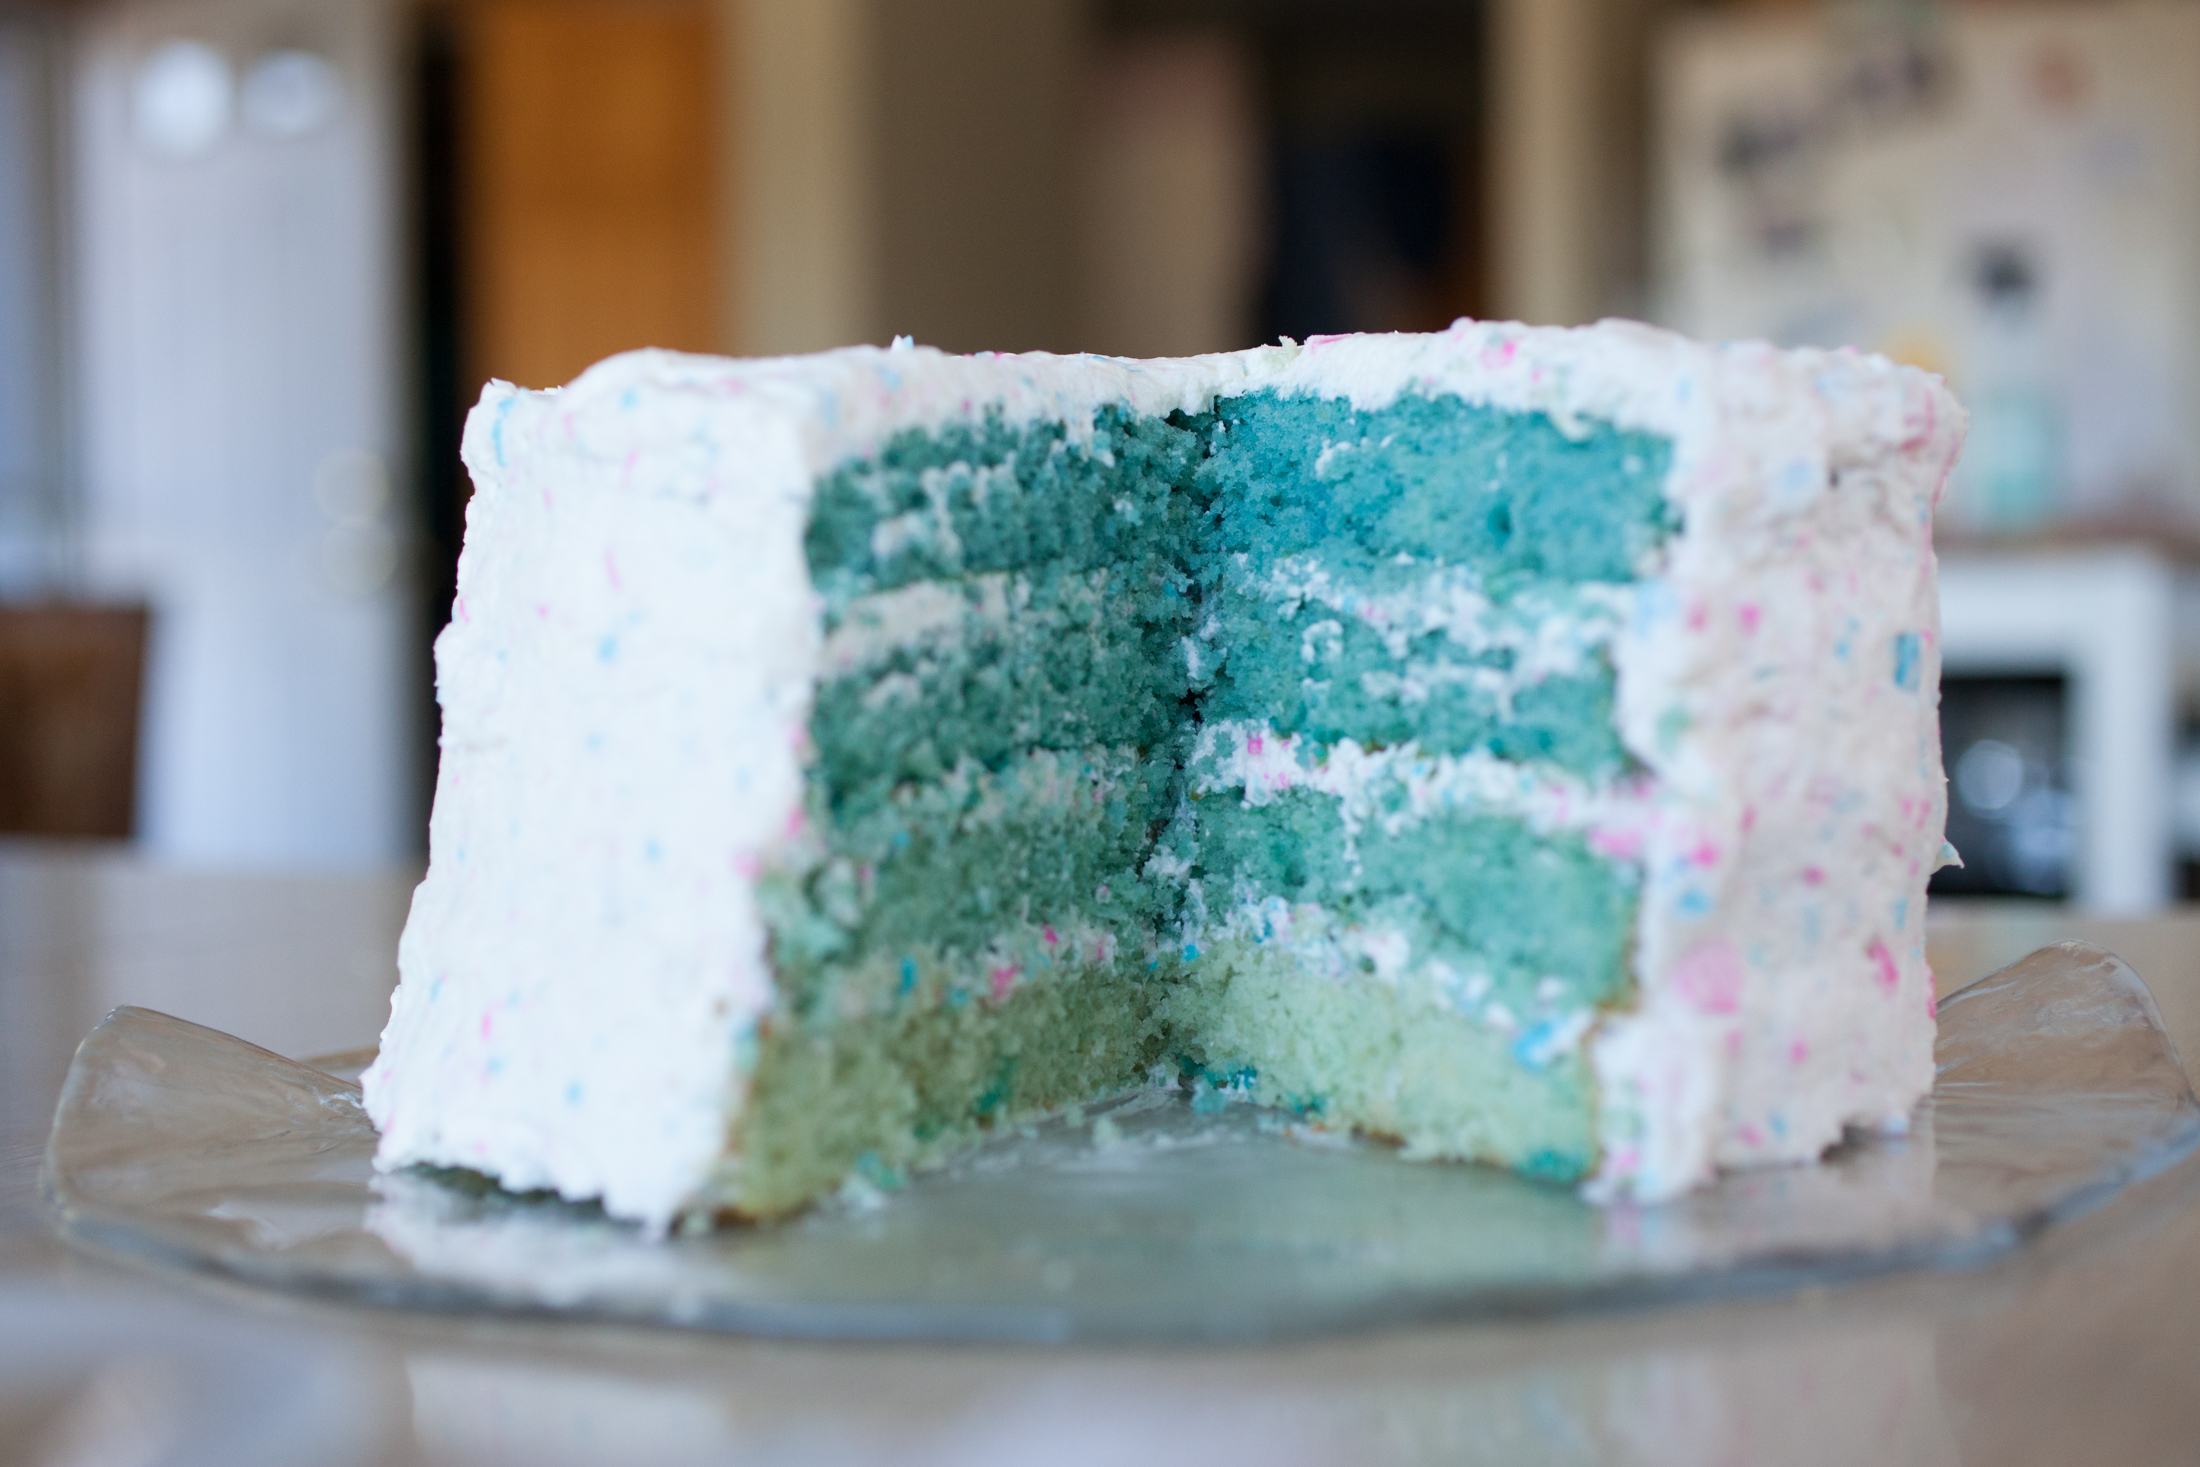
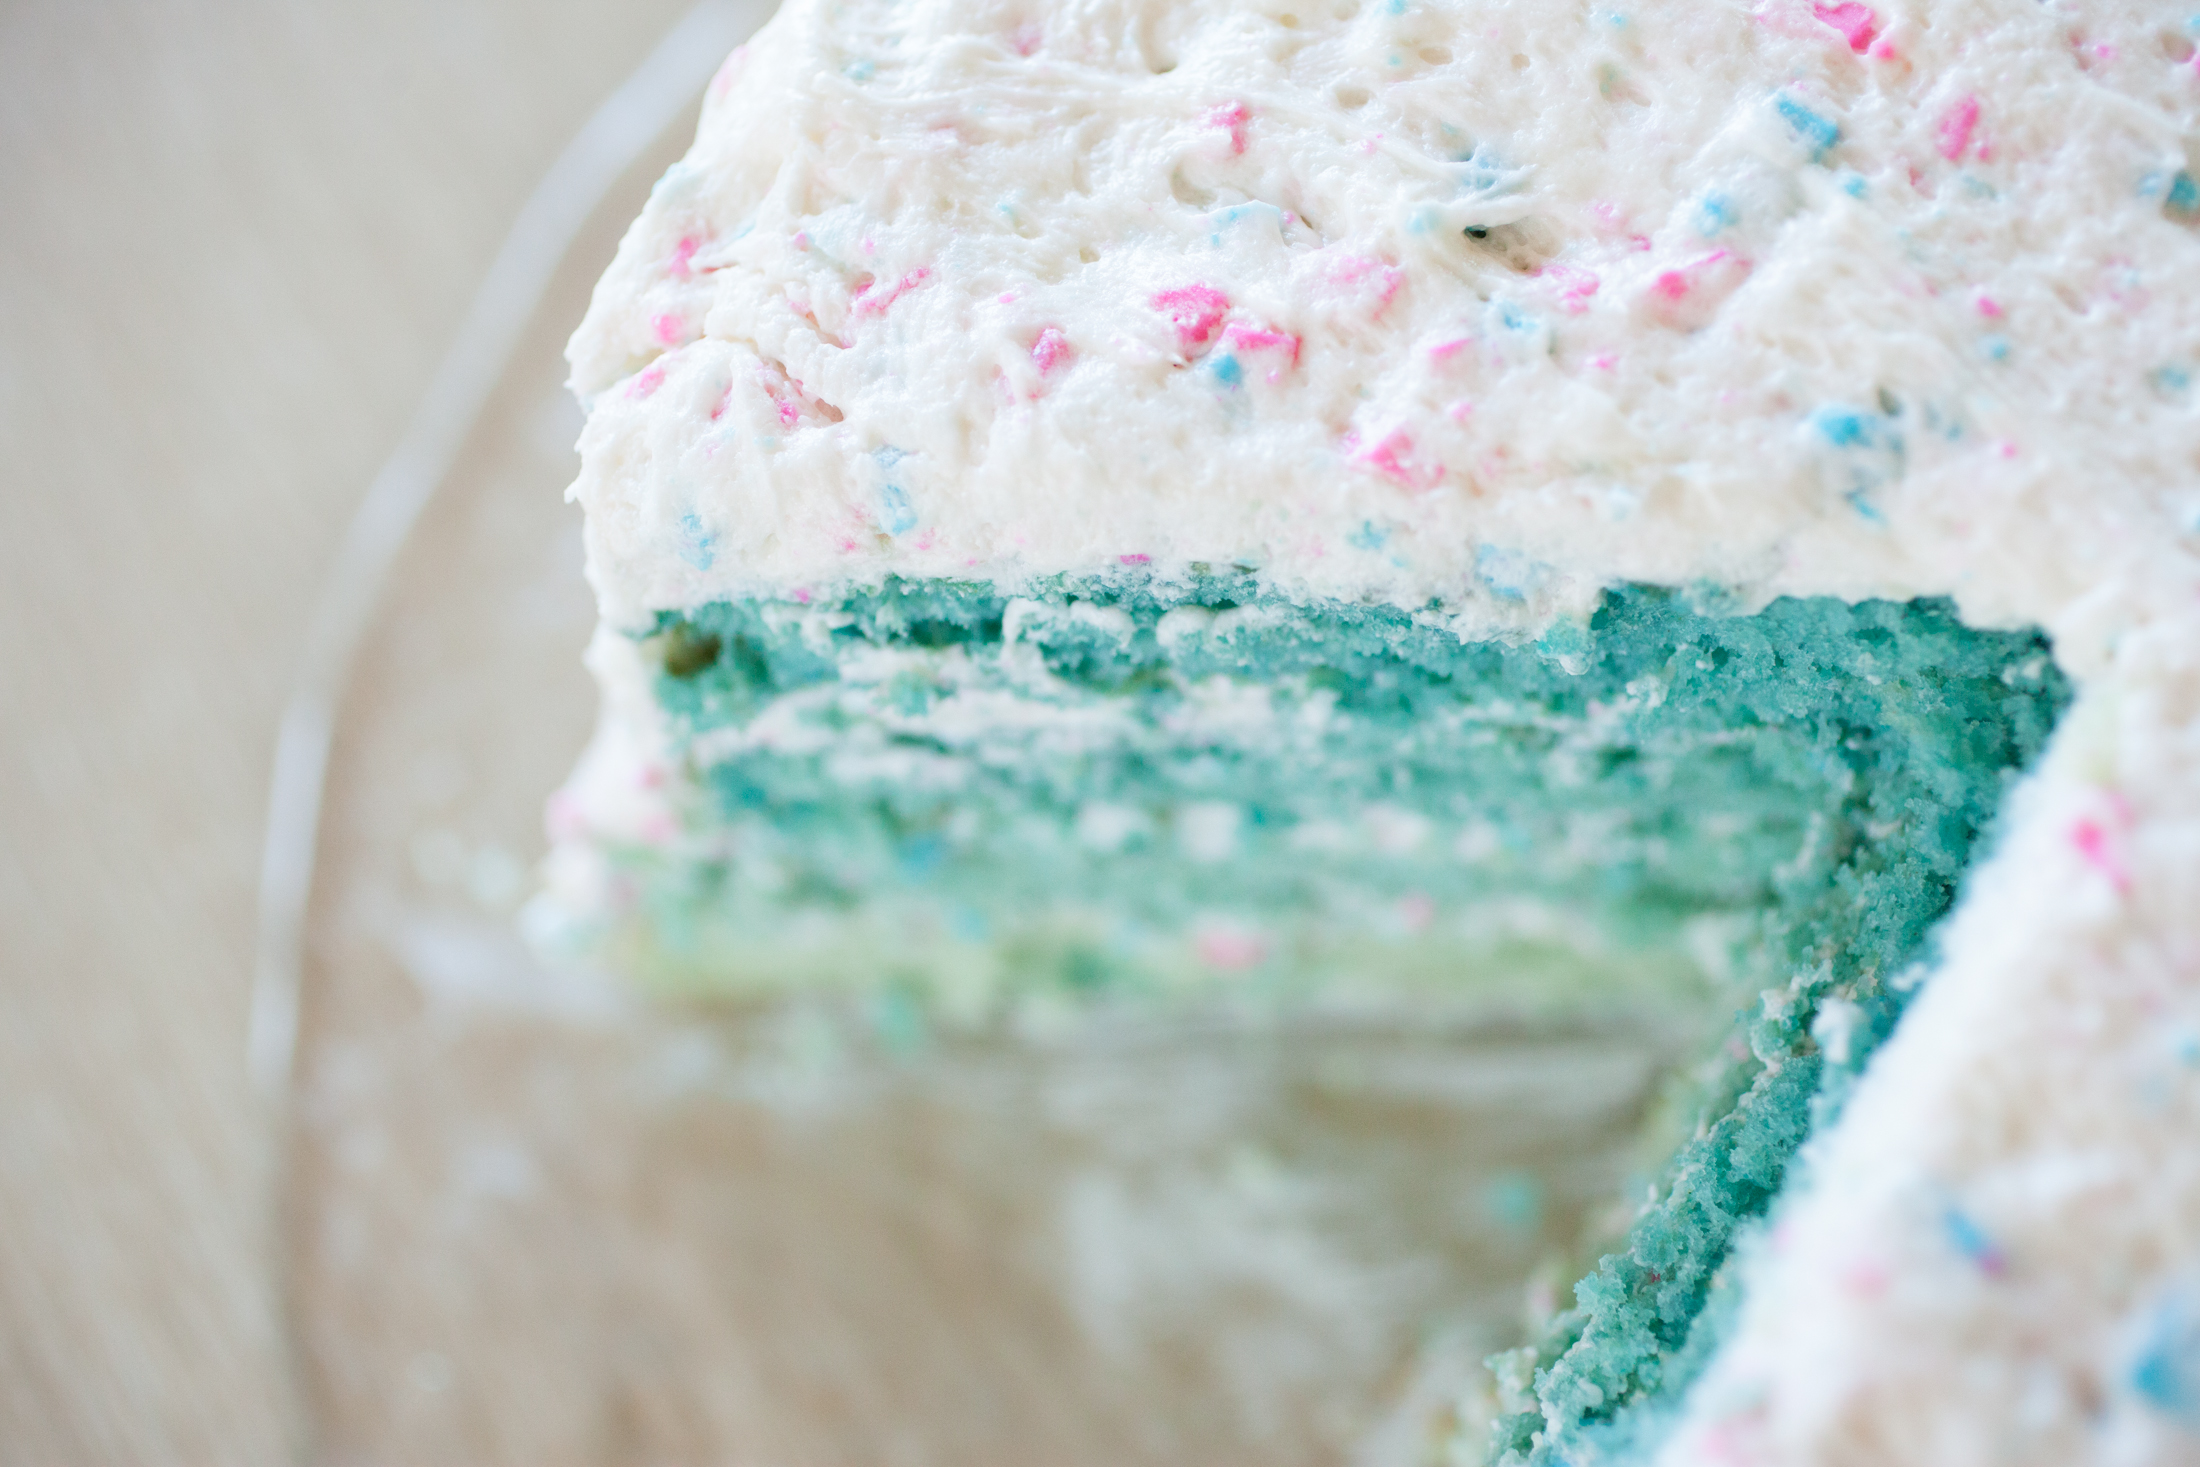
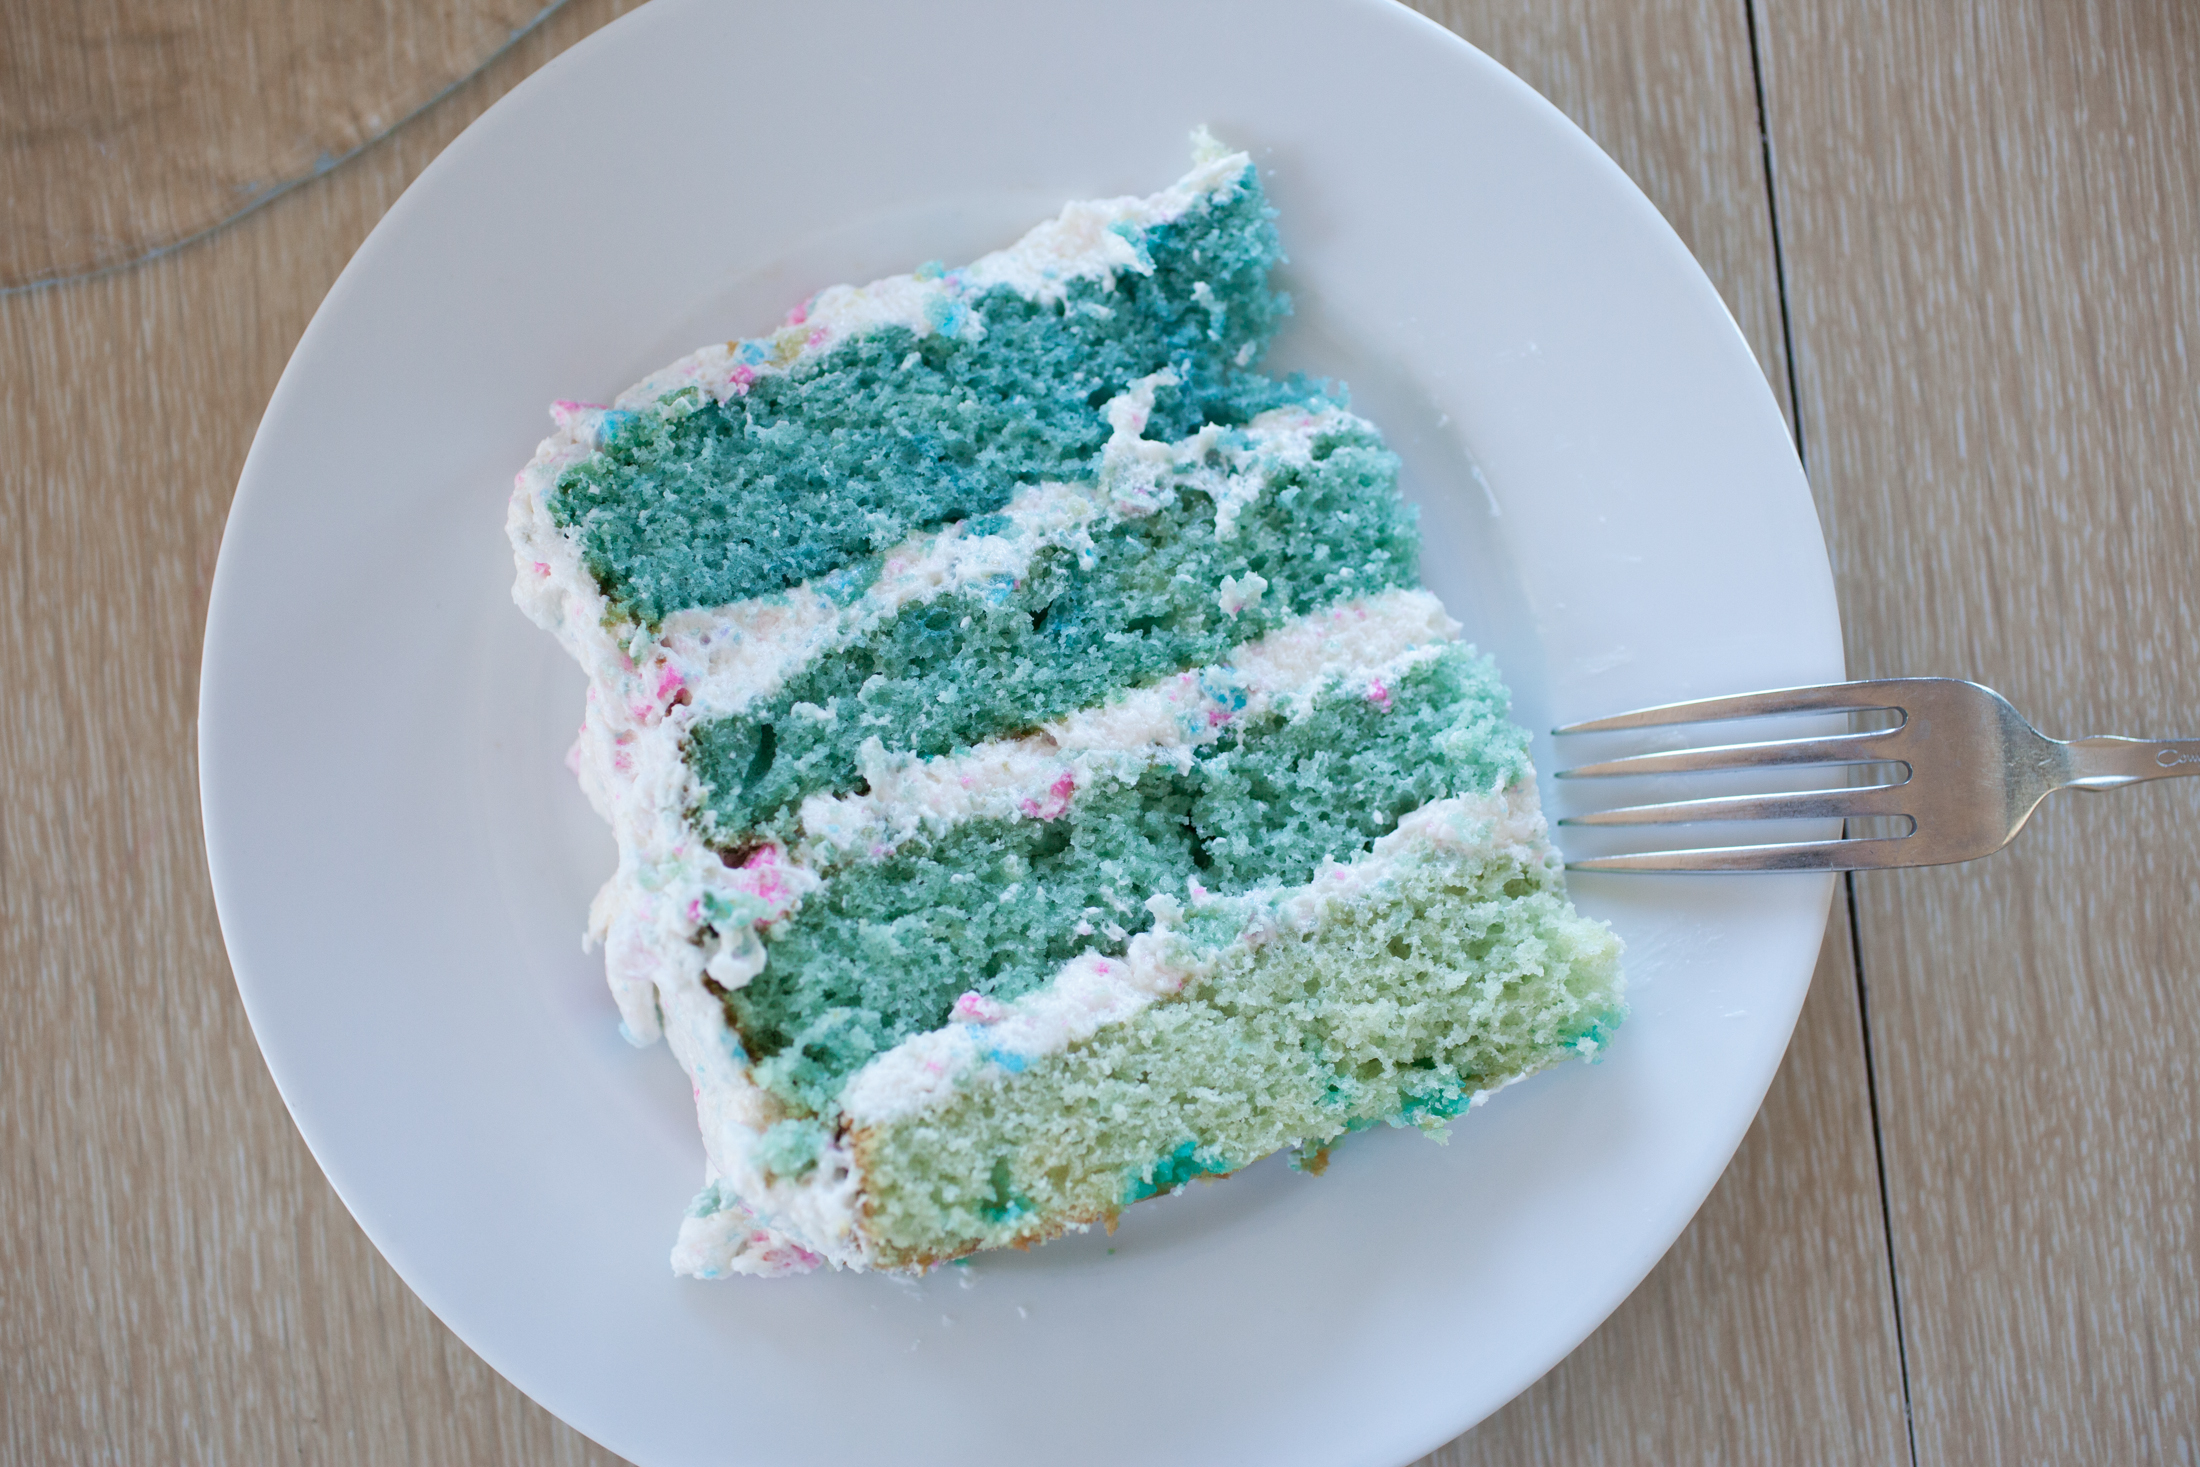
We’d decided that having some surprise for our family would be fun, so I set out to make a gender reveal cake to share the exciting news with the girls. I’d bought both pink and blue food coloring, and had all of the ingredients lined up and ready to be whipped into a “surprise, you’re going to have a brother/sister!” cake. After we came home from our appointment, Kyle took the girls off to play at the park so that I had plenty of time to cook, cool, and frost a bright blue cake… or, to be more accurate, a four layer blue ombré buttermilk and champagne cake frosted with crème fraîche frosting flecked with pink and blue chips. I got the idea of the chips from my friend Ashley, who has a brilliant version of a rainbow chip cake in her cookbook and on her blog.
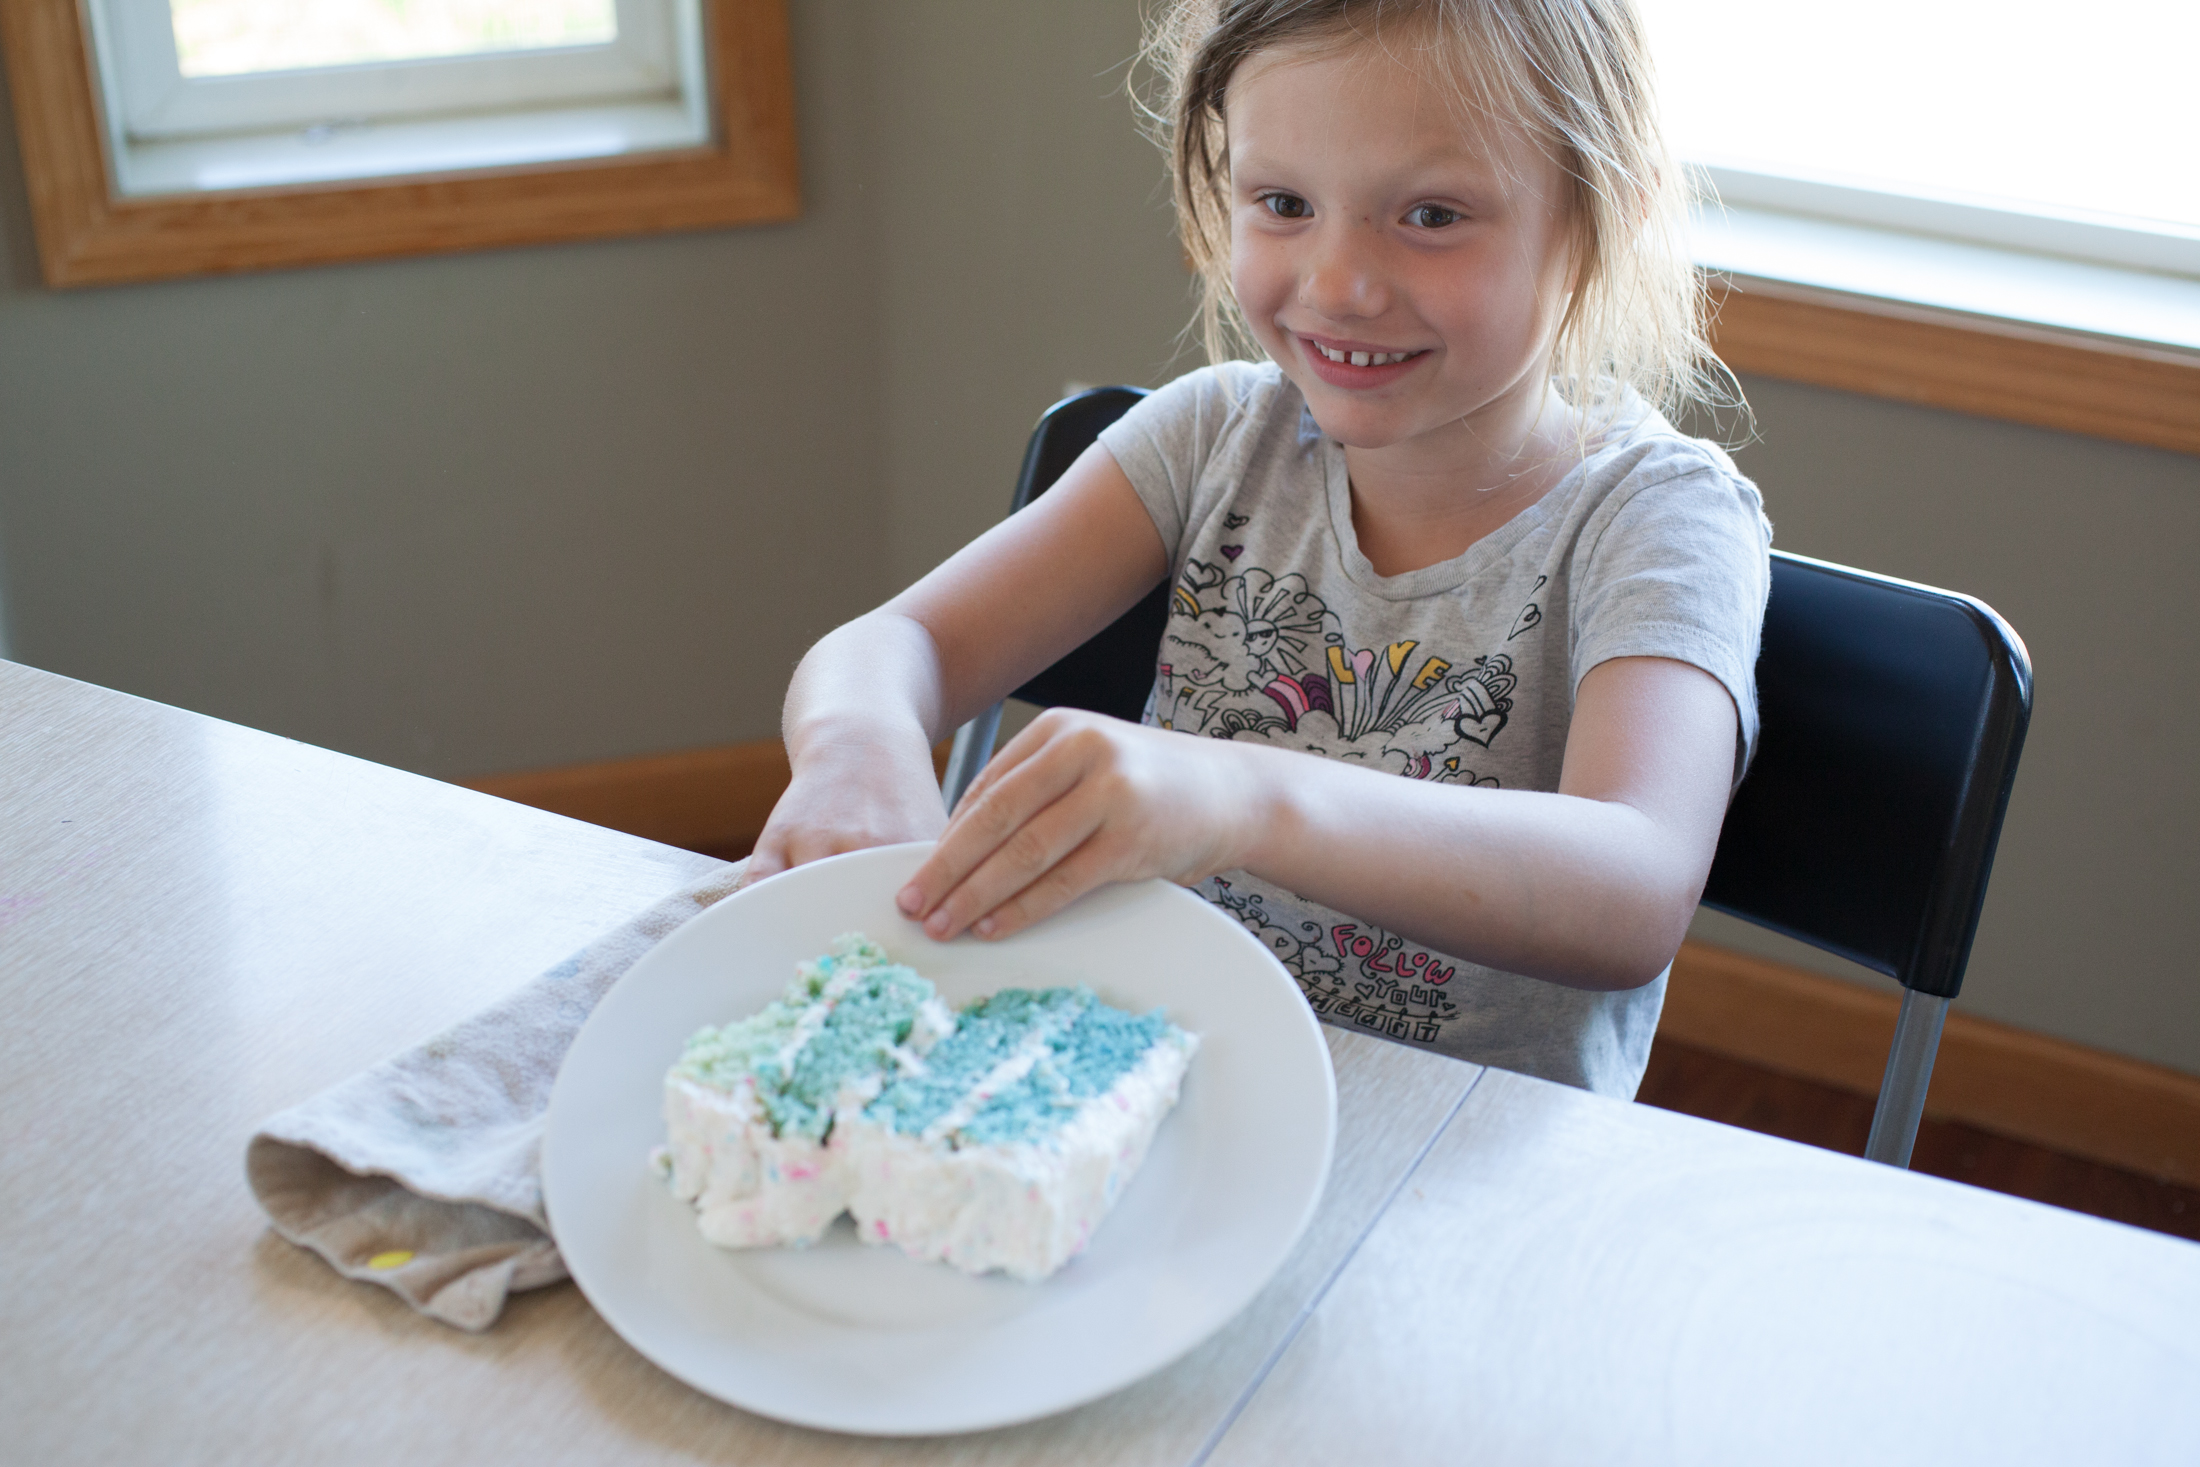
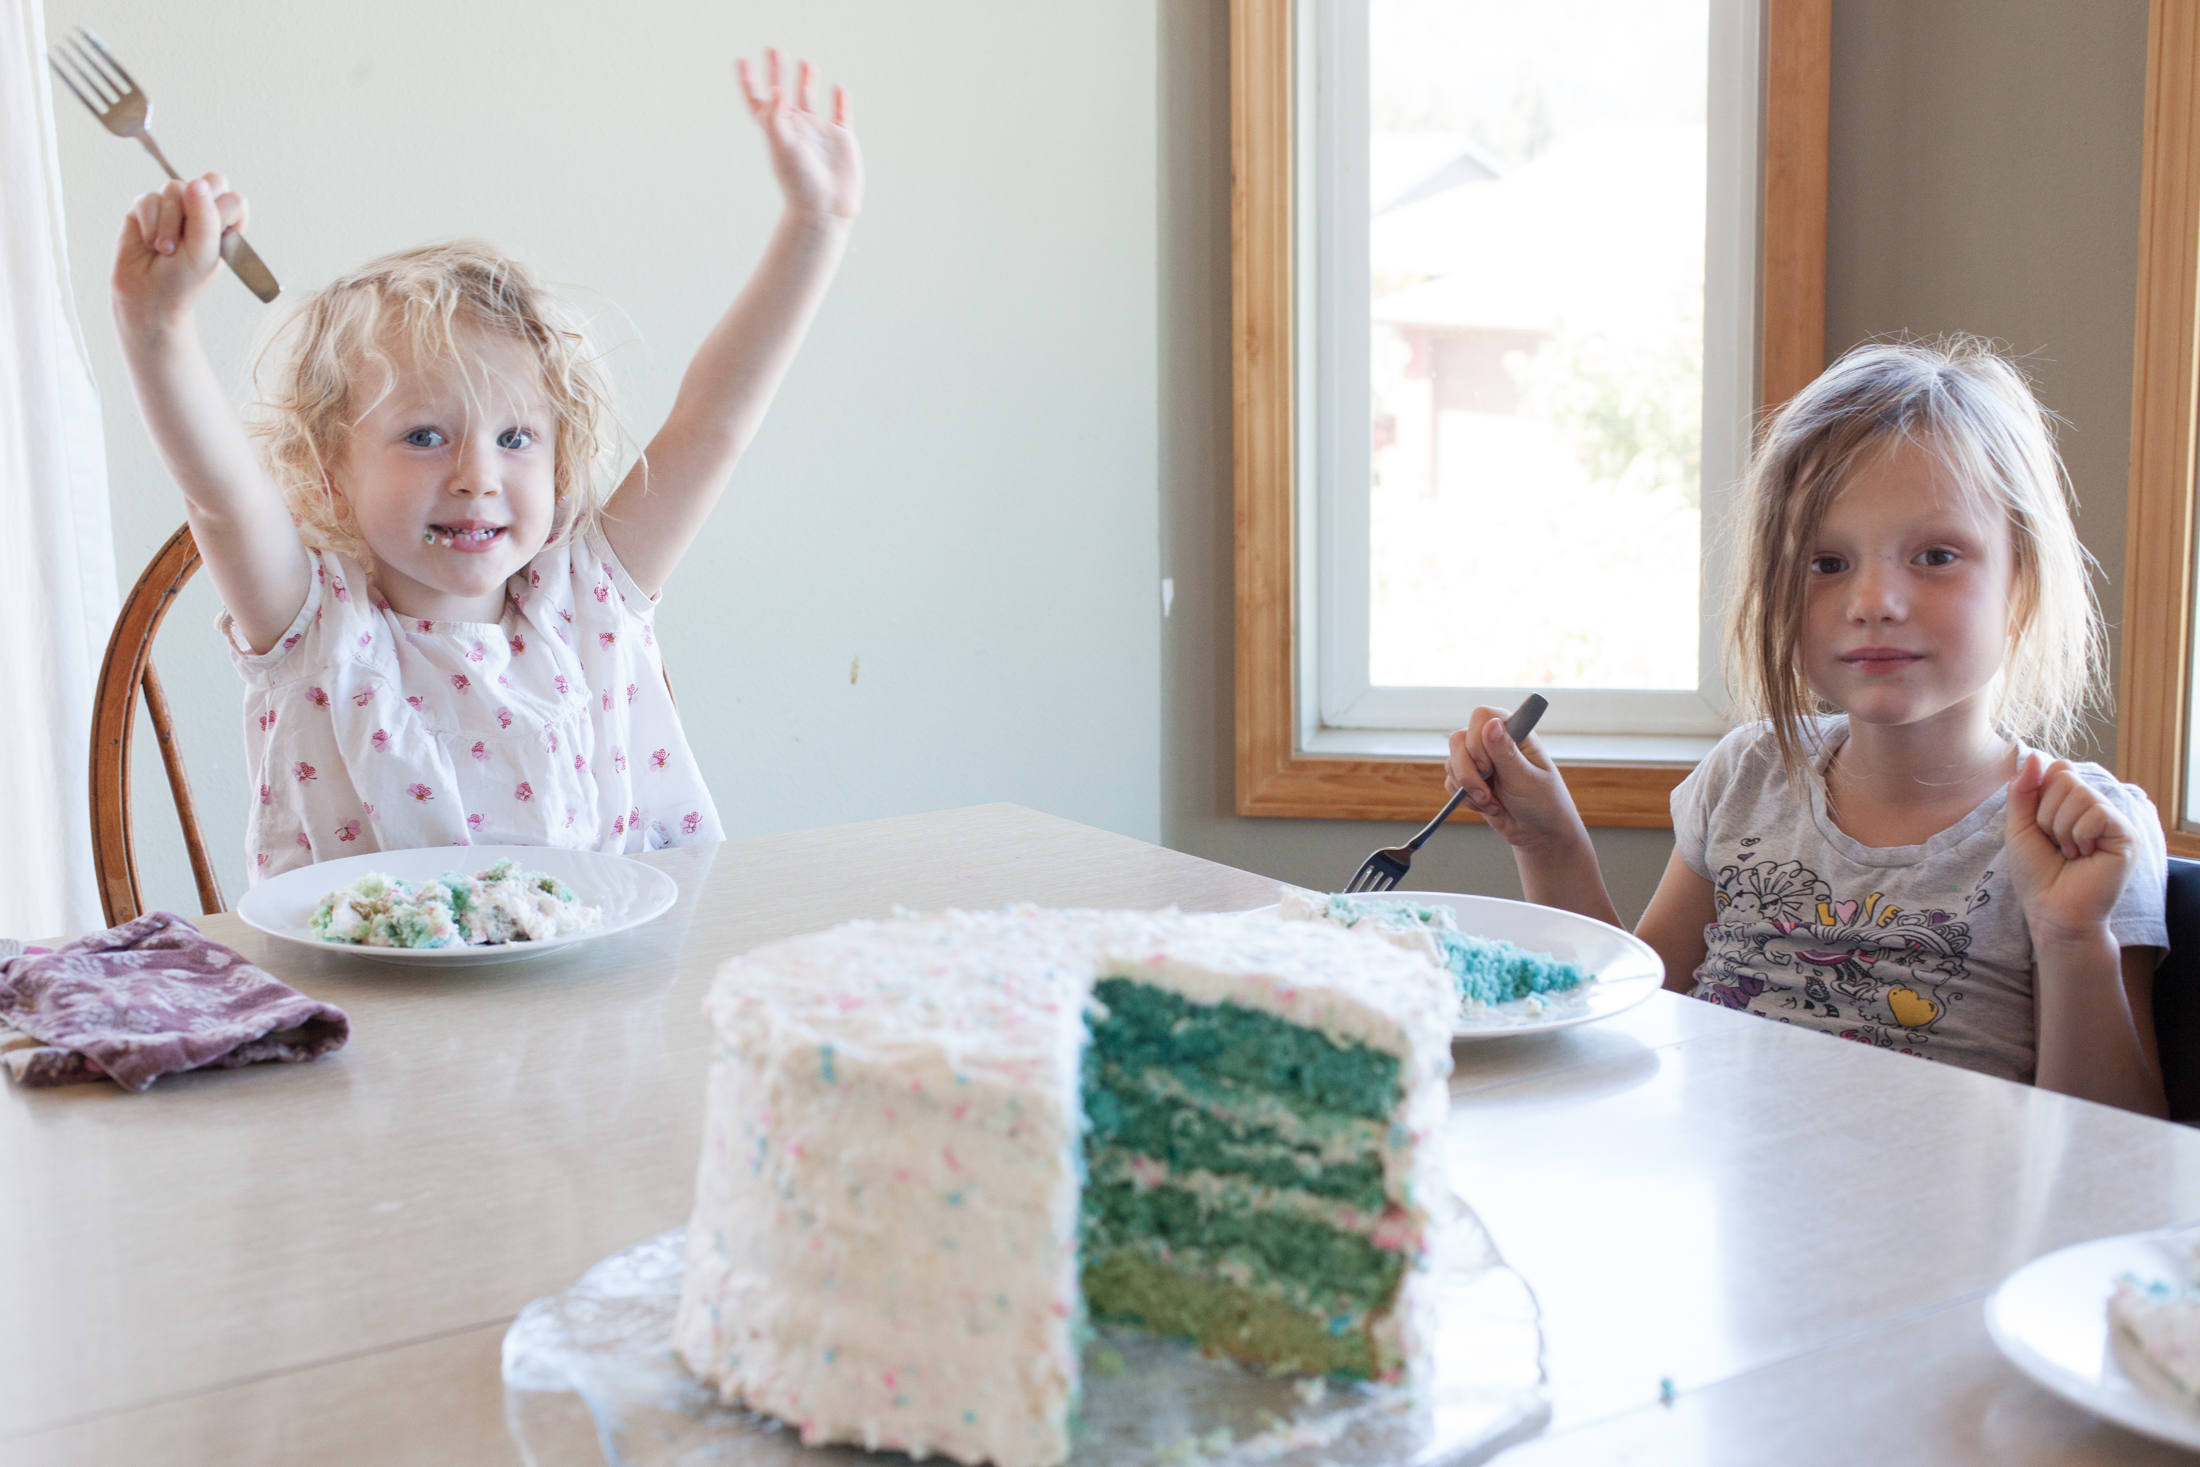
PINPINPINPINPINPINPINPINGigi had been “wishing for a brother”, while Lulu would empathically declare that it was “a girl who’s name was going to be Pippi Longstocking/Cinderella”. When Kyle and the girls returned home from the park we got right to the point, enjoying a slice of the cake for snack. Before we cut into the cake I explained, for Lulu’s sake, that the cake was either going to be PINK! or it was going to be BLUE! and what each of those colors would mean. Lulu said, “Actually, it’s going to be pink or pink.” Luckily, at the last moment, as Kyle had the knife poised to slice through the creamy frosting, into the delicate, blue layers, Lulu changed her allegiance and decided she’d like to a have a brother, too.
PINPINPINPINThe kids were ecstatic, although Lulu informed us that she was more excited about the cake than the baby (fair enough), that this baby is a boy. While there’s still a part of me that wishes I could have been surprised too, it’s been so much fun knowing that we’ll be welcoming a little boy into our family. With all the major changes going on in the months since learning I was pregnant, and that will be continuing up until he’s born, it’s actually been really nice to know the gender. Getting to surprise the girls was a wonderful way to celebrate, and I’ll take any excuse to bake a cake.
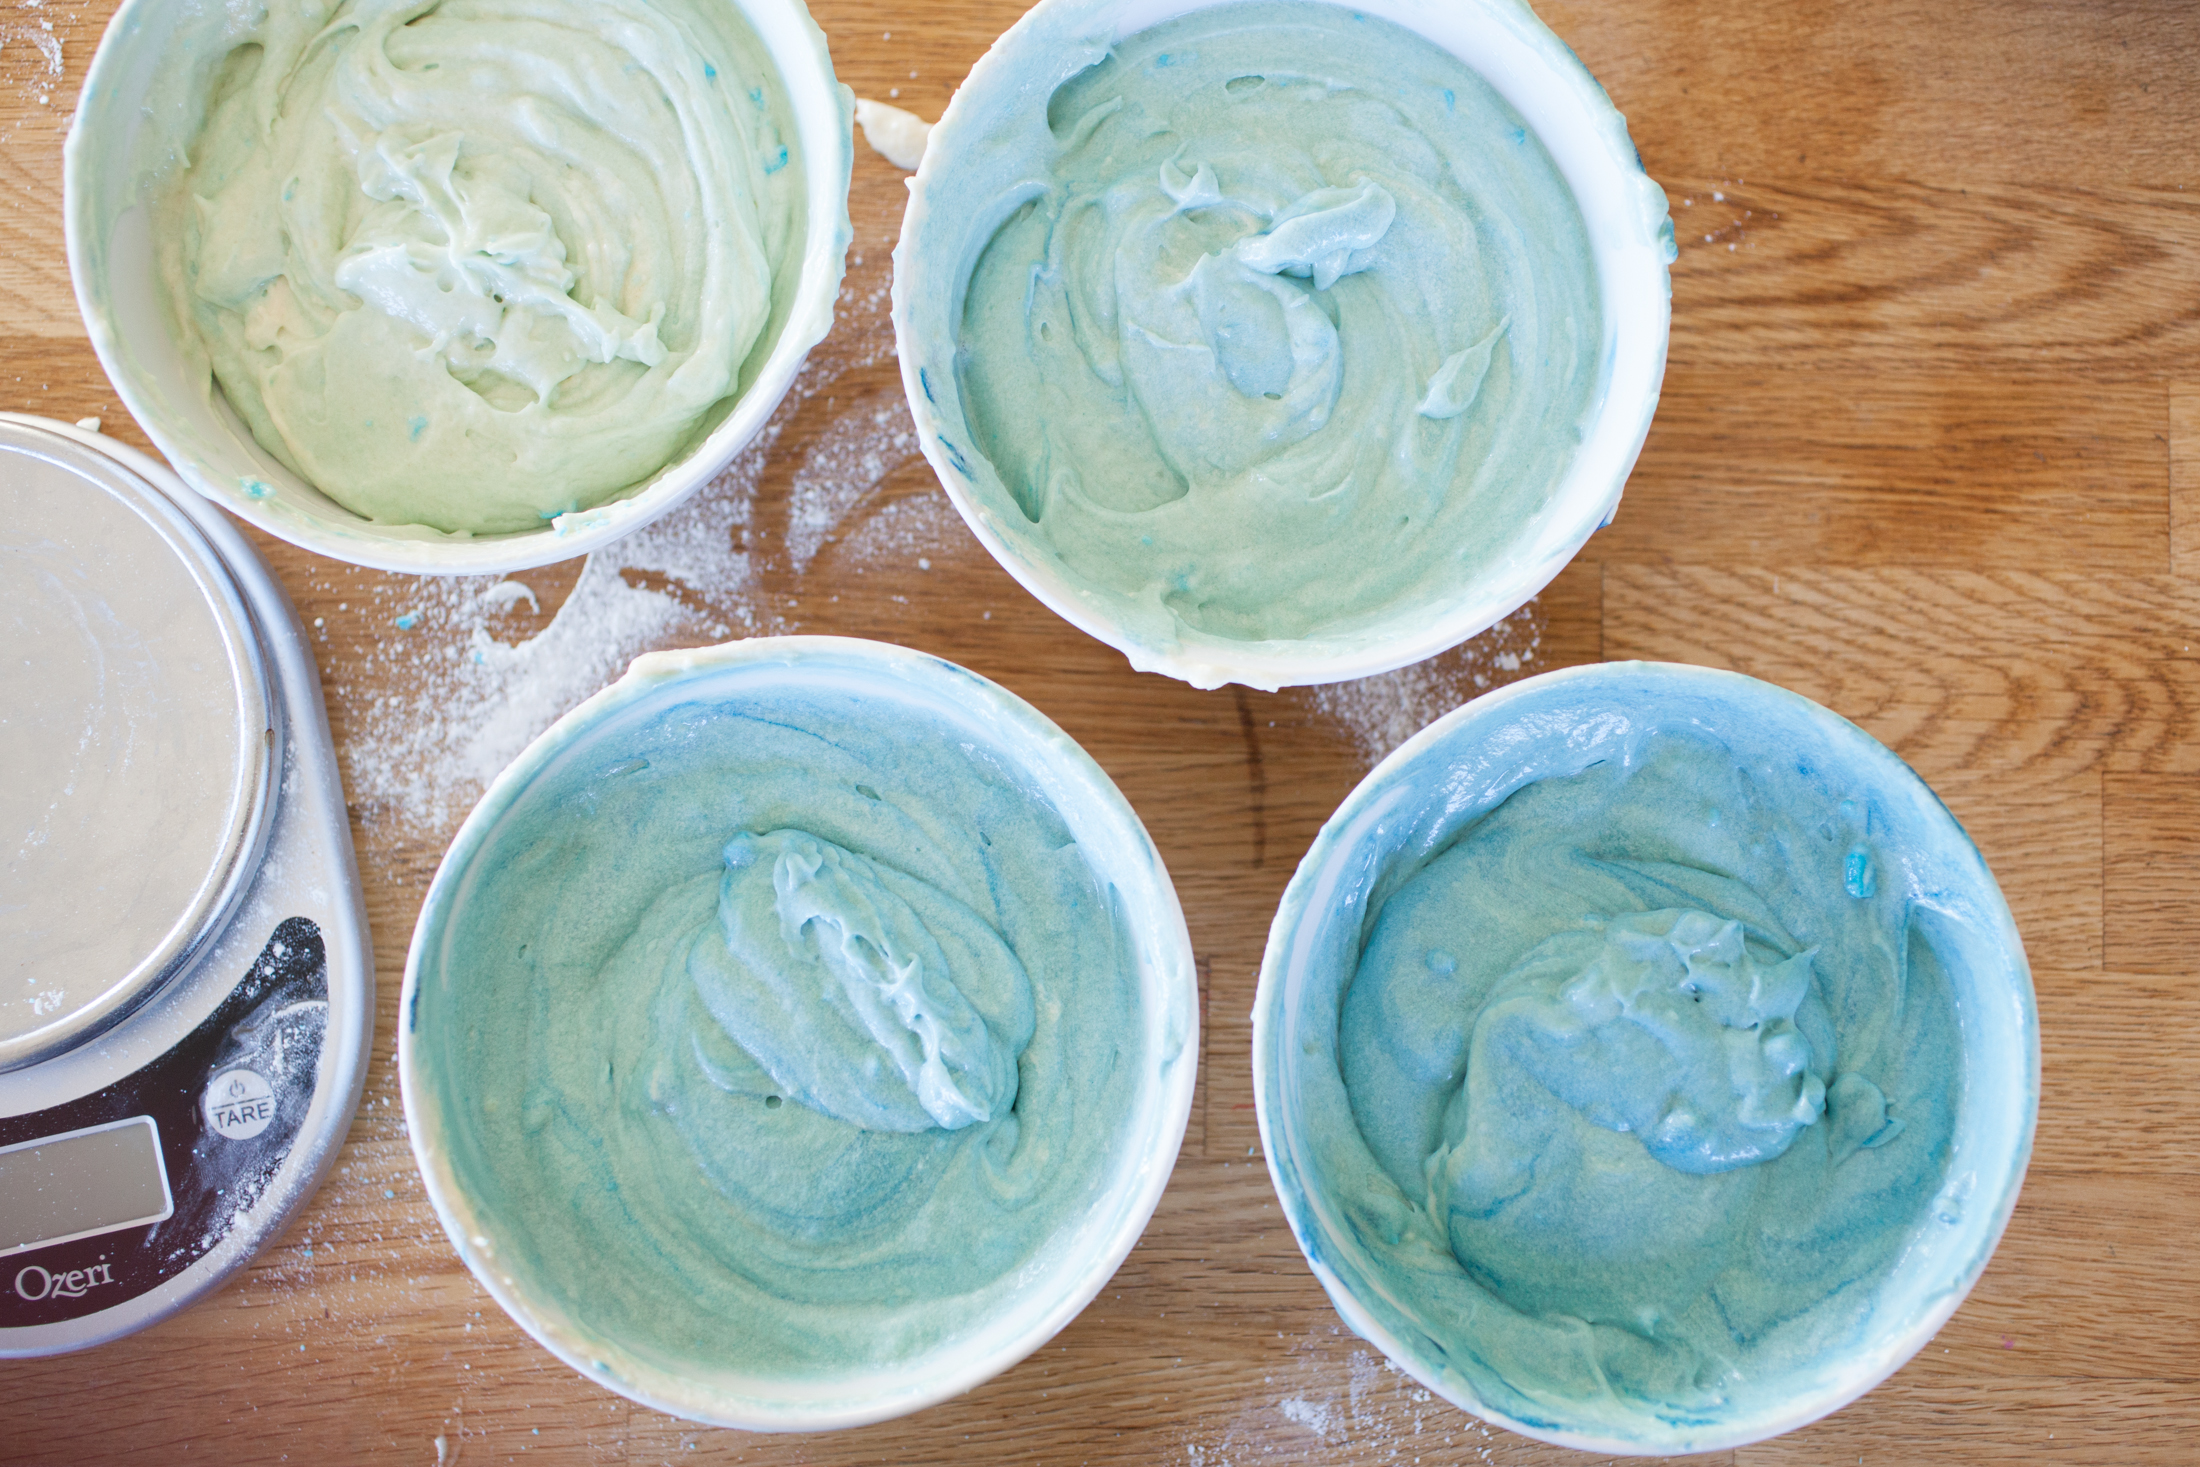
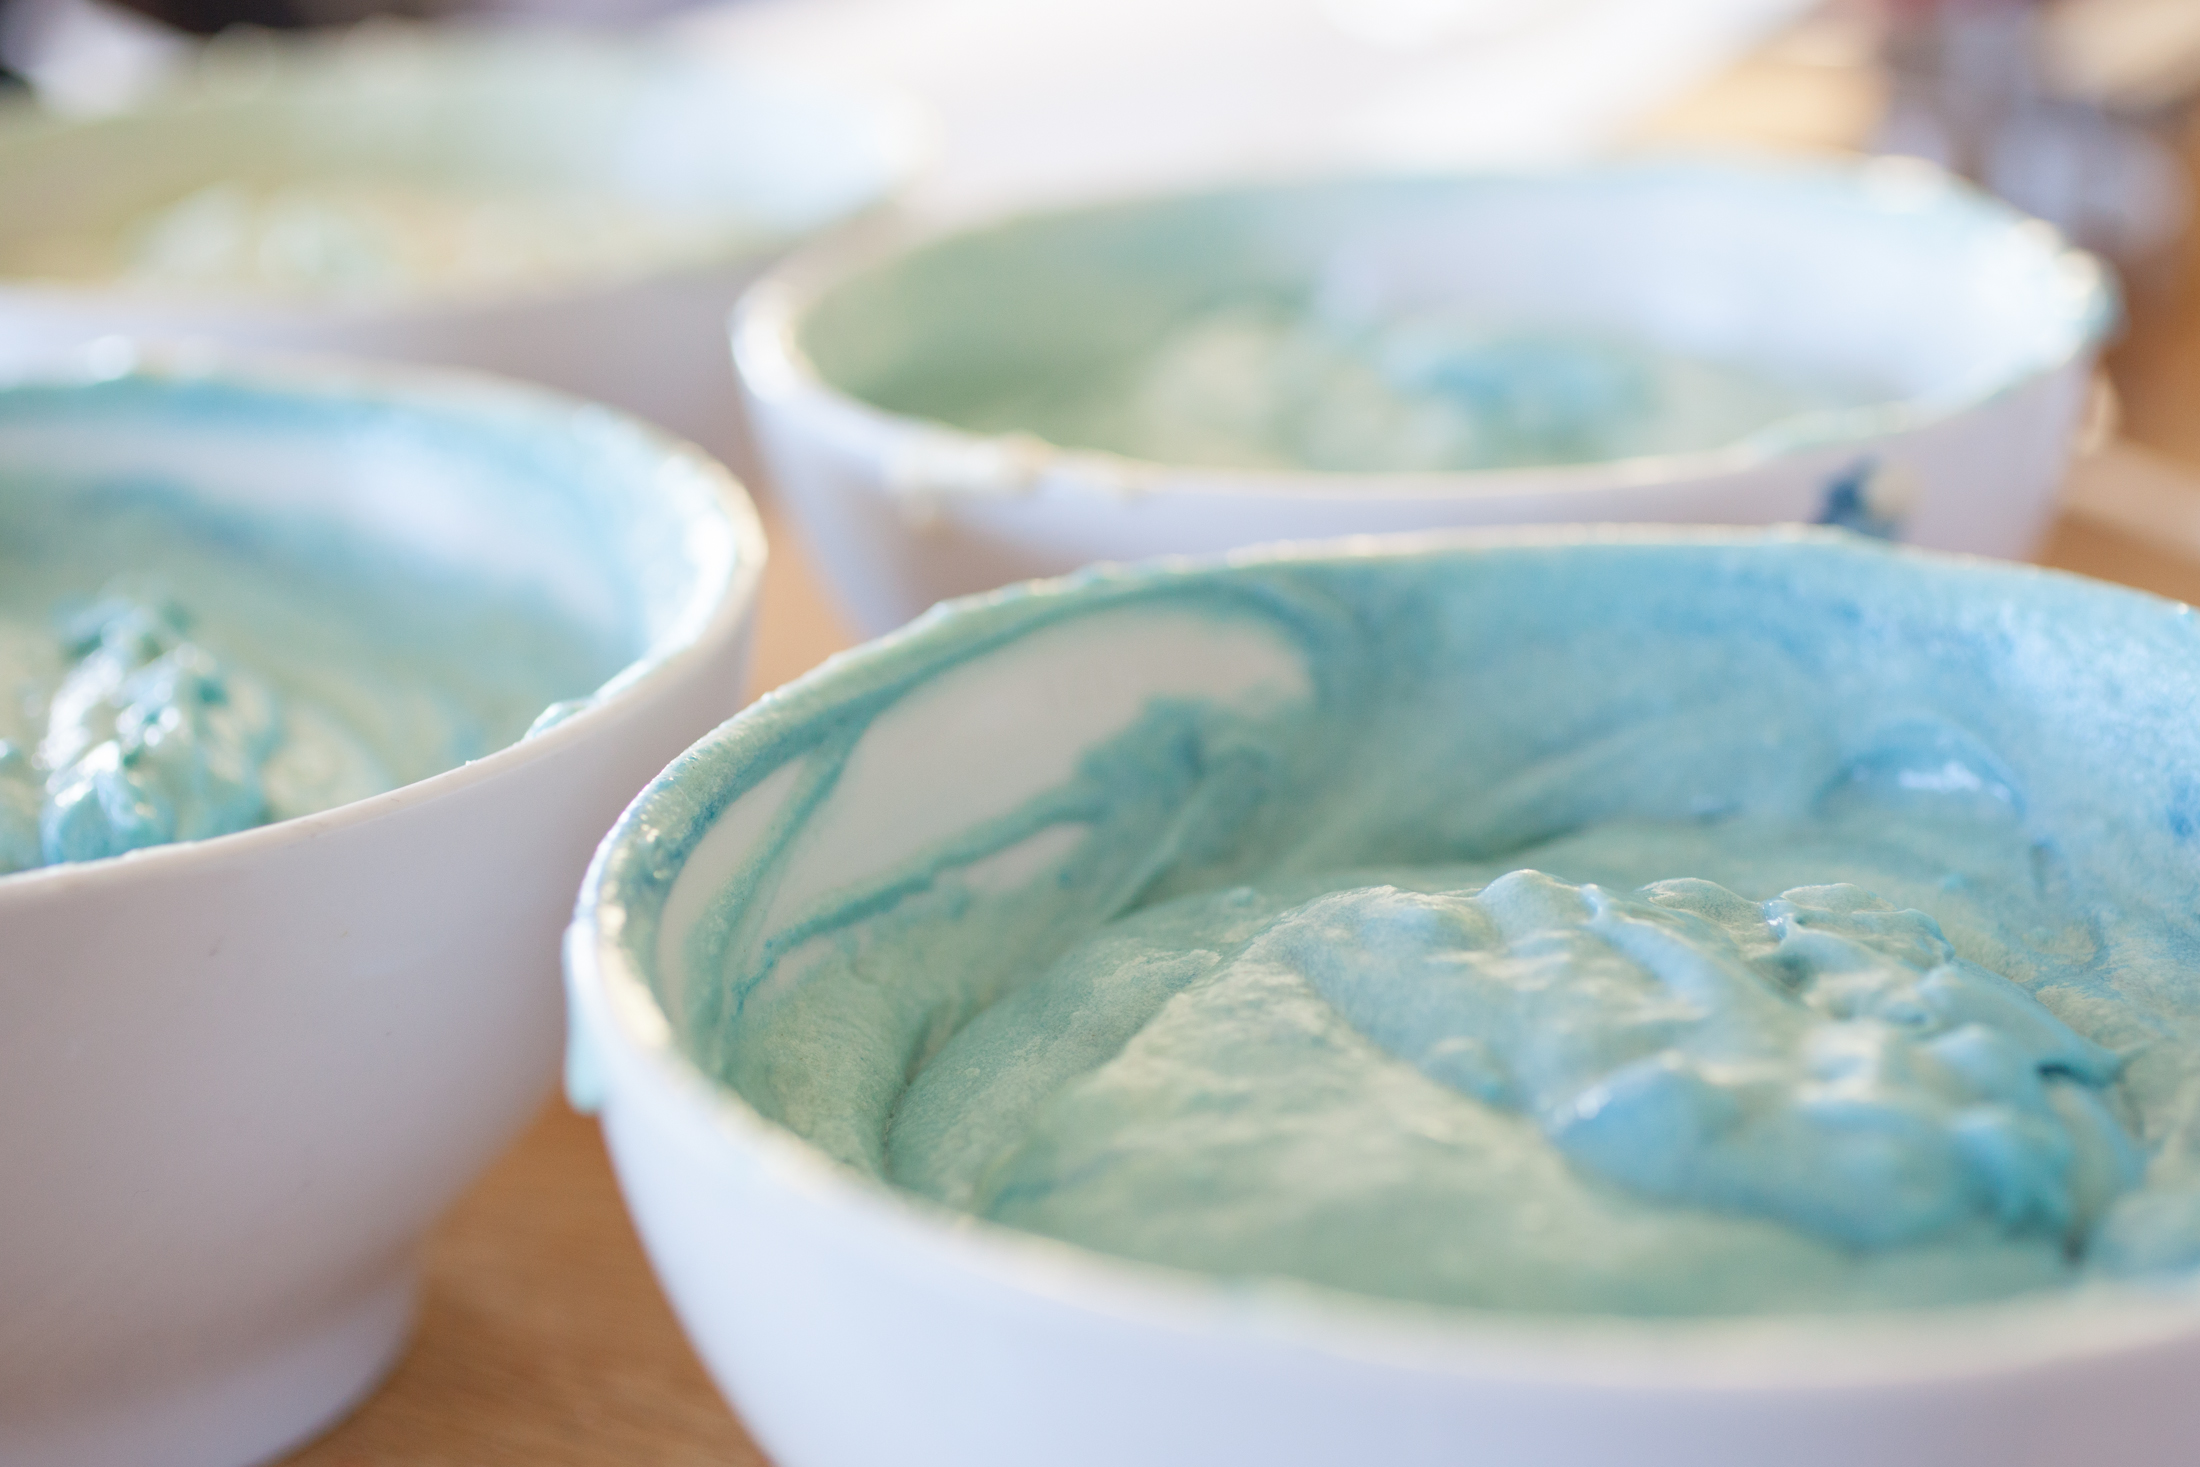
PINPINThis particular cake has four layers each increasing slightly in color, so the bottom layer is pale blue, and the top is a dark, bright blue, and the layers are flecked with blue white chocolate chips. The cake batter is made with buttermilk, and spiked with champagne to make it really celebratory, as well as making the cake itself light and delicate. The alcohol from the champagne is cooked out, leaving behind a wonderful wine-y flavor that is perfect for an expecting mom to enjoy.
PINThe cakes are frosted with a sweet, tart, creamy frosting that borders on rich buttercream, but is slightly lightened by the addition of crème fraîche. The frosting is also studded with colored chips. You could substitute the crème fraîche for room temperature cream cheese (8oz. should do it) if you don’t feel like making crème fraîche, can’t find it, or would simply prefer a slightly more traditional frosting. The frosting with it’s bright chips and playfulness, is the perfect compliment to a rather sophisticated cake. It’s enough to feed several friends and family members, so if you’re planning any sort of gender reveal celebration, it would be plenty of cake to share with a room full of people squealing, “IT’S A _____!!!!!”.
A quick note on the food coloring. The amount of coloring that you use will depend on a number of factors: the brand, the type (liquid vs. gel), and the depth of color you’d like. Gel coloring goes a long way and is much richer, but requires some forethought to get a hold of. I used Wilton brand blue and magenta gel coloring for this cake – which I found at Safeway, but there are loads of different brands, higher quality kinds, and hundreds of great colors available online.
OMBRE GENDER REVEAL CAKE
Cake Ingredients.
pink (or magenta) food coloring or coloring gel OR blue food coloring or coloring gel
1 1/2 cups (3 sticks) unsalted butter, at room temperature (plus more for greasing the cake pans)
2 1/2 cups granulated sugar
3 large eggs, at room temperature
2 teaspoons pure vanilla extract
1 3/4 cups cake flour
1 3/4 cups all-purpose flour
1 tablespoon baking powder
1 teaspoon baking soda
1 1/2 teaspoon fine sea salt
1 cup Champagne or sparkling wine
1 cup buttermilk
4 oz pink OR blue chips
canola or vegetable oil spray
Frosting Ingredients.
1 cup crème fraîche (or you could substitute with 8oz of room temperature cream cheese), at room temperature
1 1/2 cups (3 sticks) unsalted butter, at room temperature
7 cups powdered sugar
2 teaspoons pure vanilla extract
4 oz pink chips
4 oz blue chips
Pink and Blue Chips Ingredients.
12 oz white chocolate chips
pink (or magenta) food coloring or coloring gel
blue food coloring or coloring gel
Pink and Blue Chip Directions.
Lay out a large sheet of parchment paper.
Split the white chocolate chips into two glass microwave safe bowls. One bowl will have 8 oz of chips, the other will have 4 oz. You’ll color the 8 oz pink if you’re having a girl, blue if it’s a boy – and the 4 oz will be colored for the gender you’re NOT having. You’ll need to work quickly once the chocolate is melted because it will start to set right away.
Start with the bowl filled with the 8 oz of white chocolate chips. Microwave in 5-10 second spurts, stirring the chocolate after each spurt in the microwave until it’s just melted – being careful not to overheat it. Quickly stir in the desired amount of food coloring (matching the gender of your baby) until thoroughly combined, and spread out the melted, colored chocolate into a thin layer on the parchment paper and allow it to cool.
Next melt the 4 oz of white chocolate chips following the same method, but this batch will be the opposite color (the color matching the gender that you’re NOT having). Spread out the melted, colored chocolate into a thin layer on the parchment paper and allow it to cool.
Once the chocolate has cooled and set, chop it up into small chip-size pieces, keeping the colors separated. Set aside 4 oz from the 8 oz batch, these will be folded into the cake batter. Combine the remaining 4oz of pink and 4 oz of blue, tossing to mix. Set aside.
Cake Directions.
Prepare two 9” round cake pans by greasing them with butter and lining the bottoms with parchment paper. Lightly flour the sides of the pans after the parchment is pressed into place. Preheat the oven to 350oF.
Sift together the flour, cake flour, baking powder, baking soda, and salt into a bowl. Set aside.
In a stand mixer with the paddle attachment cream together the sugar and the butter until the mixture is pale in color, and fluffy in texture.
With the mixer running on low, add the eggs, one a time, allowing each to fully mix in before adding the next. Scrape down the sides if needed.
Add the vanilla.
Add 1 cup of the dry ingredients, allow to combine.
Add the buttermilk, allow to combine.
Add another cup of the dry ingredients, allow to combine. Add the Champagne, allow to combine.
Finally, add the remainder of the dry ingredients, allow to combine, being careful not to over-mix.
Use a kitchen scale (or measuring cup) measure out four equal parts of the batter, dividing the batter into four bowls. Color each bowl in increasing shades of blue, starting with the palest one and working your way up in saturation.
Pour two of the batters into the two prepared cake pans. Smooth the batter evenly in the pan. Place the pans in the oven on the middle rack and bake, rotating them 180o once halfway through baking, for 20-25 minutes. They’re done when the center is set, and a skewer inserted into the center comes out clean except for a couple crumbs.
Transfer the cake pans to cooling racks and allow to cool for 10-15 minutes. Line two cooling racks with parchment paper, and lightly spray the paper with canola or vegetable oil, before carefully inverting the cakes onto the cooling racks. I place the greased parchment and cooling rack on top of the cake pan before flipping the whole lot over to release the cake from the pan.
Re-grease and line the pans before filling with the remaining two batters, baking, and cooling the final cake layers as directed above.
Allow to cakes to cool completely before assembling your cake. While the cakes are cooling, prepare your frosting.
Frosting Directions.
In a stand mixer combine the butter and crème fraîche, churning them together to combine as much as possible, slowly increasing the speed to avoid splattering. The nature of the crème fraîche won’t allow them to thoroughly combine, but once the powdered sugar is added it will come together. Turn the mixer off, add in all of the powdered sugar, and slowly increase the speed until the frosting is a light, pale white, and is fluffy and airy. Reduce the speed to low, add the vanilla, and the combined pink and blue chips. Mix until thoroughly combined.
Assembling Directions.
Line your platter with four sections of parchment leaving a space the middle for the cake to go. Place a small dollop of frosting in the center of the platter to hold the cake in place. Place the first (lightest) layer of cake down in the center of the platter. Using an offset spatula, place about half a cup of the frosting in the center of the cake, slowly spreading outward towards the edges. Remove excess frosting, ensuring that it’s level, before adding the second (slightly darker) layer of cake.
Repeat the frosting and layering method until you get to the top (darkest) layer. Place this final layer on upside down so you have a nice, flat surface on the top of your cake. Place lots of frosting on top of the cake, spreading out with the offset spatula and over the edges, down the sides, to completely frost the cake. Take a moment to ensure that
every bit is covered so as not to spoil the surprise color inside! Carefully remove the four sections of parchment from the platter.
Enjoy the cake with loved ones!
PRINTABLE RECIPE.
Save
Save
Yesterday was a long day, and I ate garlic bread for dinner. The girls had a bath at 4pm, and oatmeal with blueberries for dinner. They’re now cuddled up on the couch watching a movie that I hope will carry us right up to the cusp of bedtime. Yesterday was challenging, today was easy… so it goes with parenting… so it seems to go with life. We are chipping away towards our new adventure. I know I’m being coy about where and when we’re moving but mostly that’s because I don’t want to say anything until it feels more real. If that makes sense. But what I can tell you is that part of our new adventure will include a new family member. We are expecting our third babe this winter and we’re so, so happy.
PINMenu planning has been a little interesting lately since my brain doesn’t seem to be working properly (for obvious reasons) and all my beautiful cookbooks are temporarily residing with my sister. I called my sister up for advice about planning a simple menu since I tend to make my menu based on my mood, and our current living situation doesn’t make that a very reasonable option. My sister wisely recommended that I make one menu plan for one full week, and then just repeat it for the next few weeks.
The creative cook in me cringed mildly at this idea, but my frayed nerves cheered at the opportunity to cross something significant off my daily to do list. I immediately texted a few of my closest friends to ask them, “What are your easy, go-to dinners?” I got great suggestions and pulled together a simple menu that included things like soba noodle salad with fried tofu, teriyaki chicken with jasmine rice and a side of quick pickled cucumbers, and, of course, breakfast for dinner. When I laid out my breakfast for dinner plans I didn’t exactly mean that I would be making the kids oatmeal at 4:30pm, but that was just what the day, and especially the afternoon, called for.
Keeping the menu prepped, the freezer and pantry stocked for the exact meals on that menu, has freed me up to spend my days making fun desserts which have been making me, and the kids, pretty pleased. This new baby is all about desserts, and gummy bears. I made a super simple, but pretty decadent version of bananas foster (minus the booze), and we made a delicious Blackberry and Blueberry Pie after a couple of days of berry picking with my Mom in town.
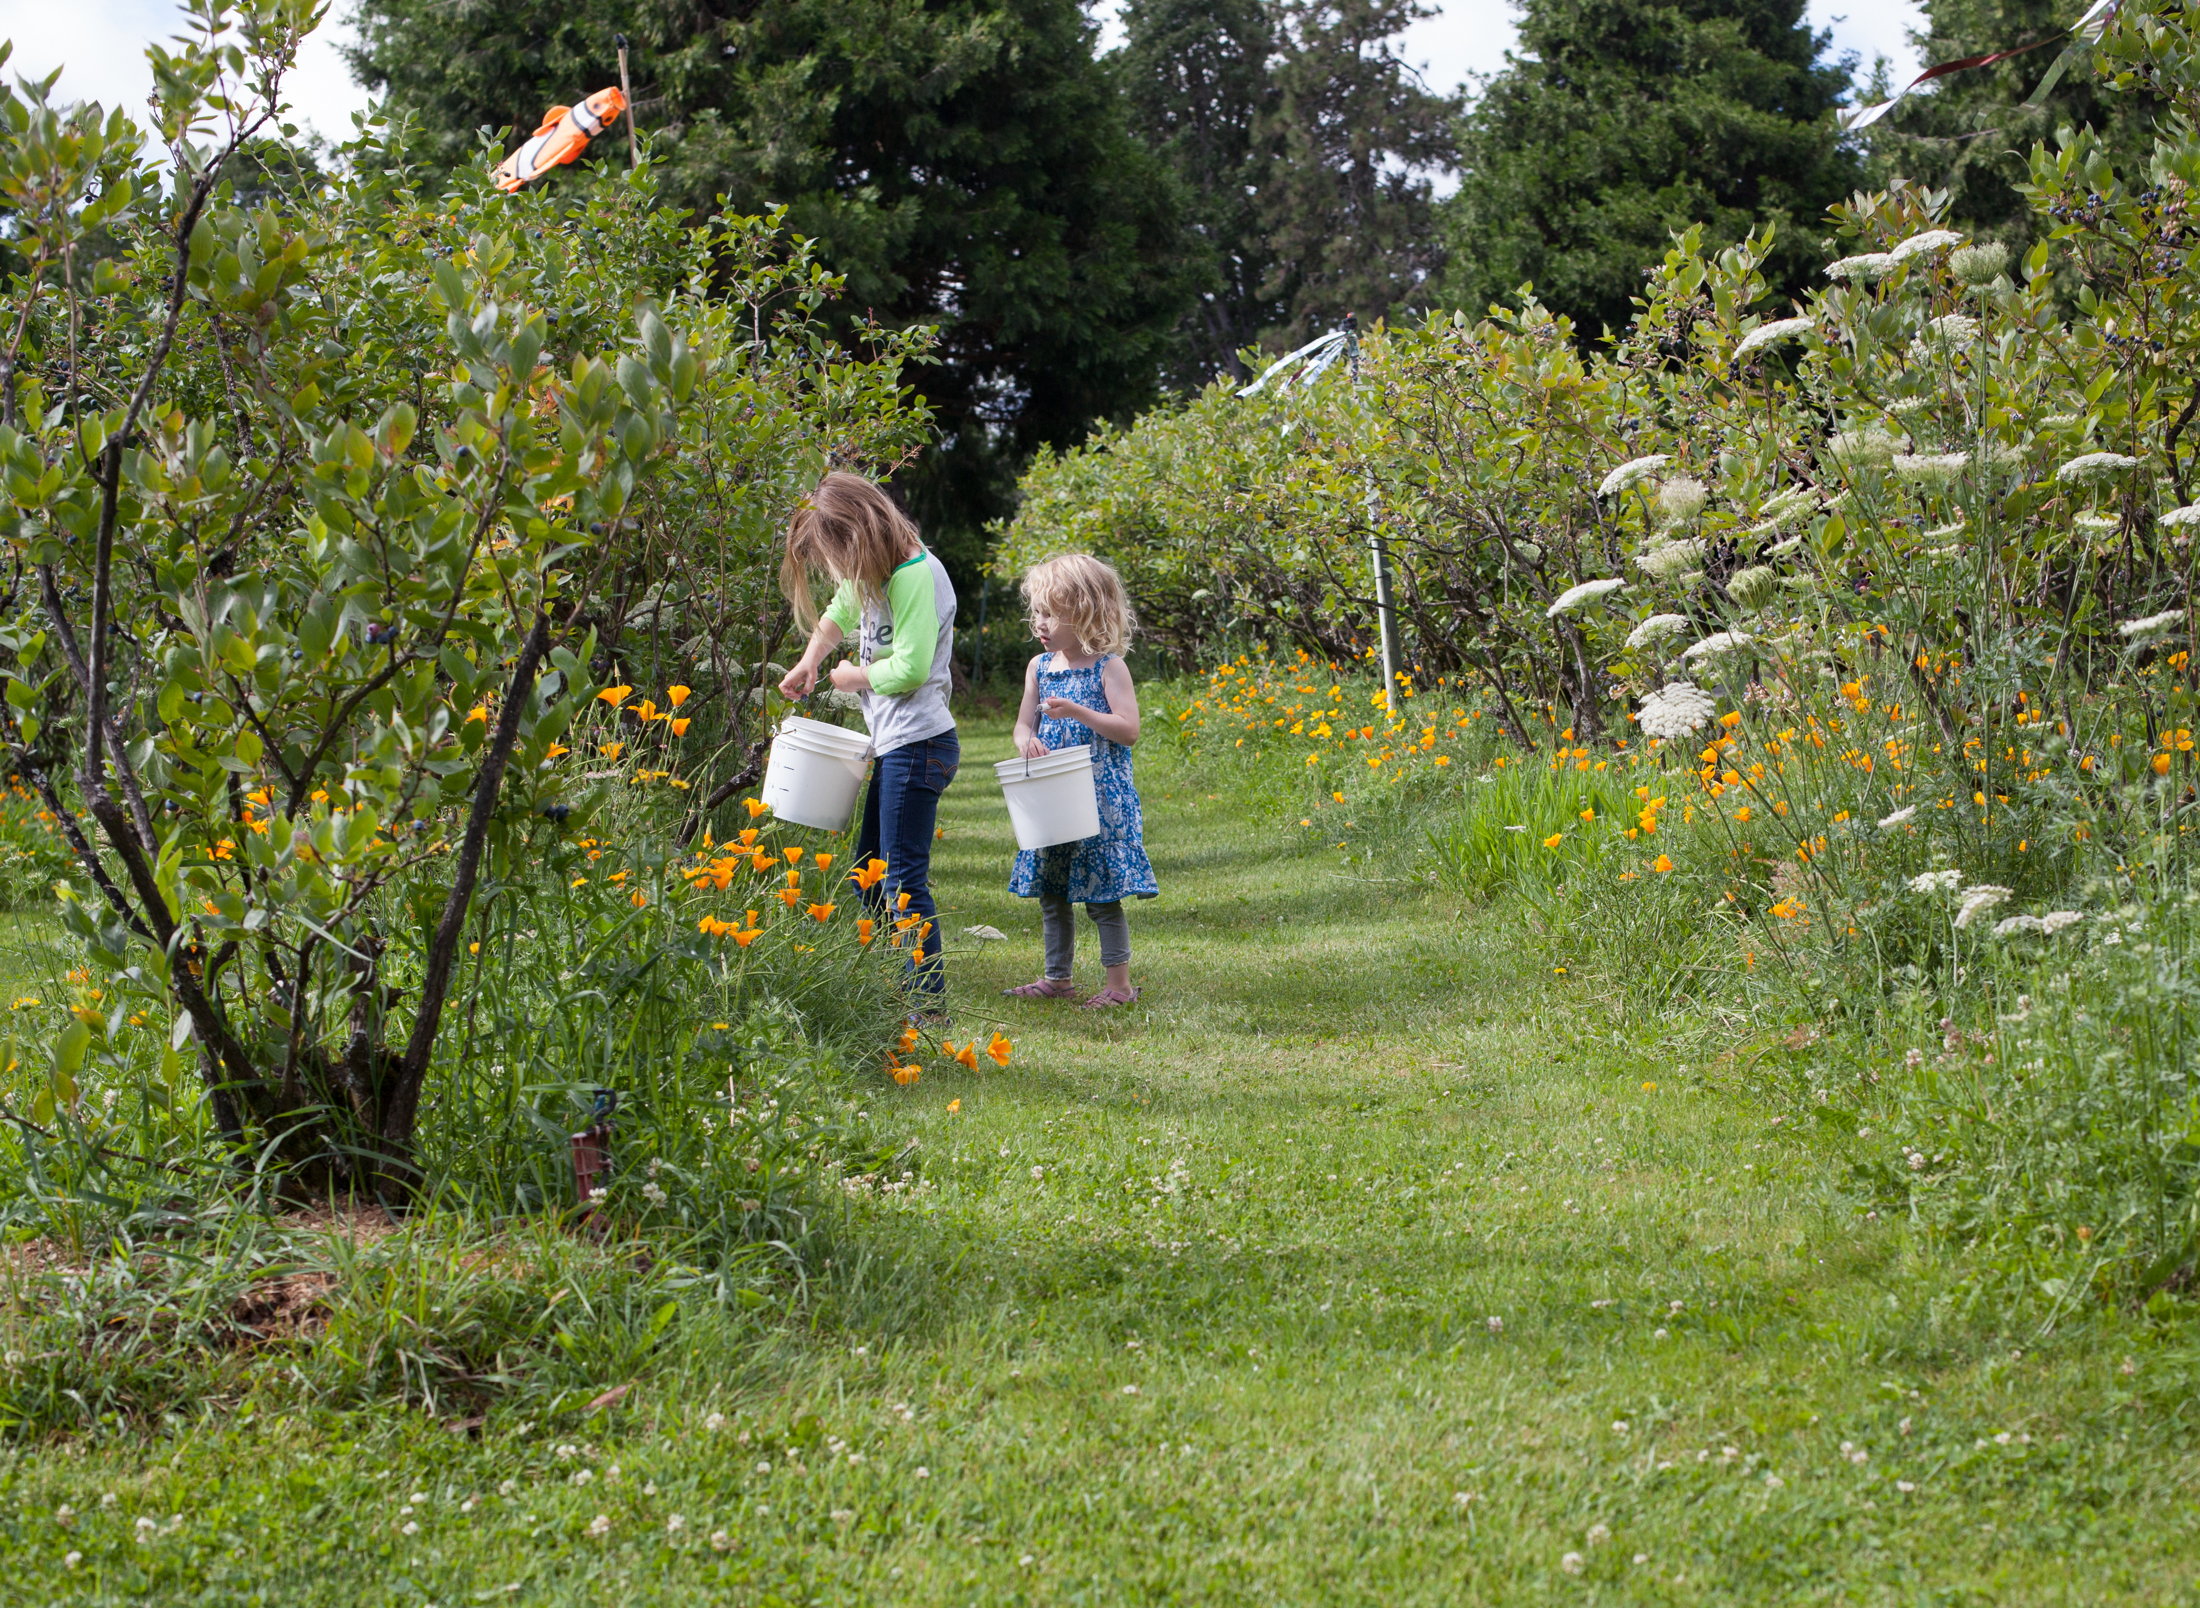
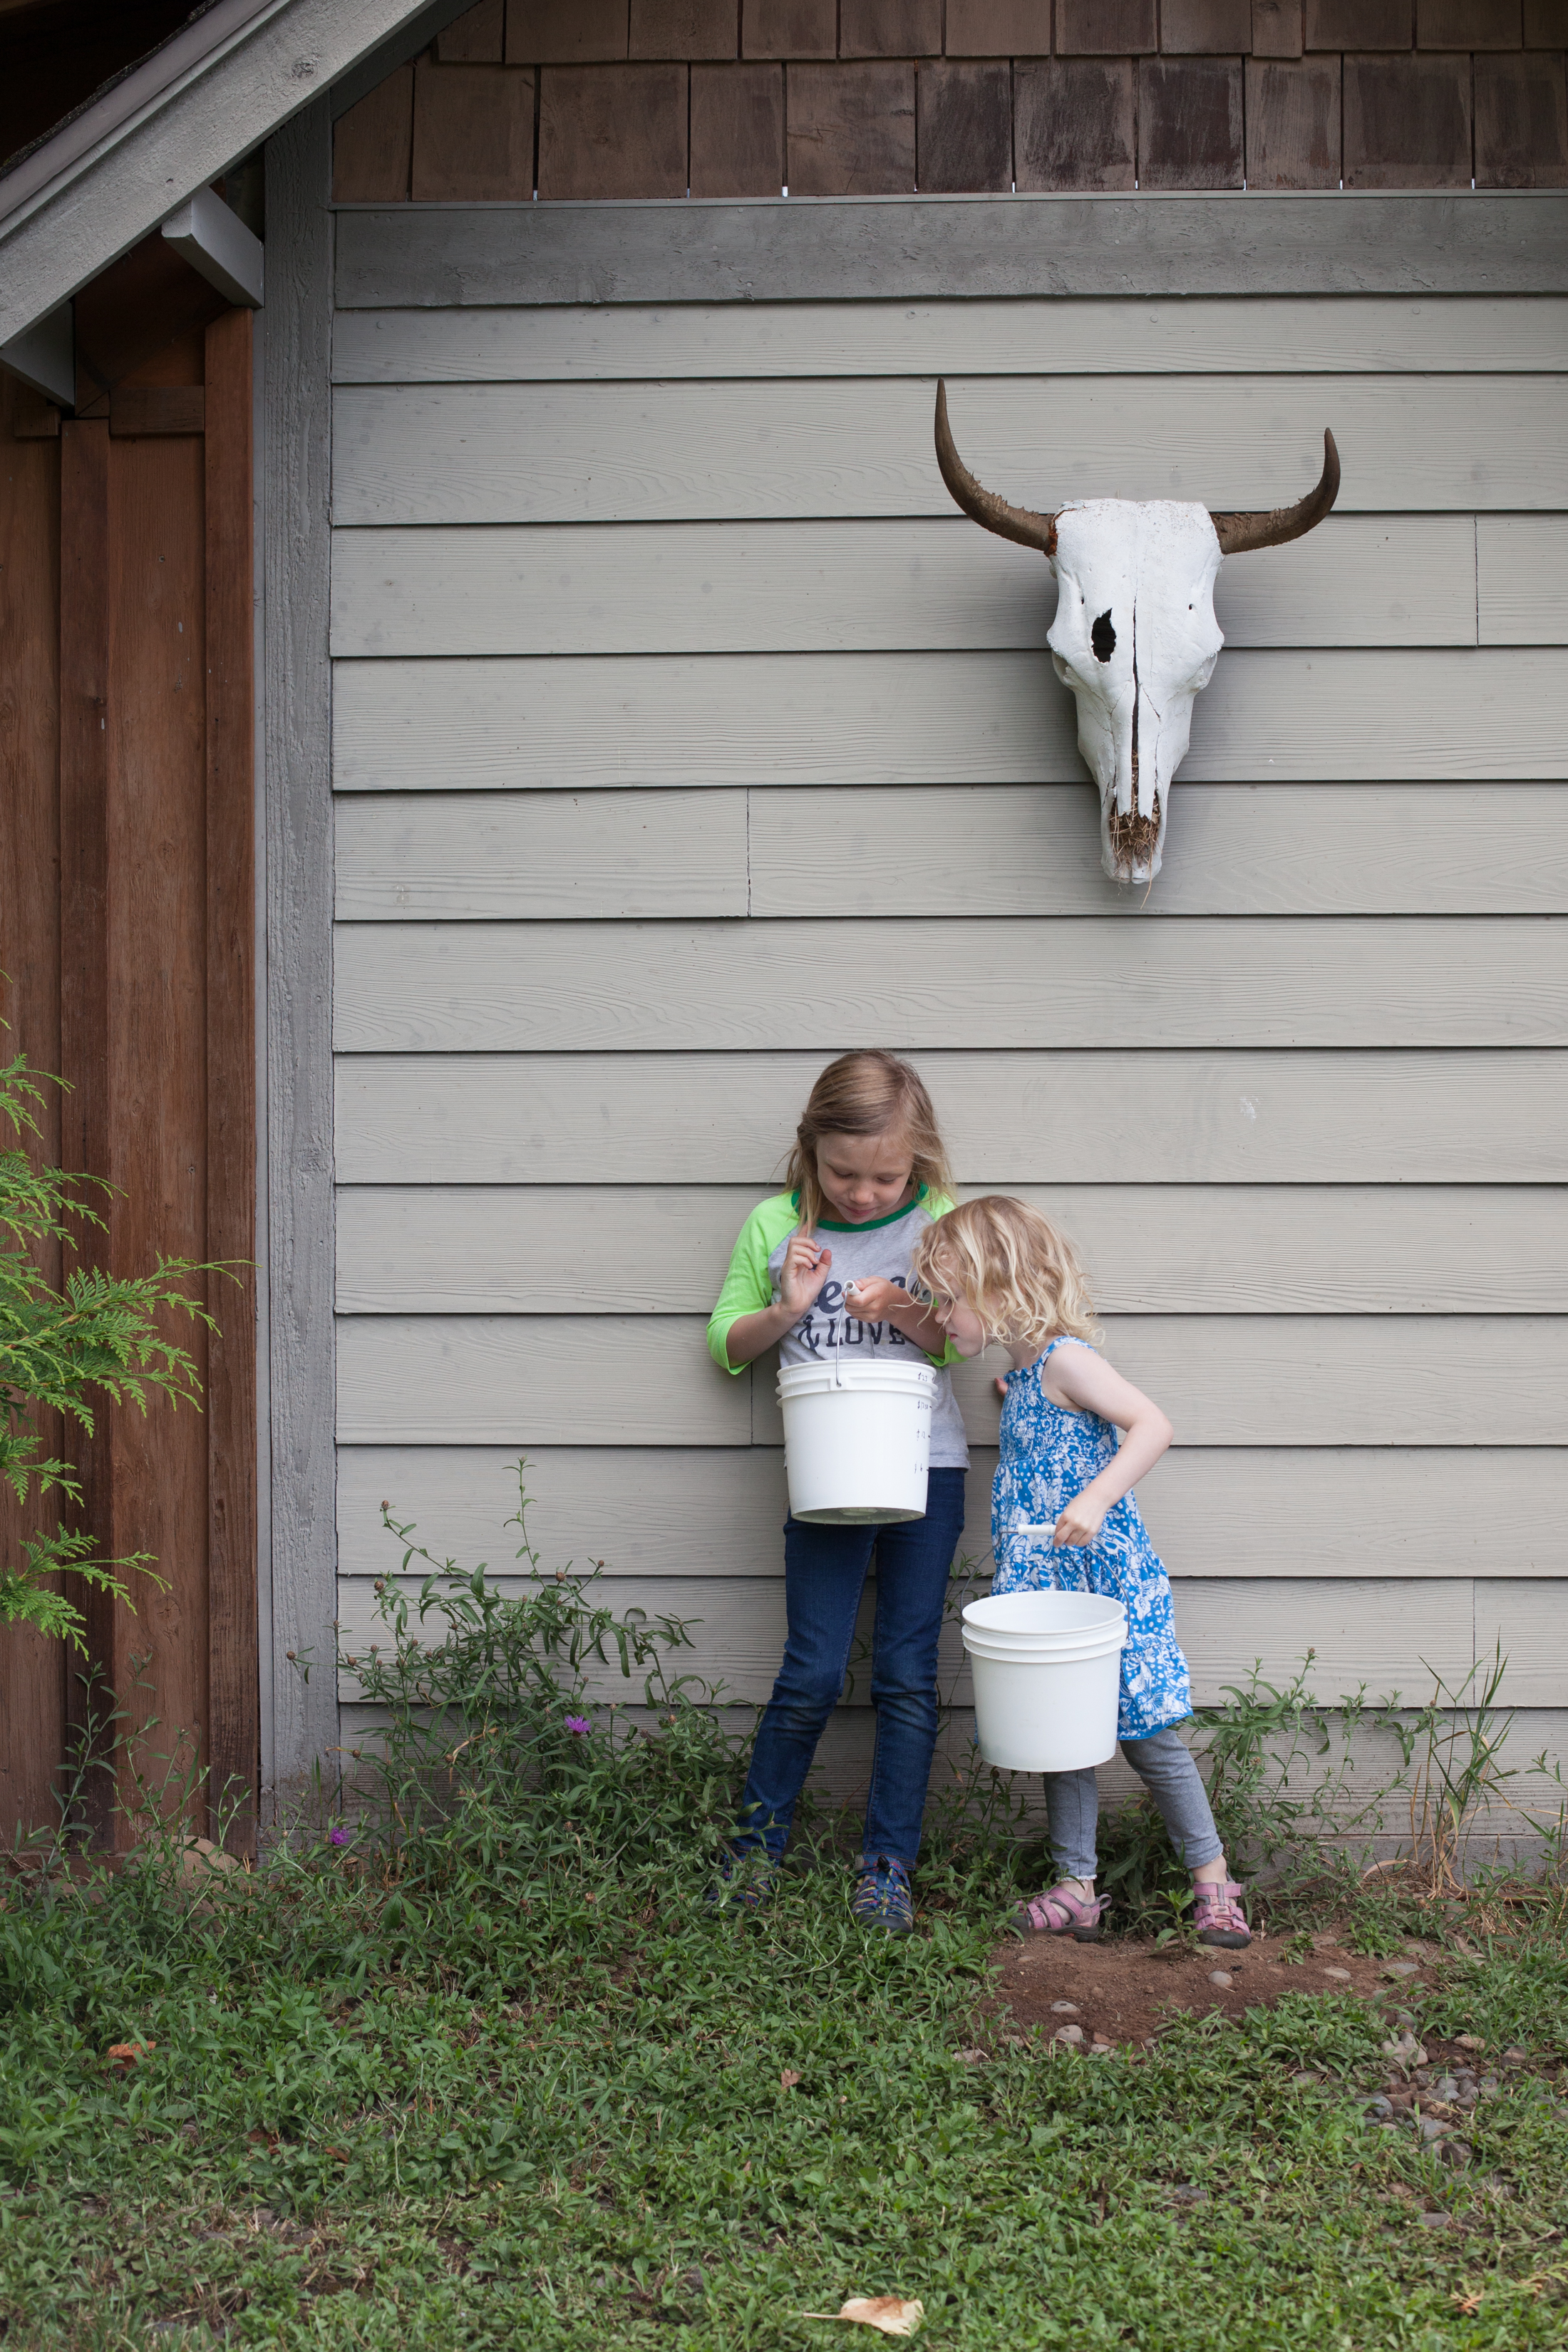
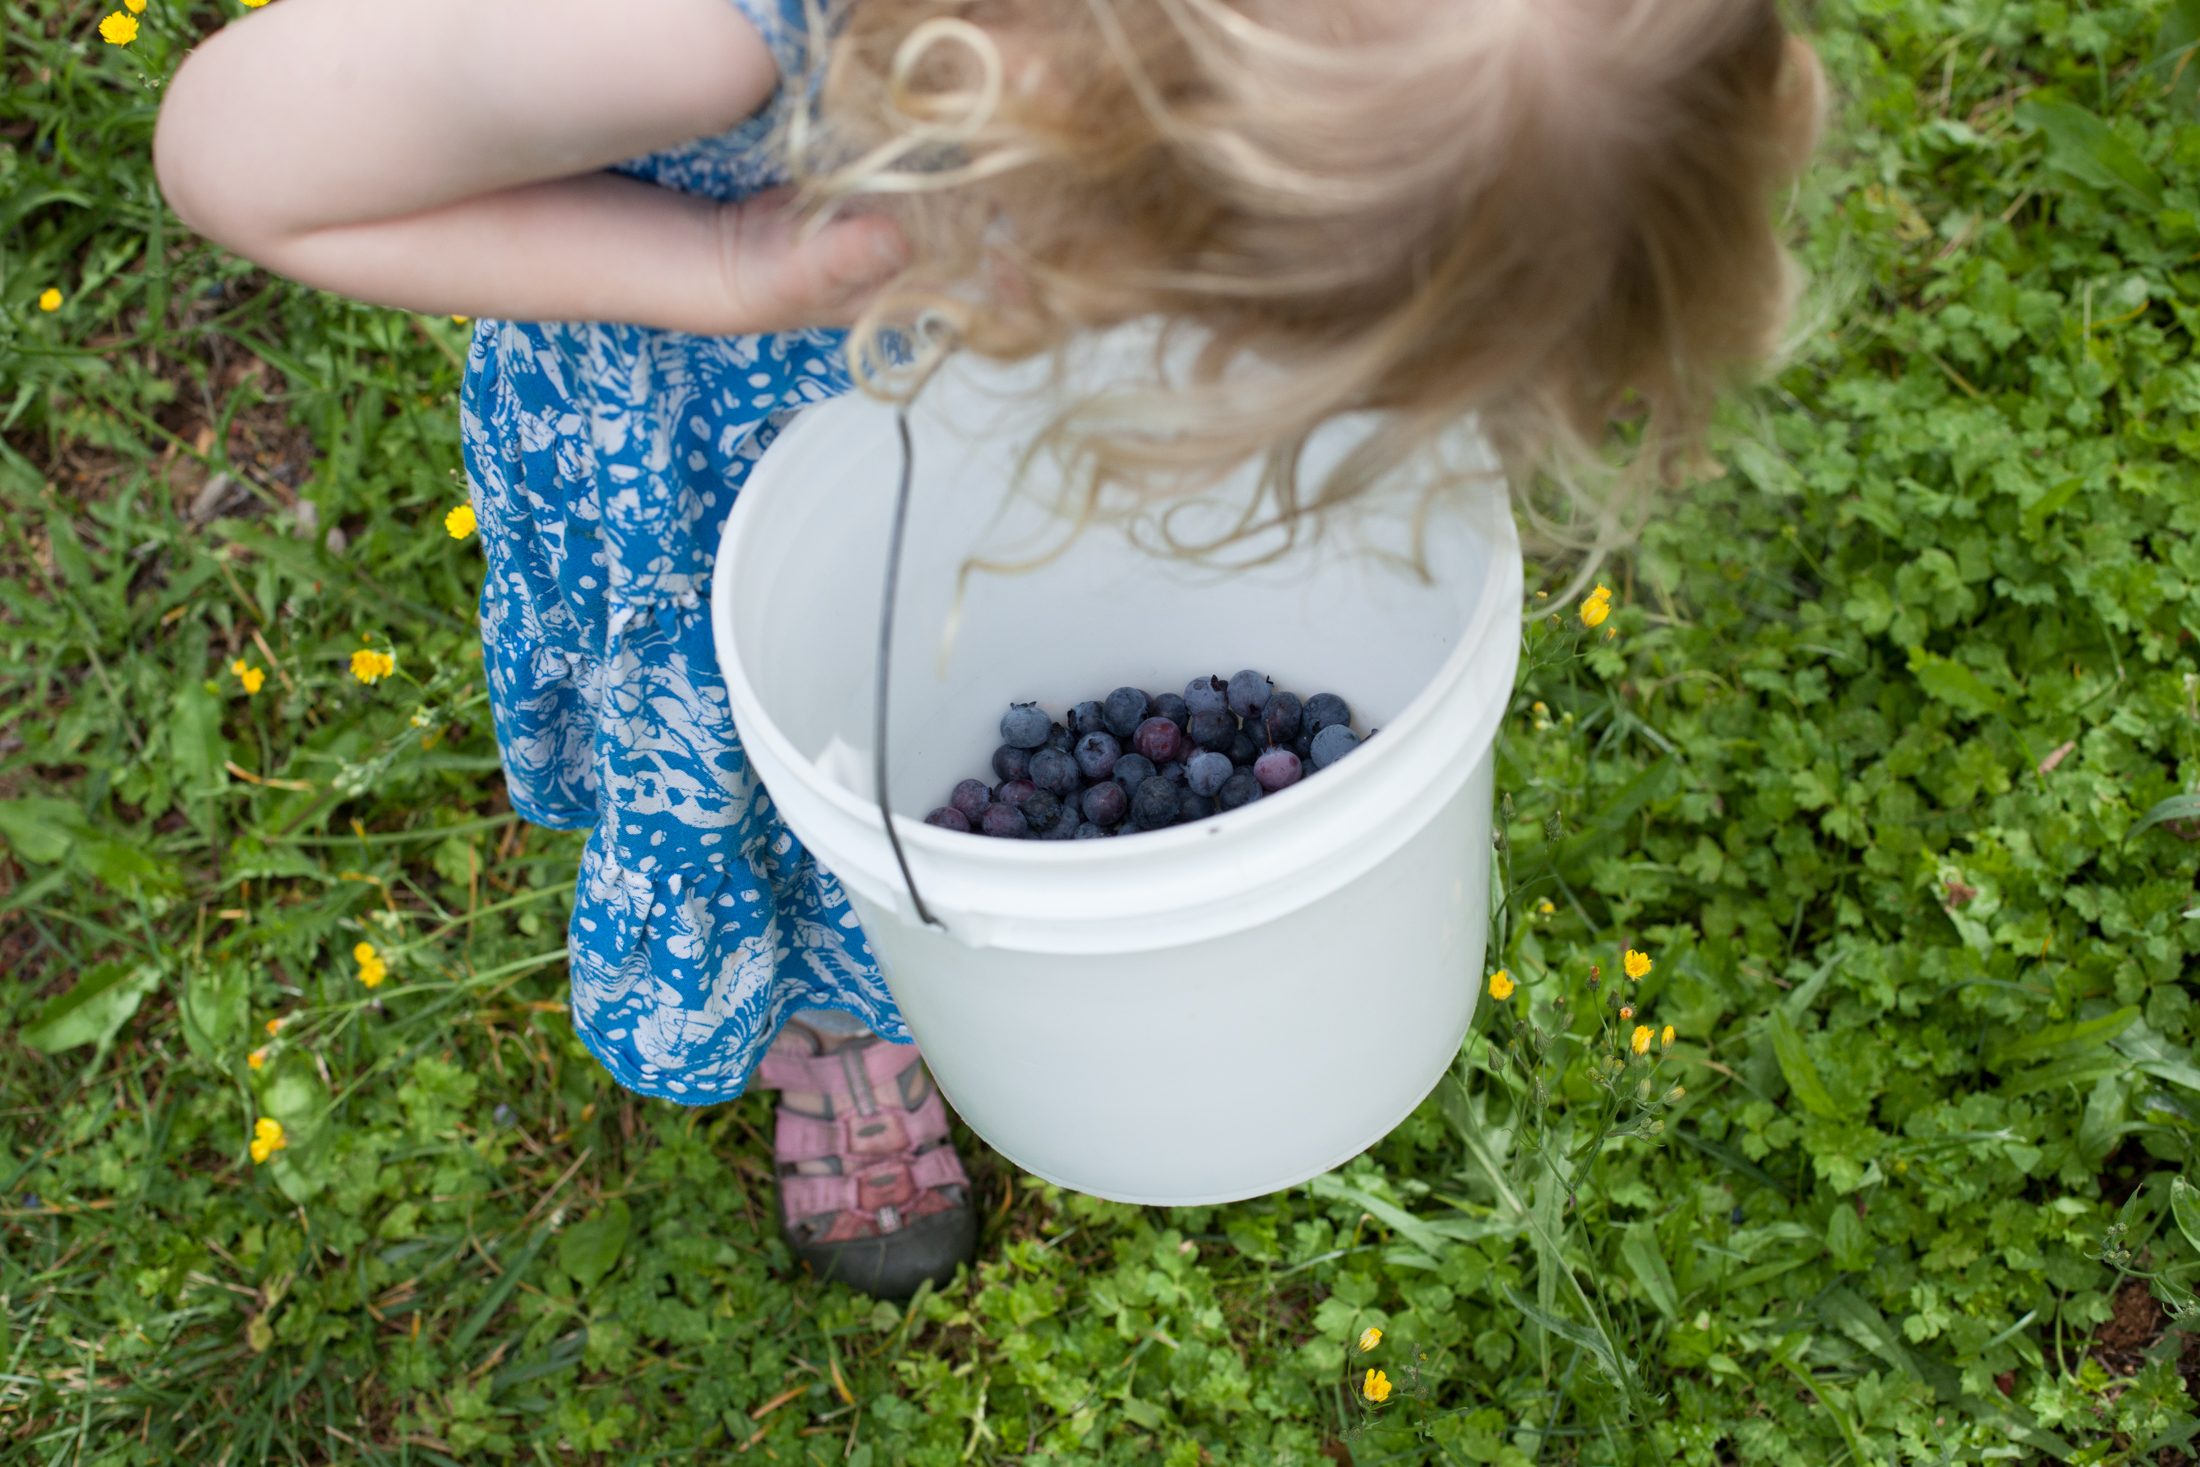
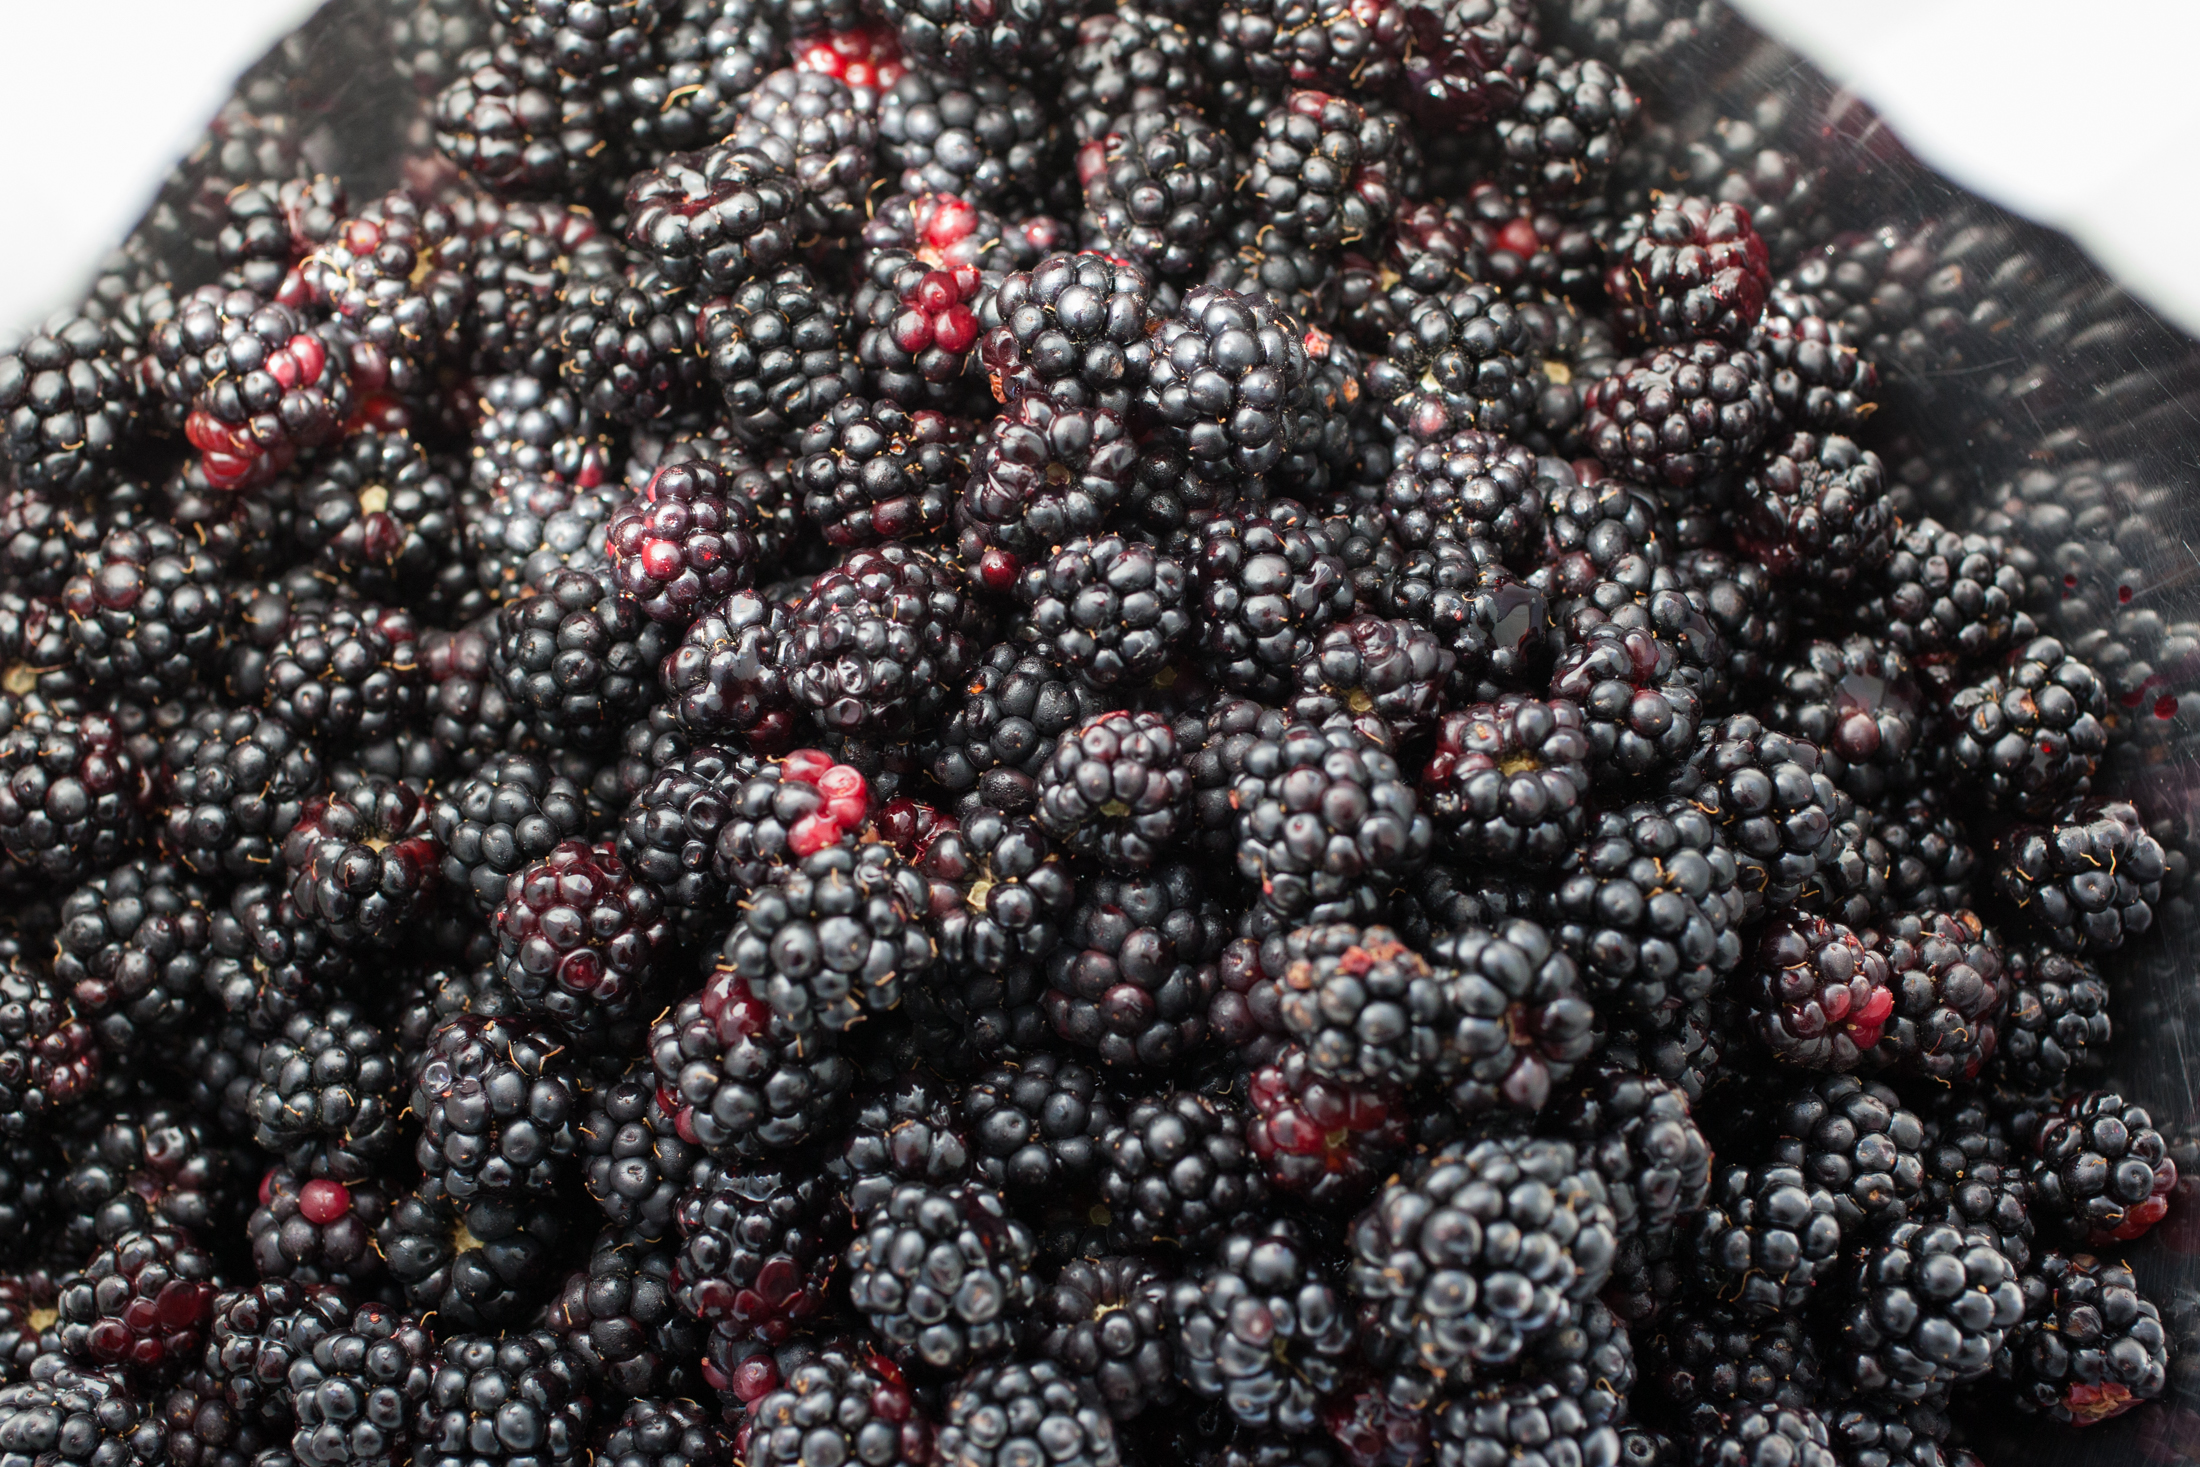
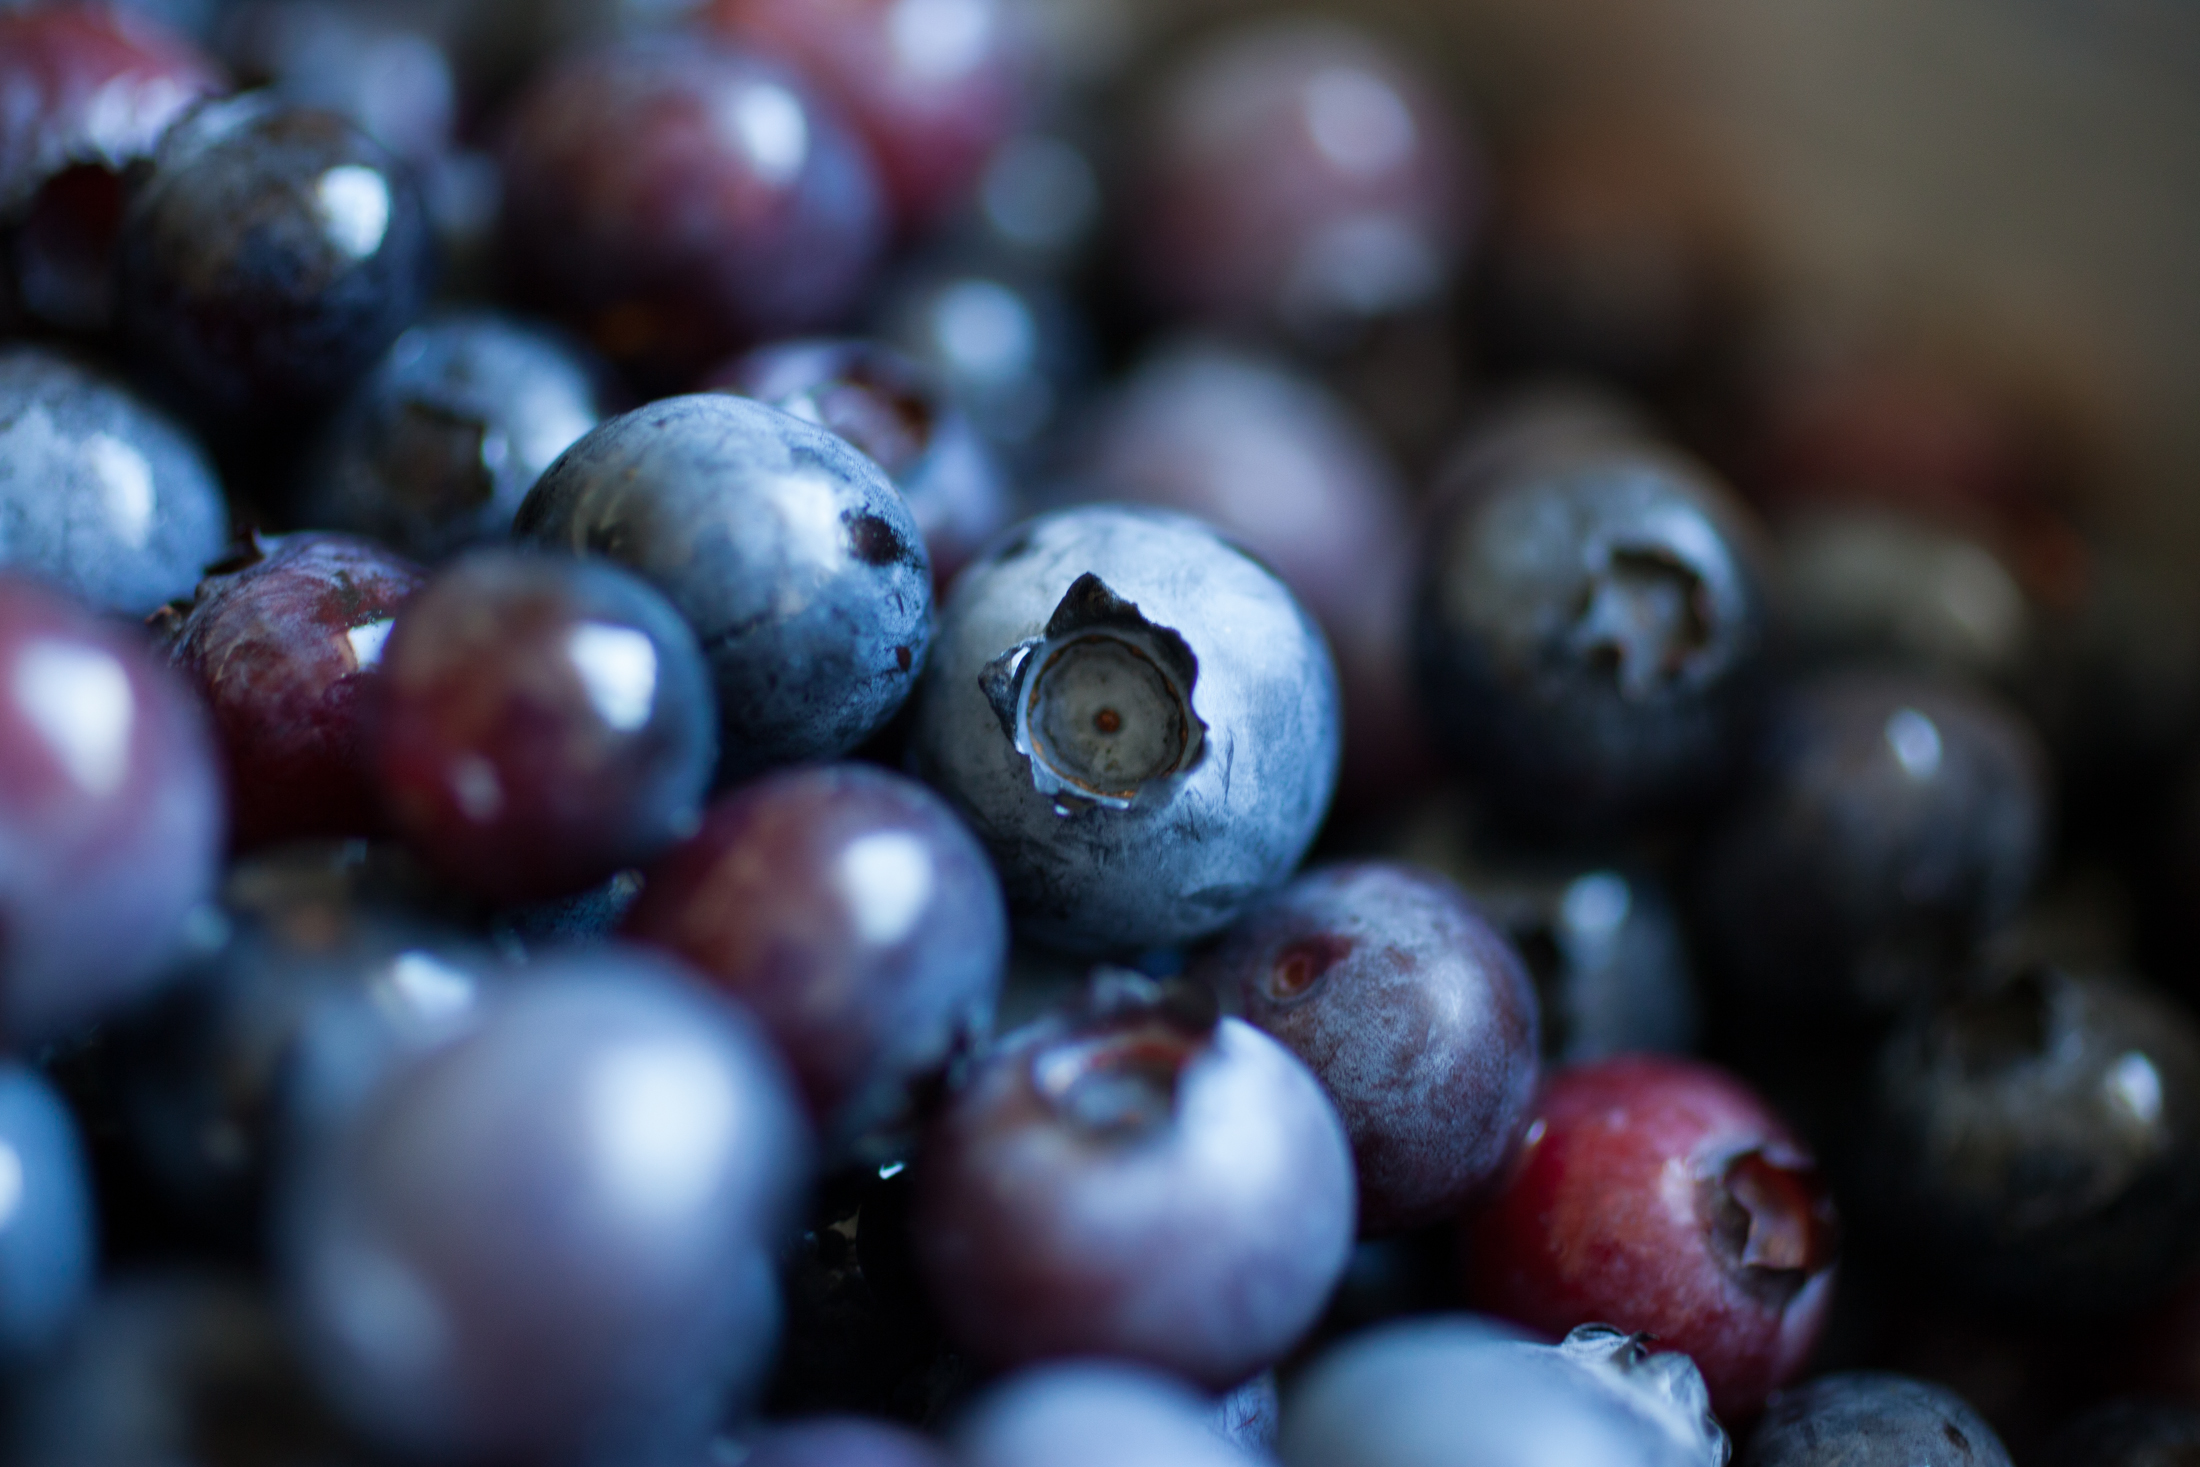
We spent about two hours picking blackberries, seeking out the ripest ones we could find and spitting out many tart ones along the way. The girls would pick their berries and plunk them into small containers to be added to my bigger one, and before long we had two full pounds of plump, warm berries. The following morning we loaded up nice and early and headed to our favorite local blueberry farm where we picked another couple pounds of blueberries. The girls had dropped theirs a fair number of times so by the time we got home their blueberries were bleeding juice through their paper bags, practically screaming to be made into pie.
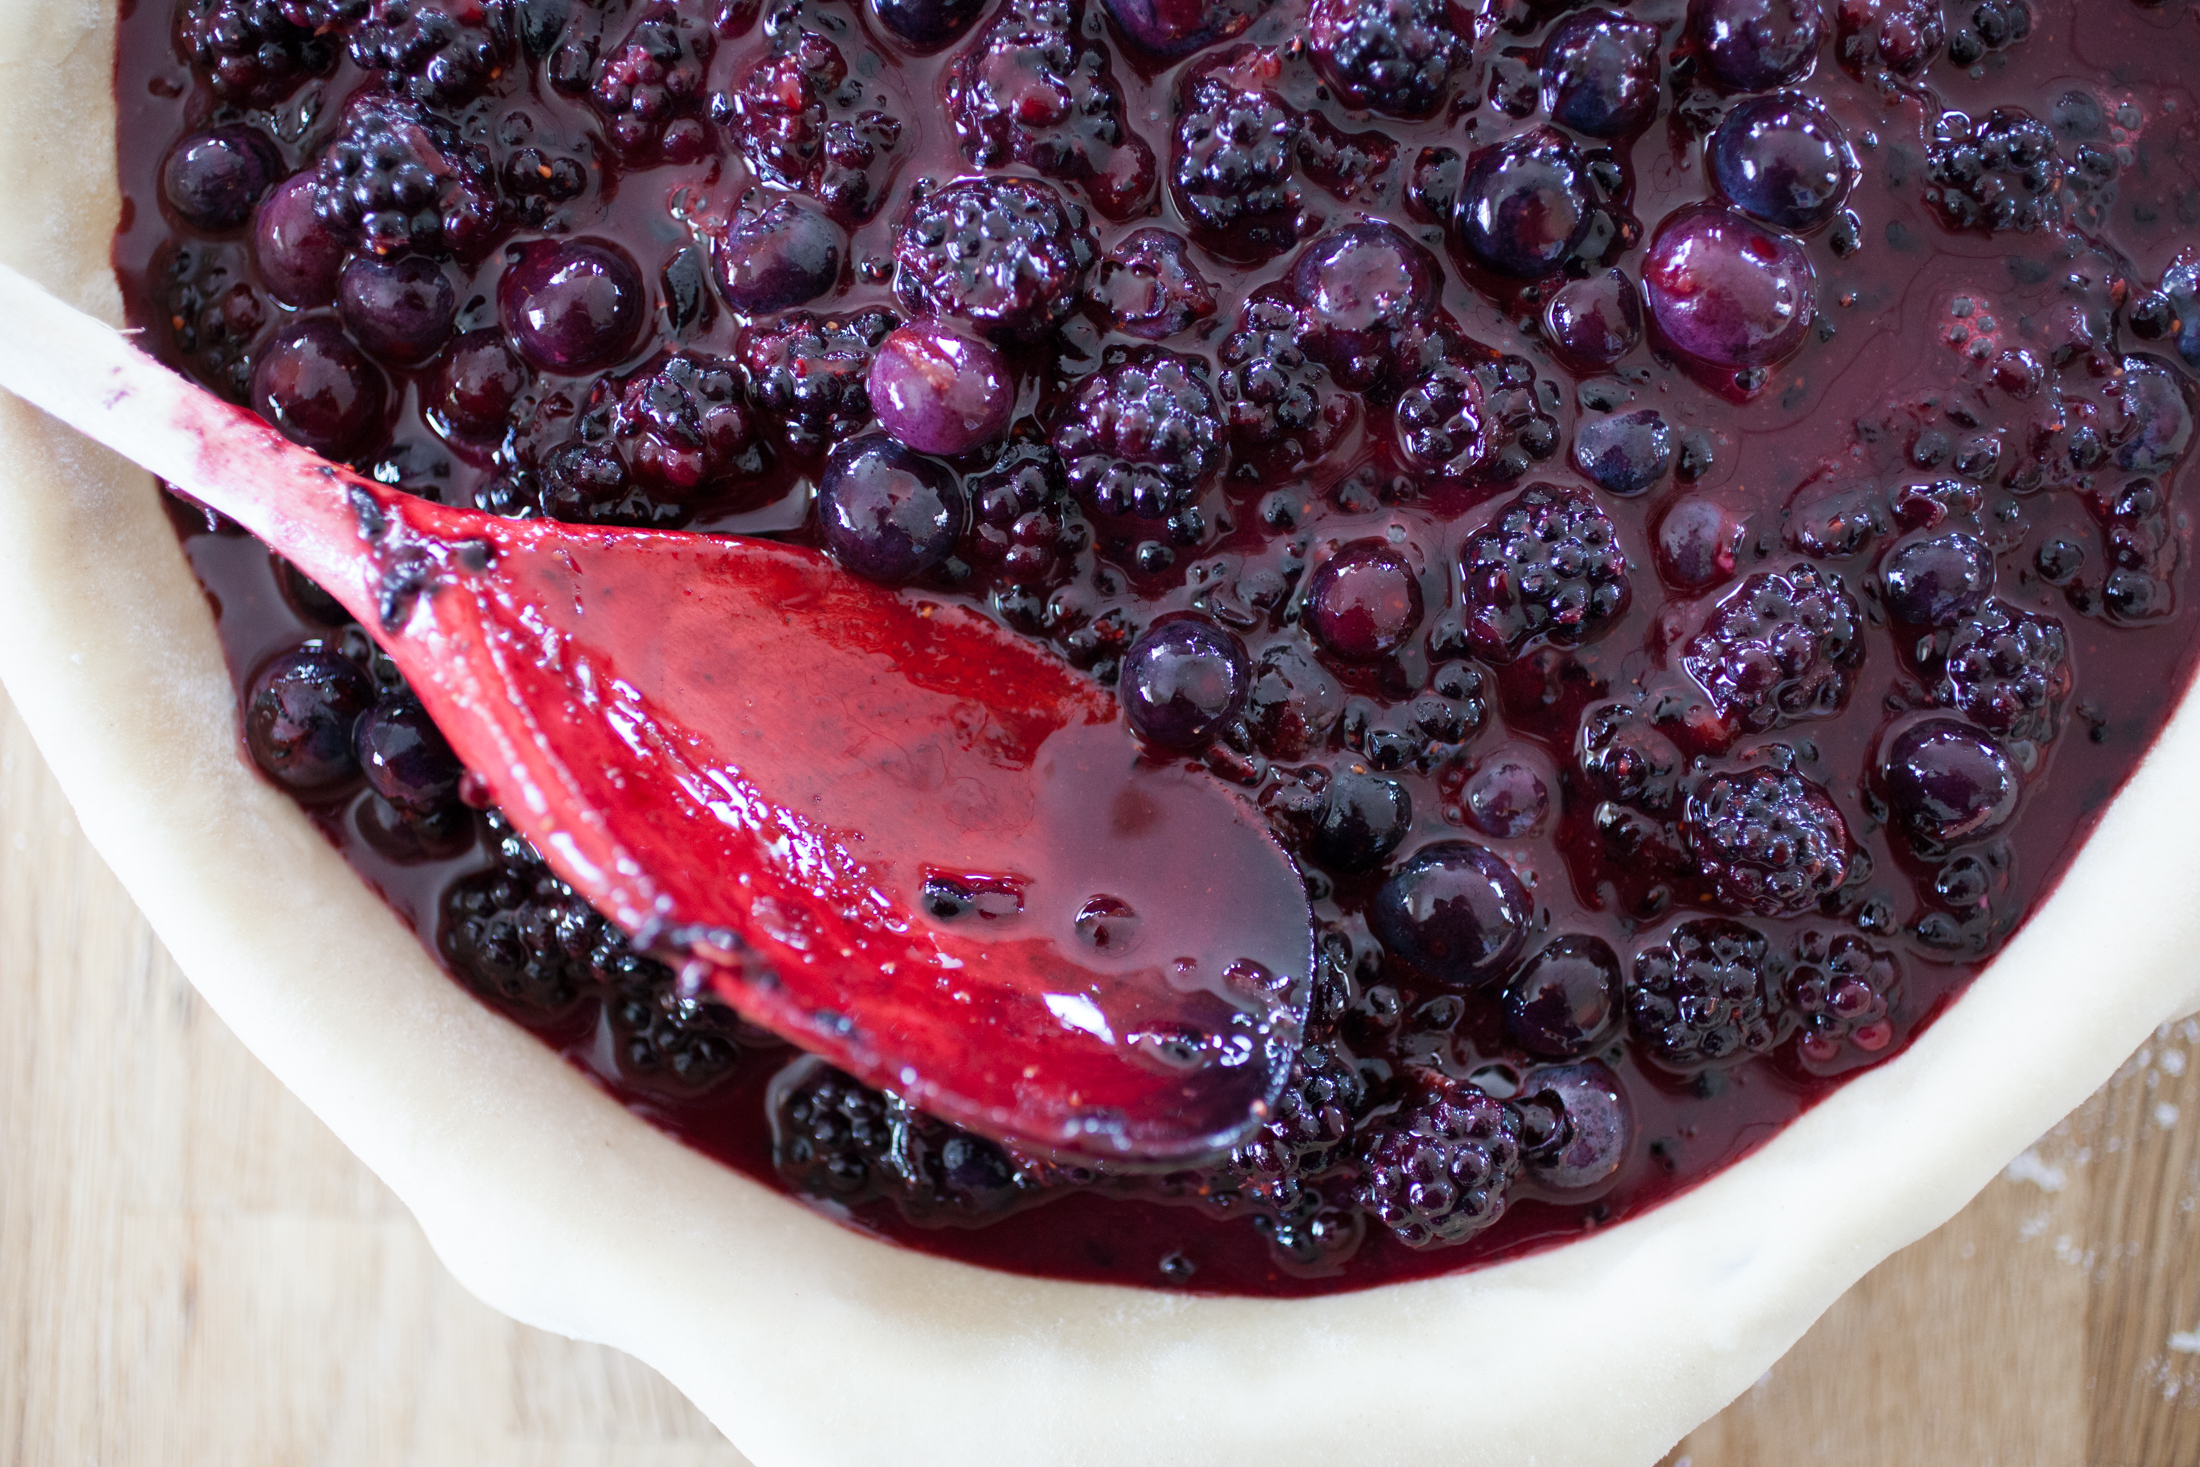
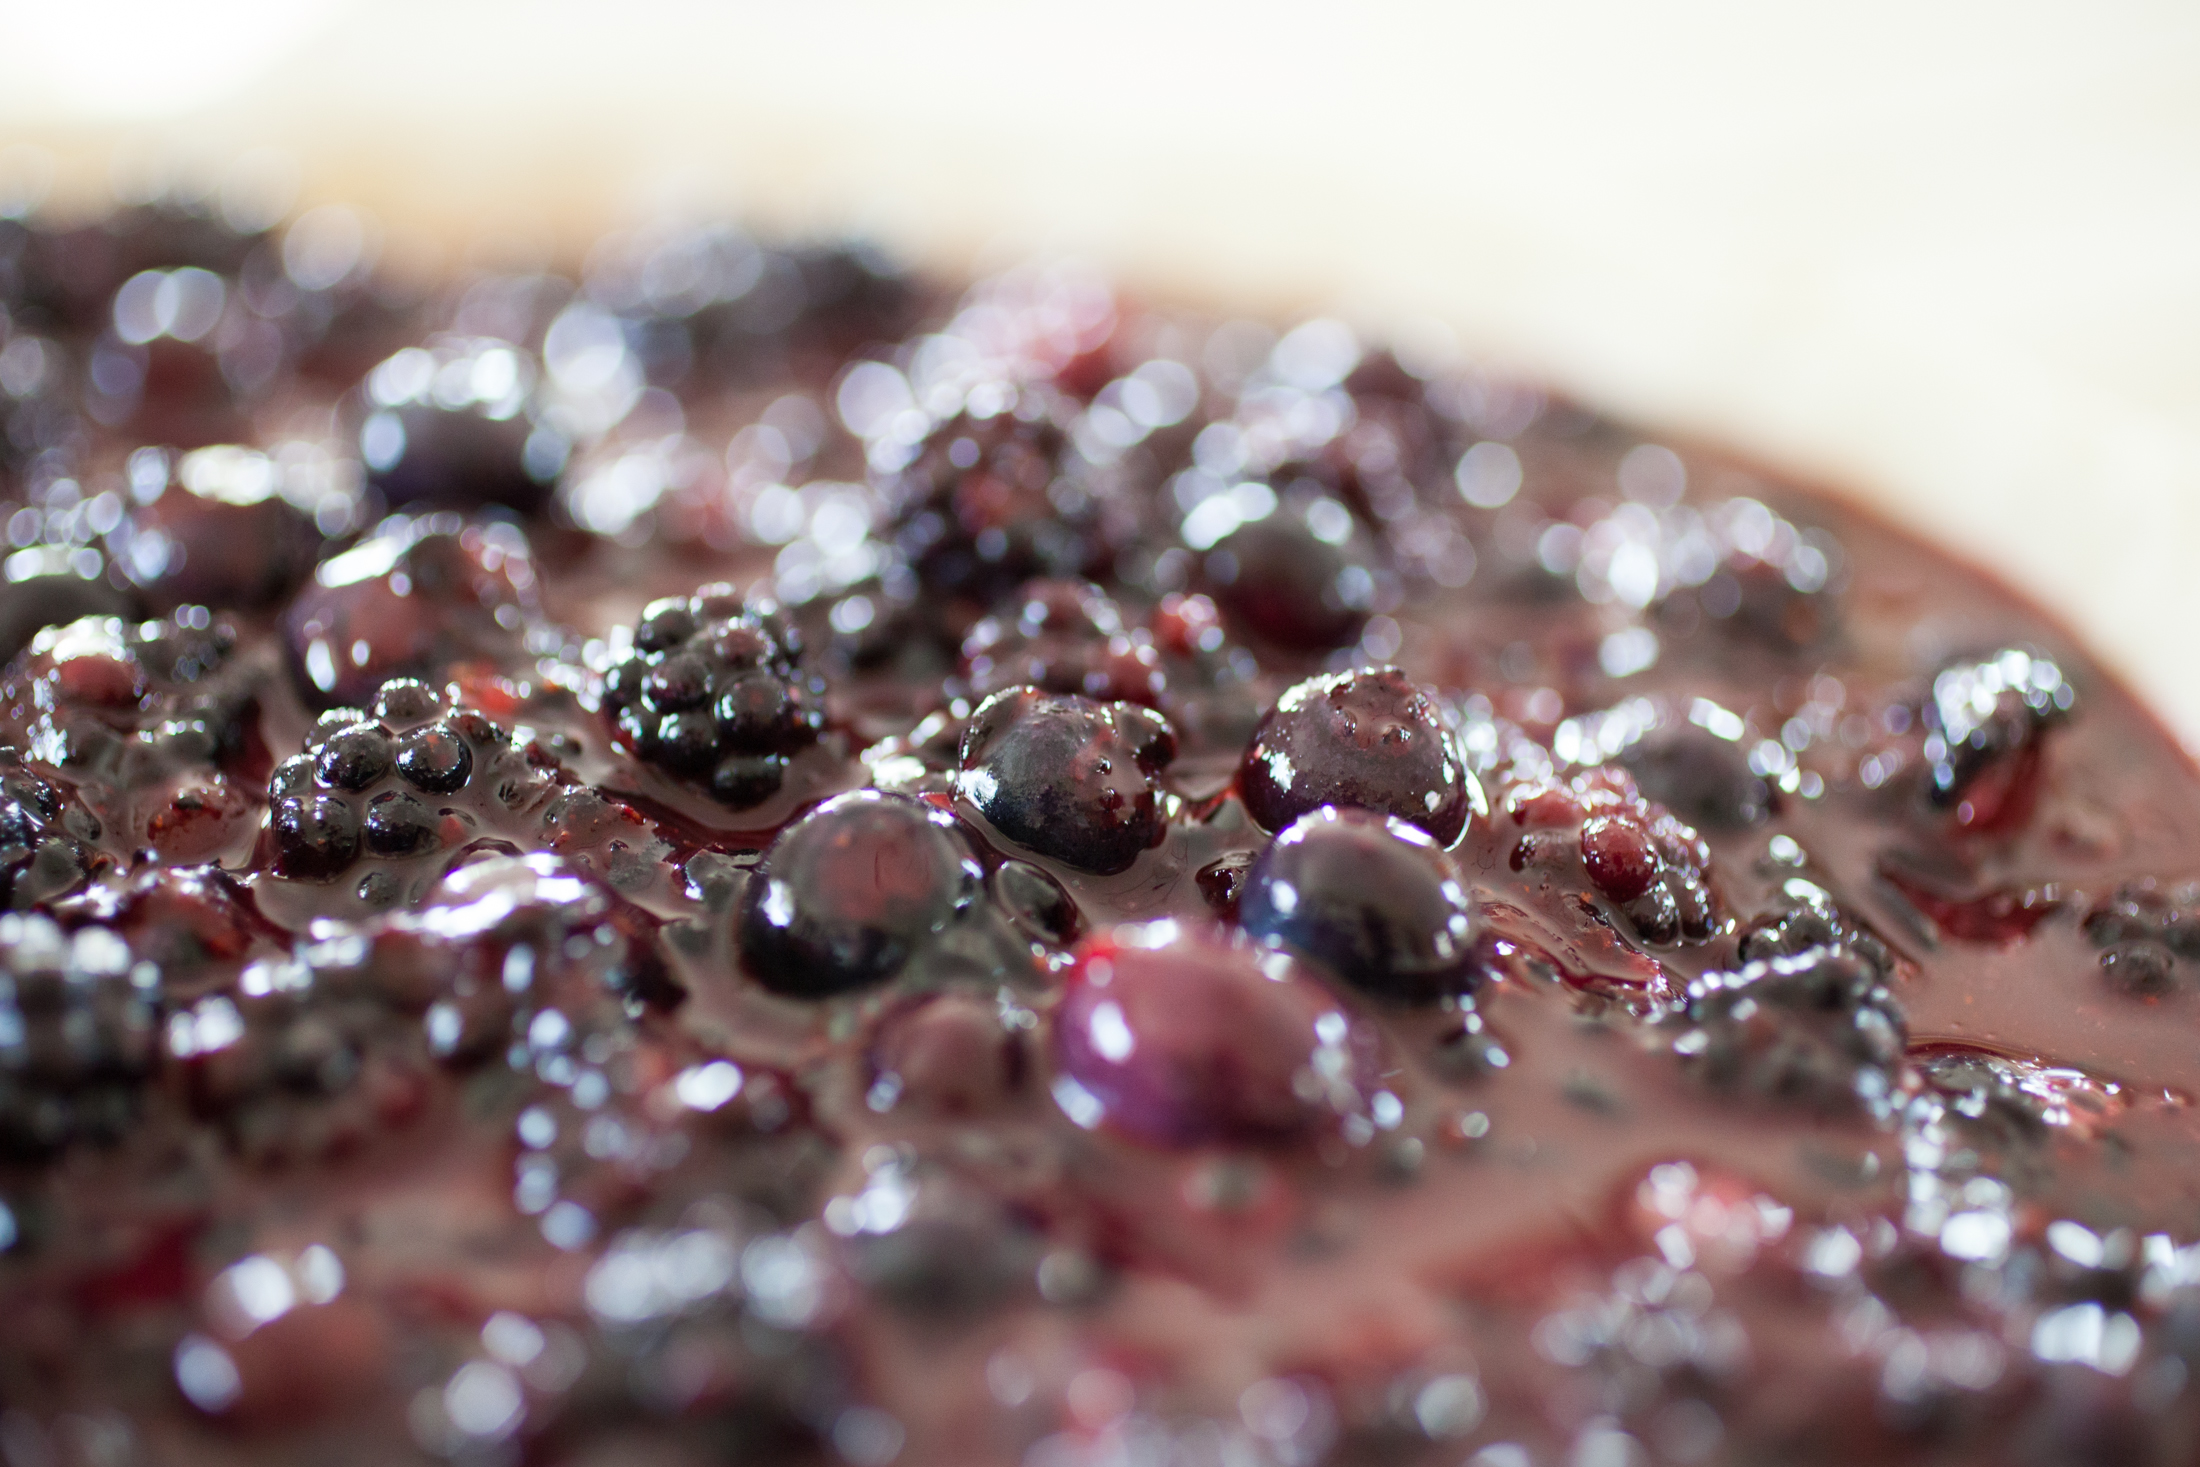
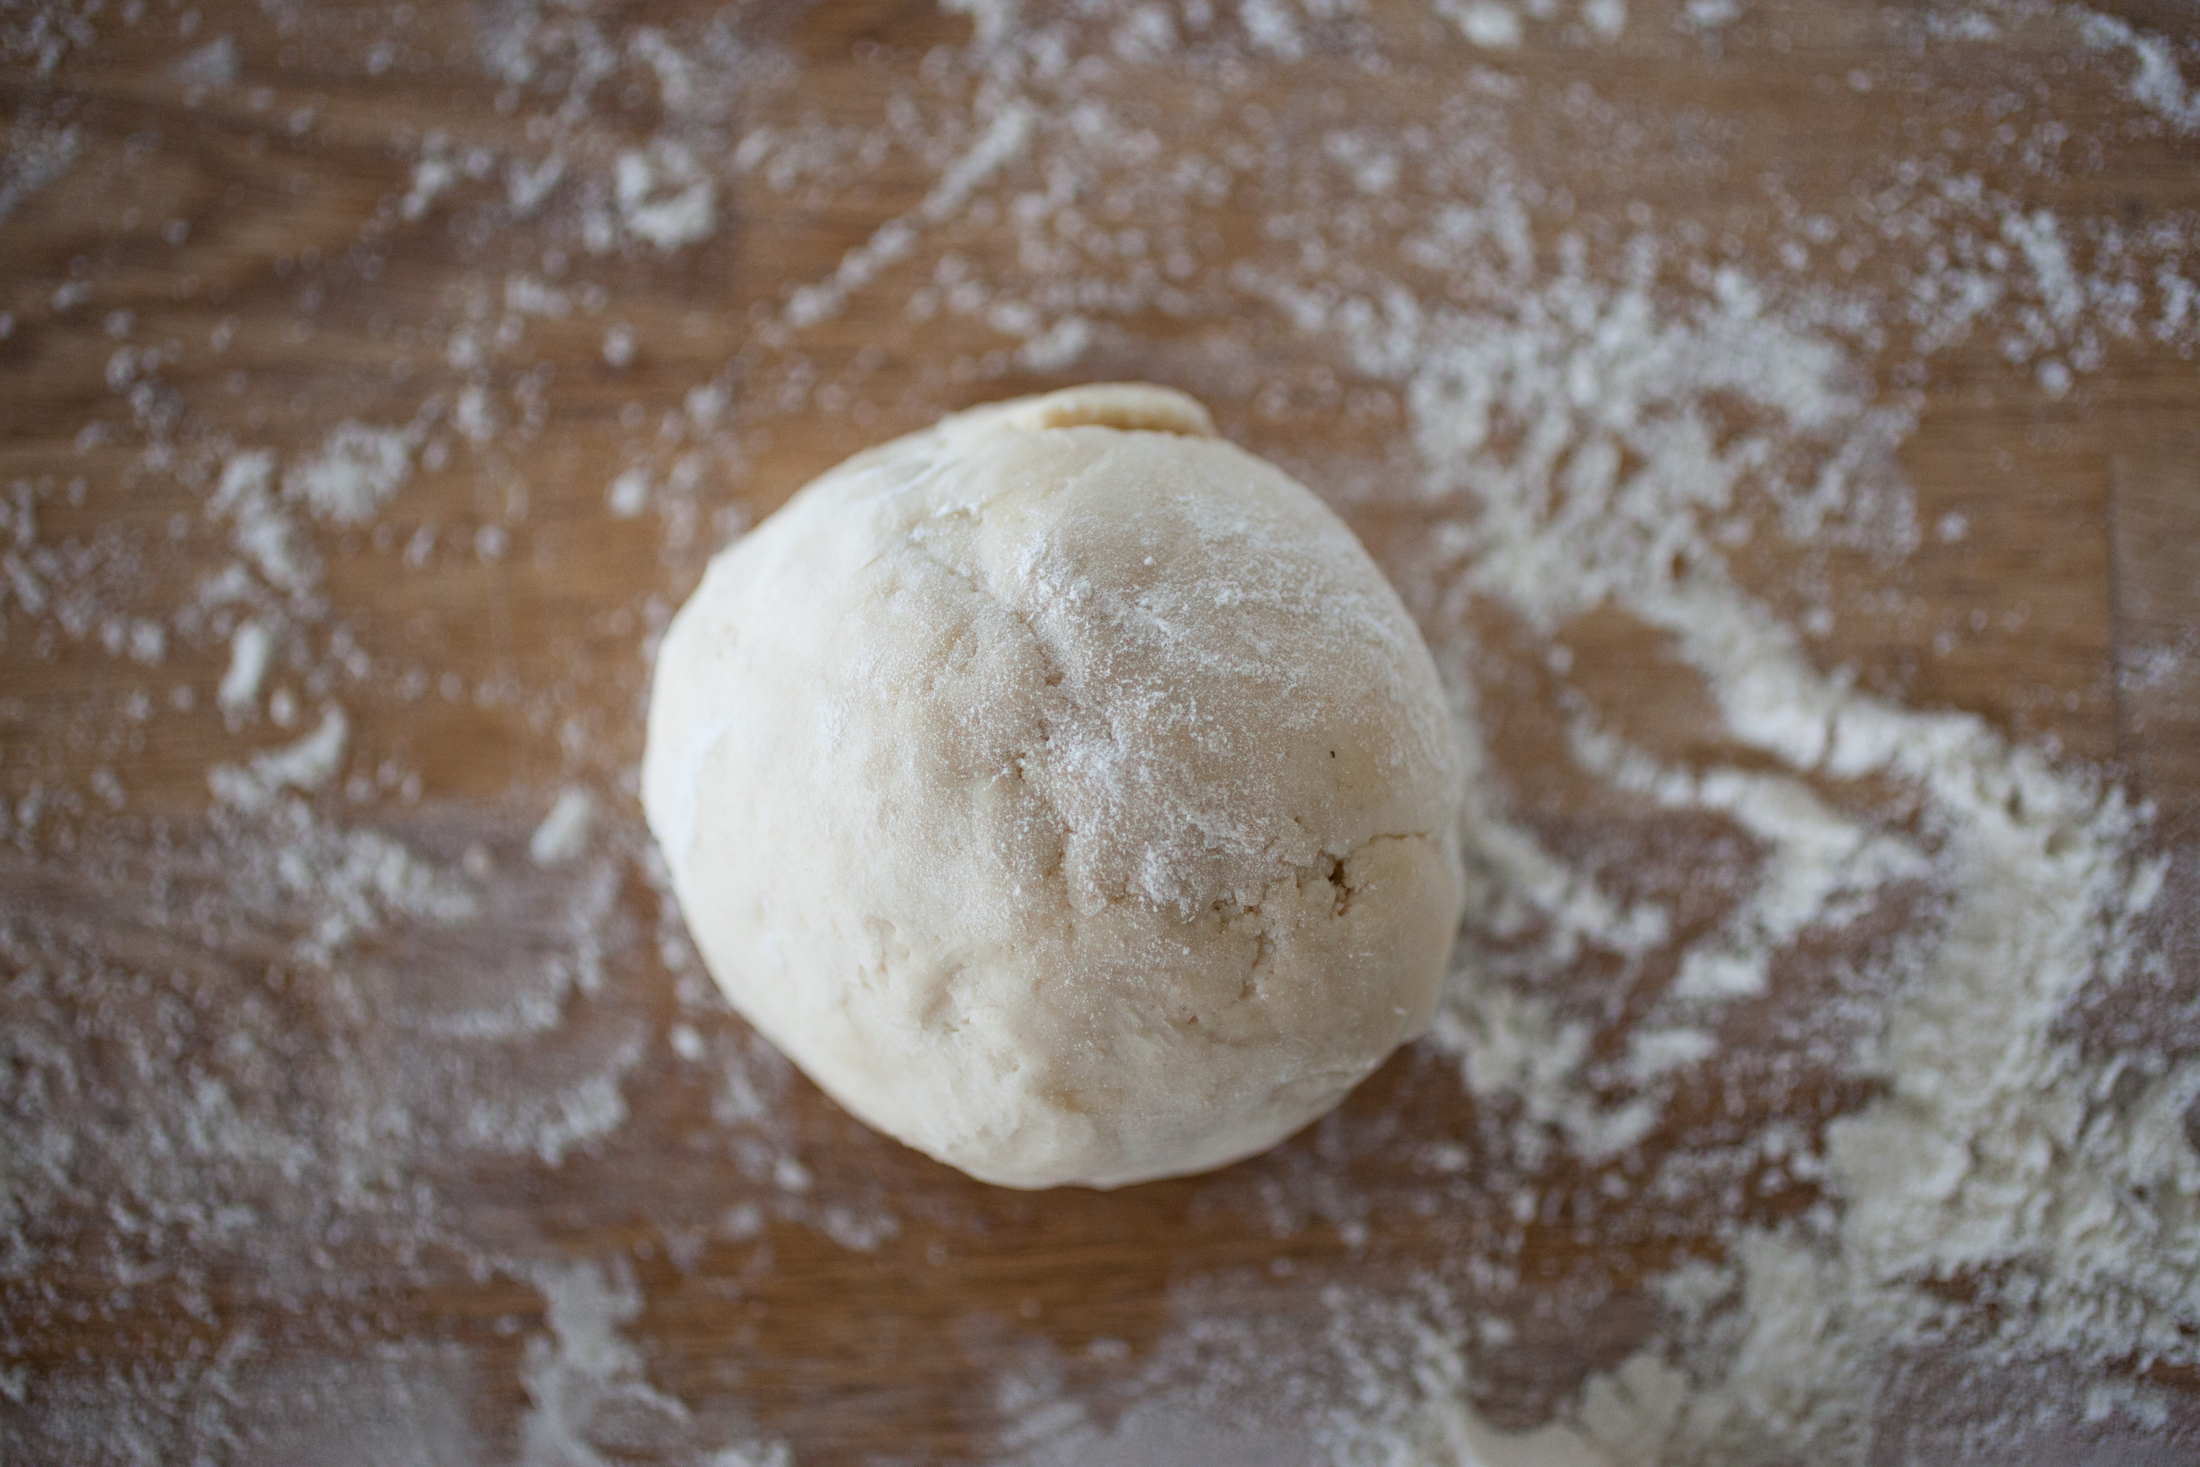
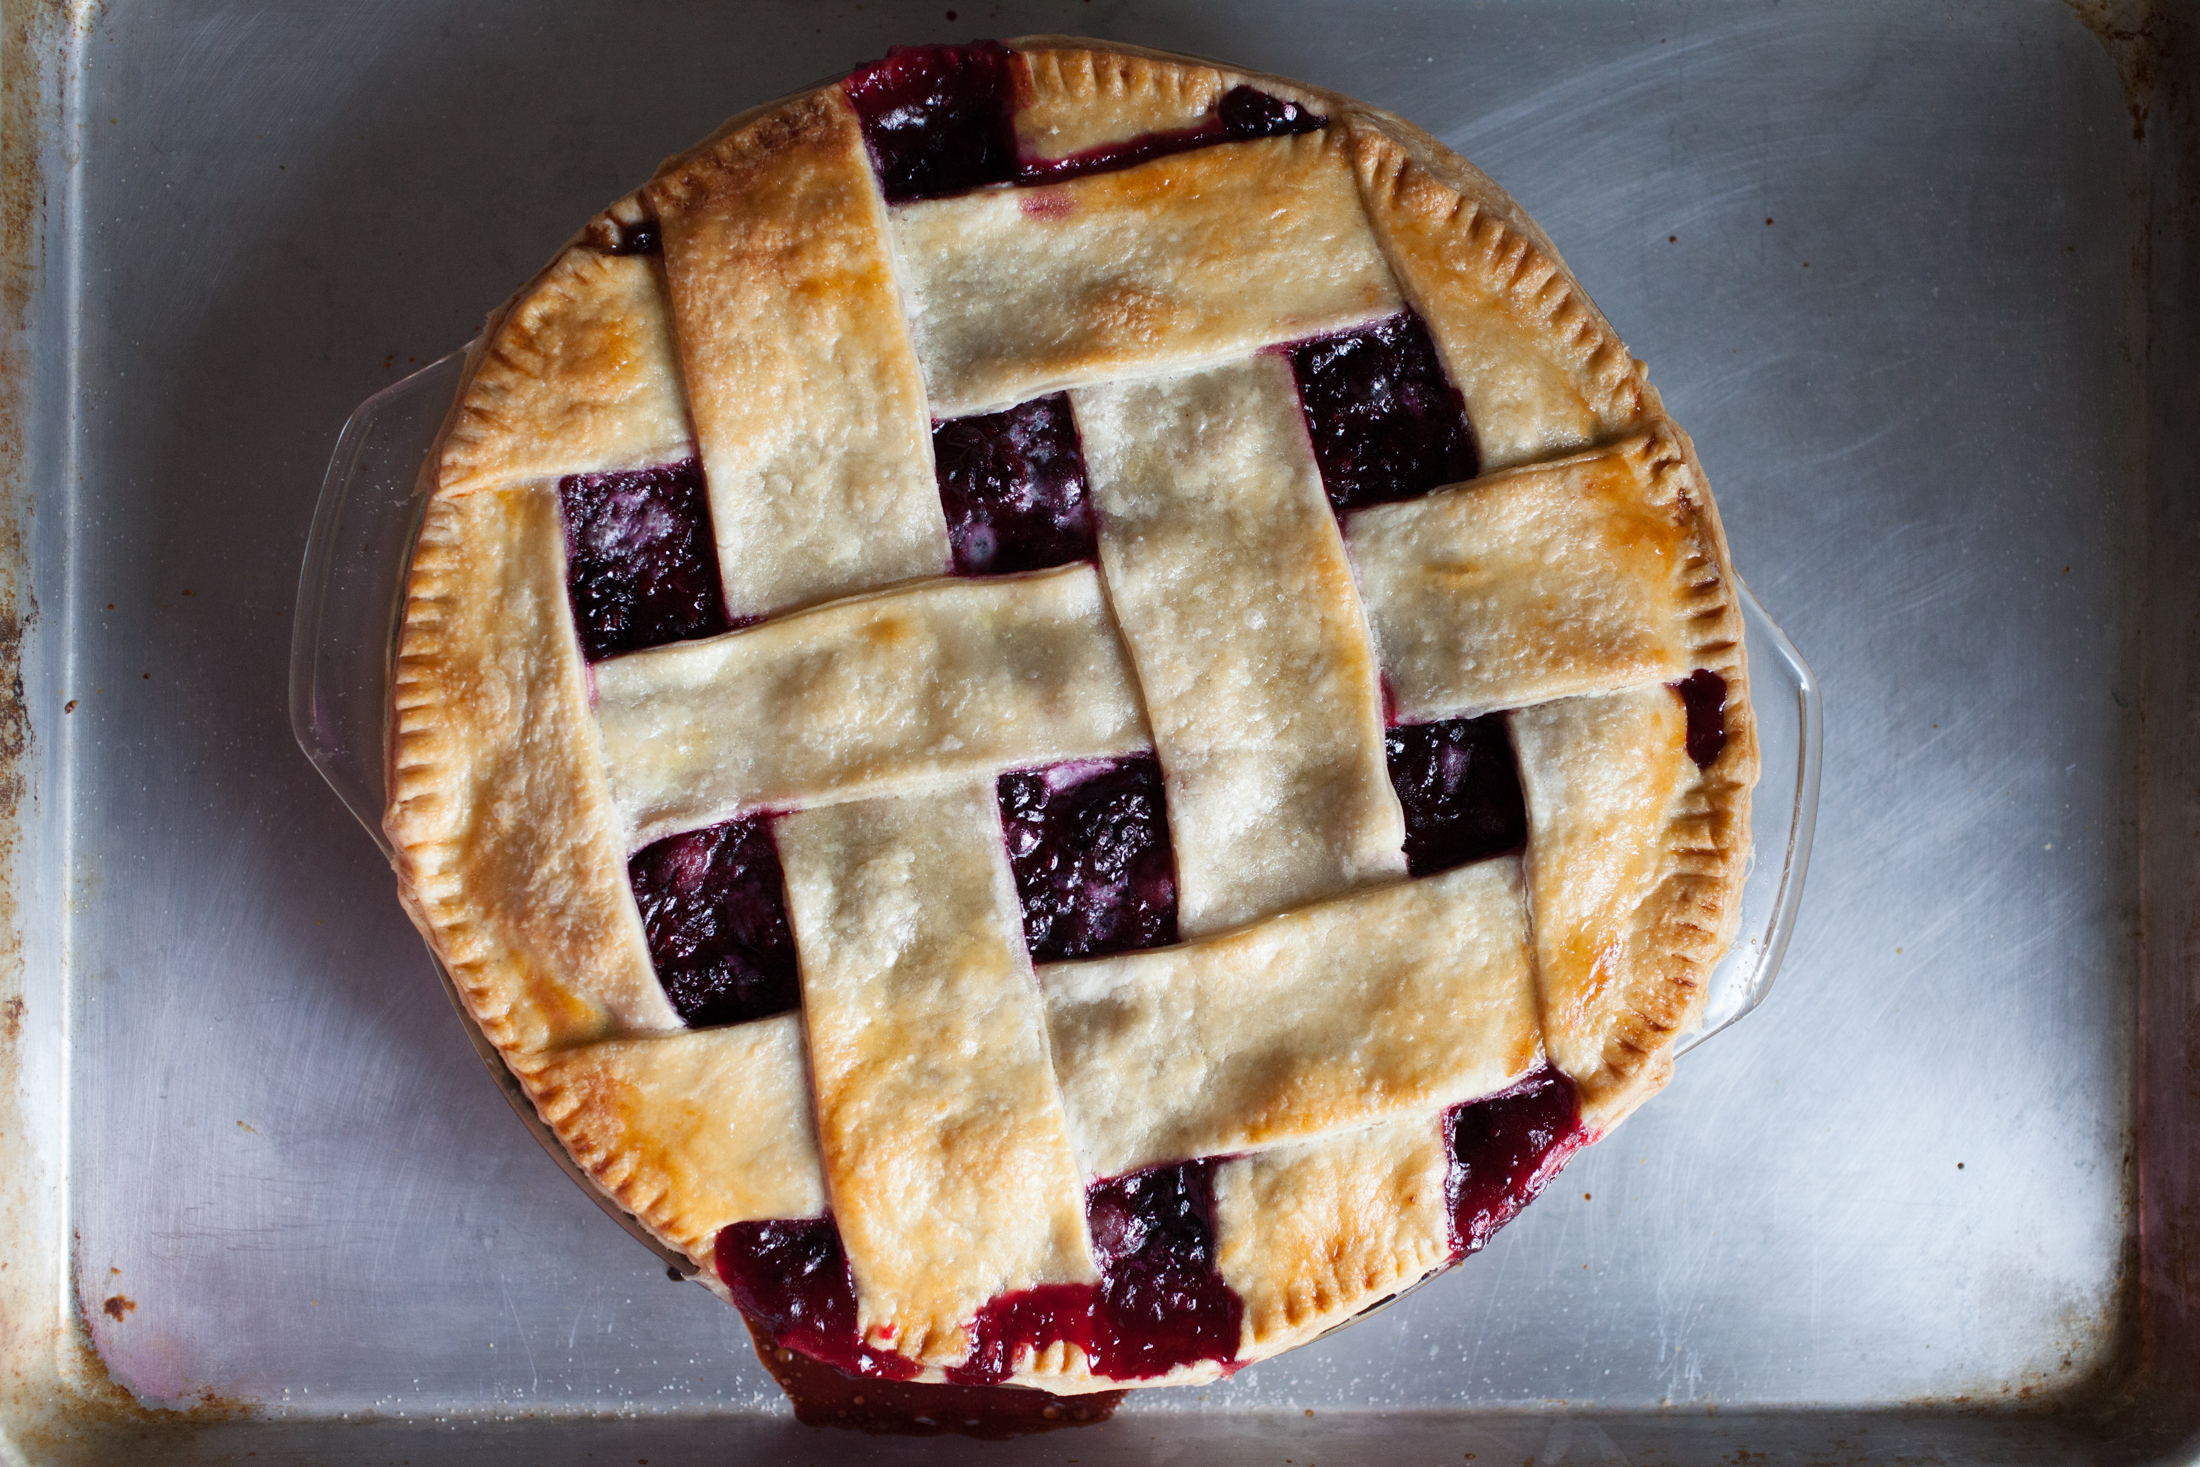
PINPINPINPINPINI made up a basic pie crust before we’d left for the blueberry patch, so by the time we returned it had been resting for a few hours and was ready to be rolled out. I prepared the base, wrapped it tight and returned it to the fridge to chill while I prepared the berries. I used about half of the blueberries (basically all the ones the girls had pre-macerated), and all of the blackberries we’d picked. To them I added a fair amount of sugar to sweeten the still-tart berries, some bright lemon zest and juice, a bit of salt, warming nutmeg, flour and cornstarch to bind it all together, and on a whim I added a splash of fragrant almond extract. Lulu and I mixed the berries together with all the other filling ingredients roughly together in a large bowl. Once it was fully combined I let it sit for about 20 minutes so that the flavors could meld together and the berries would release a bit of their juices.
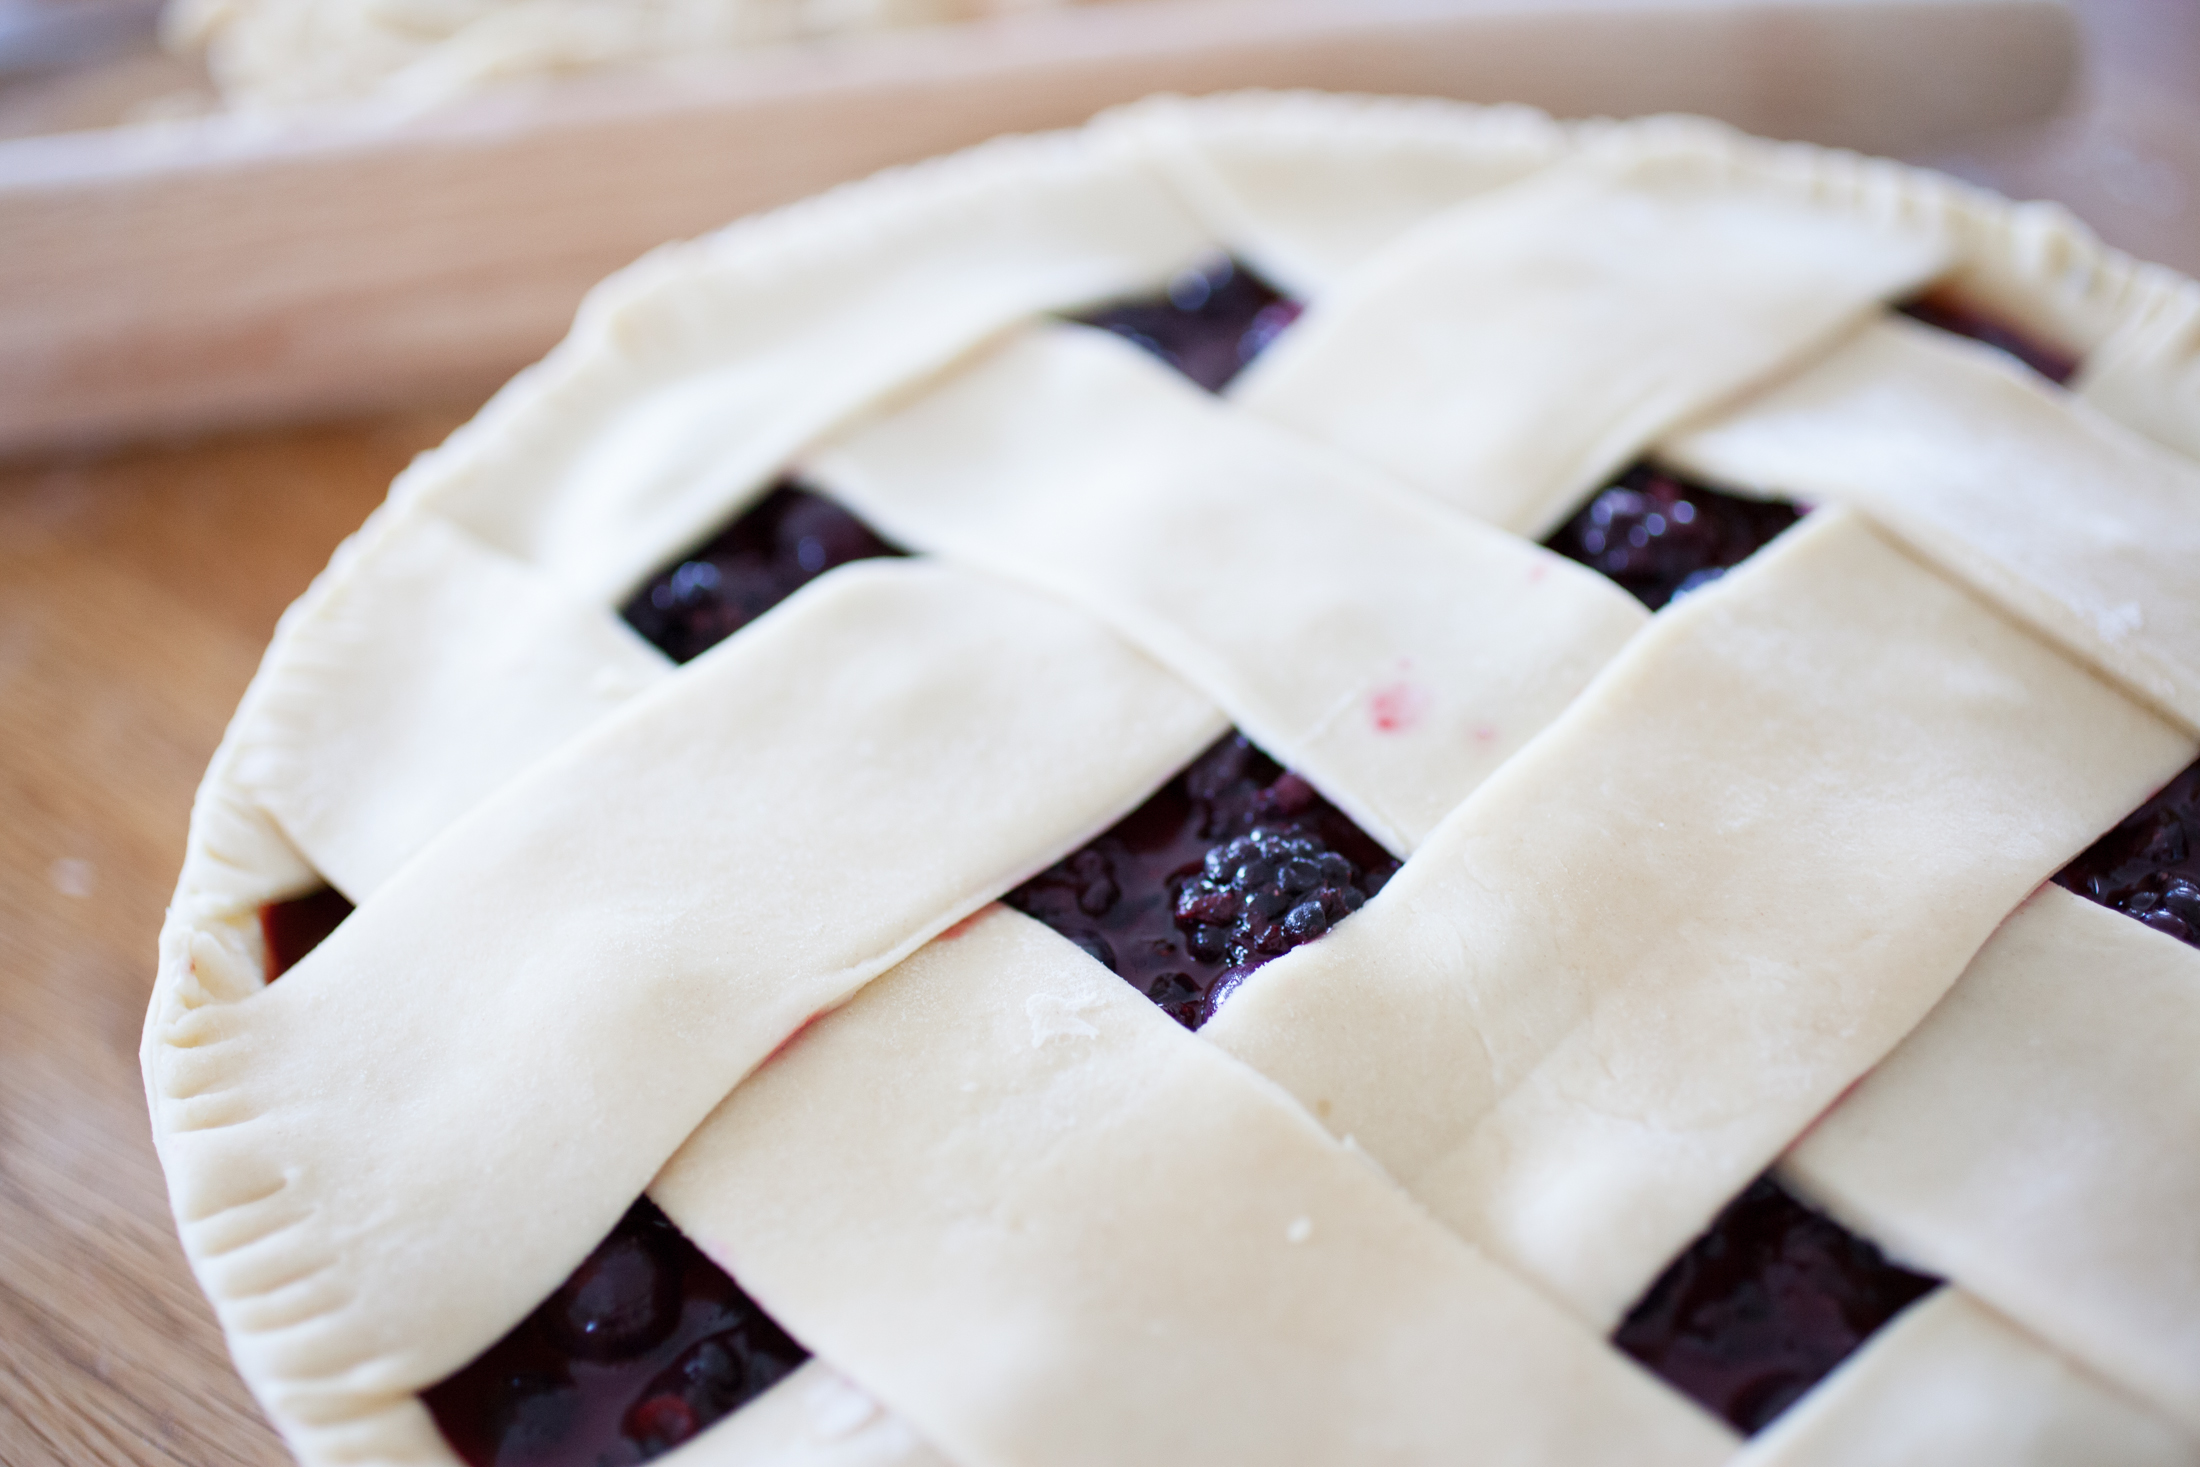
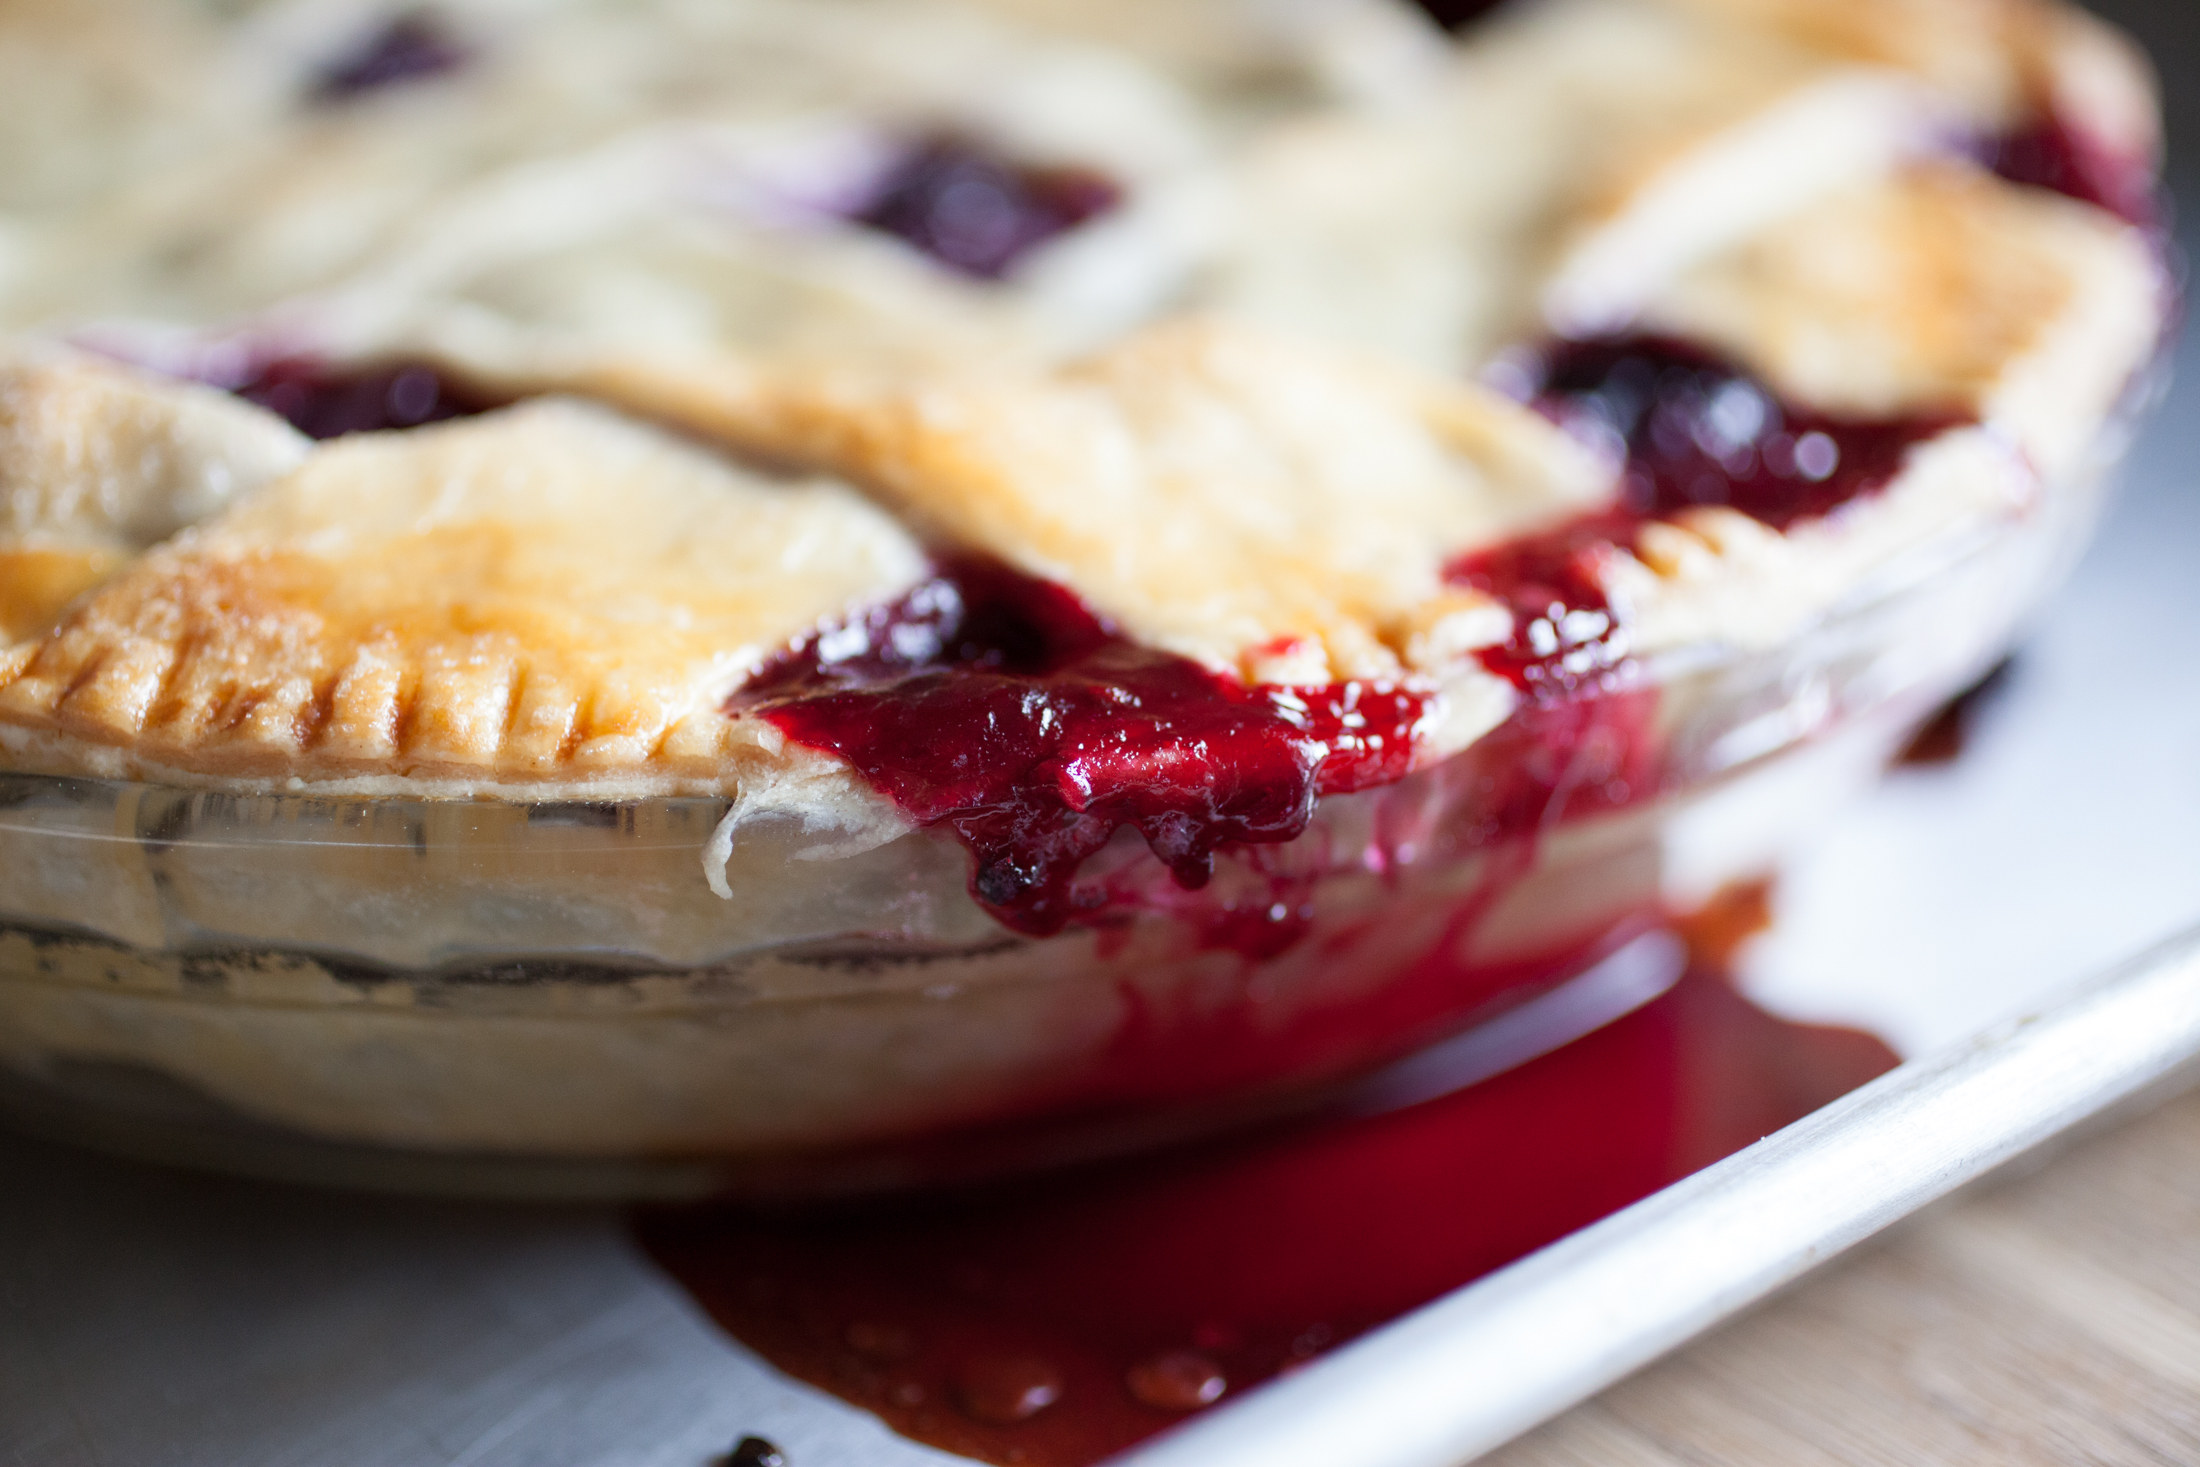
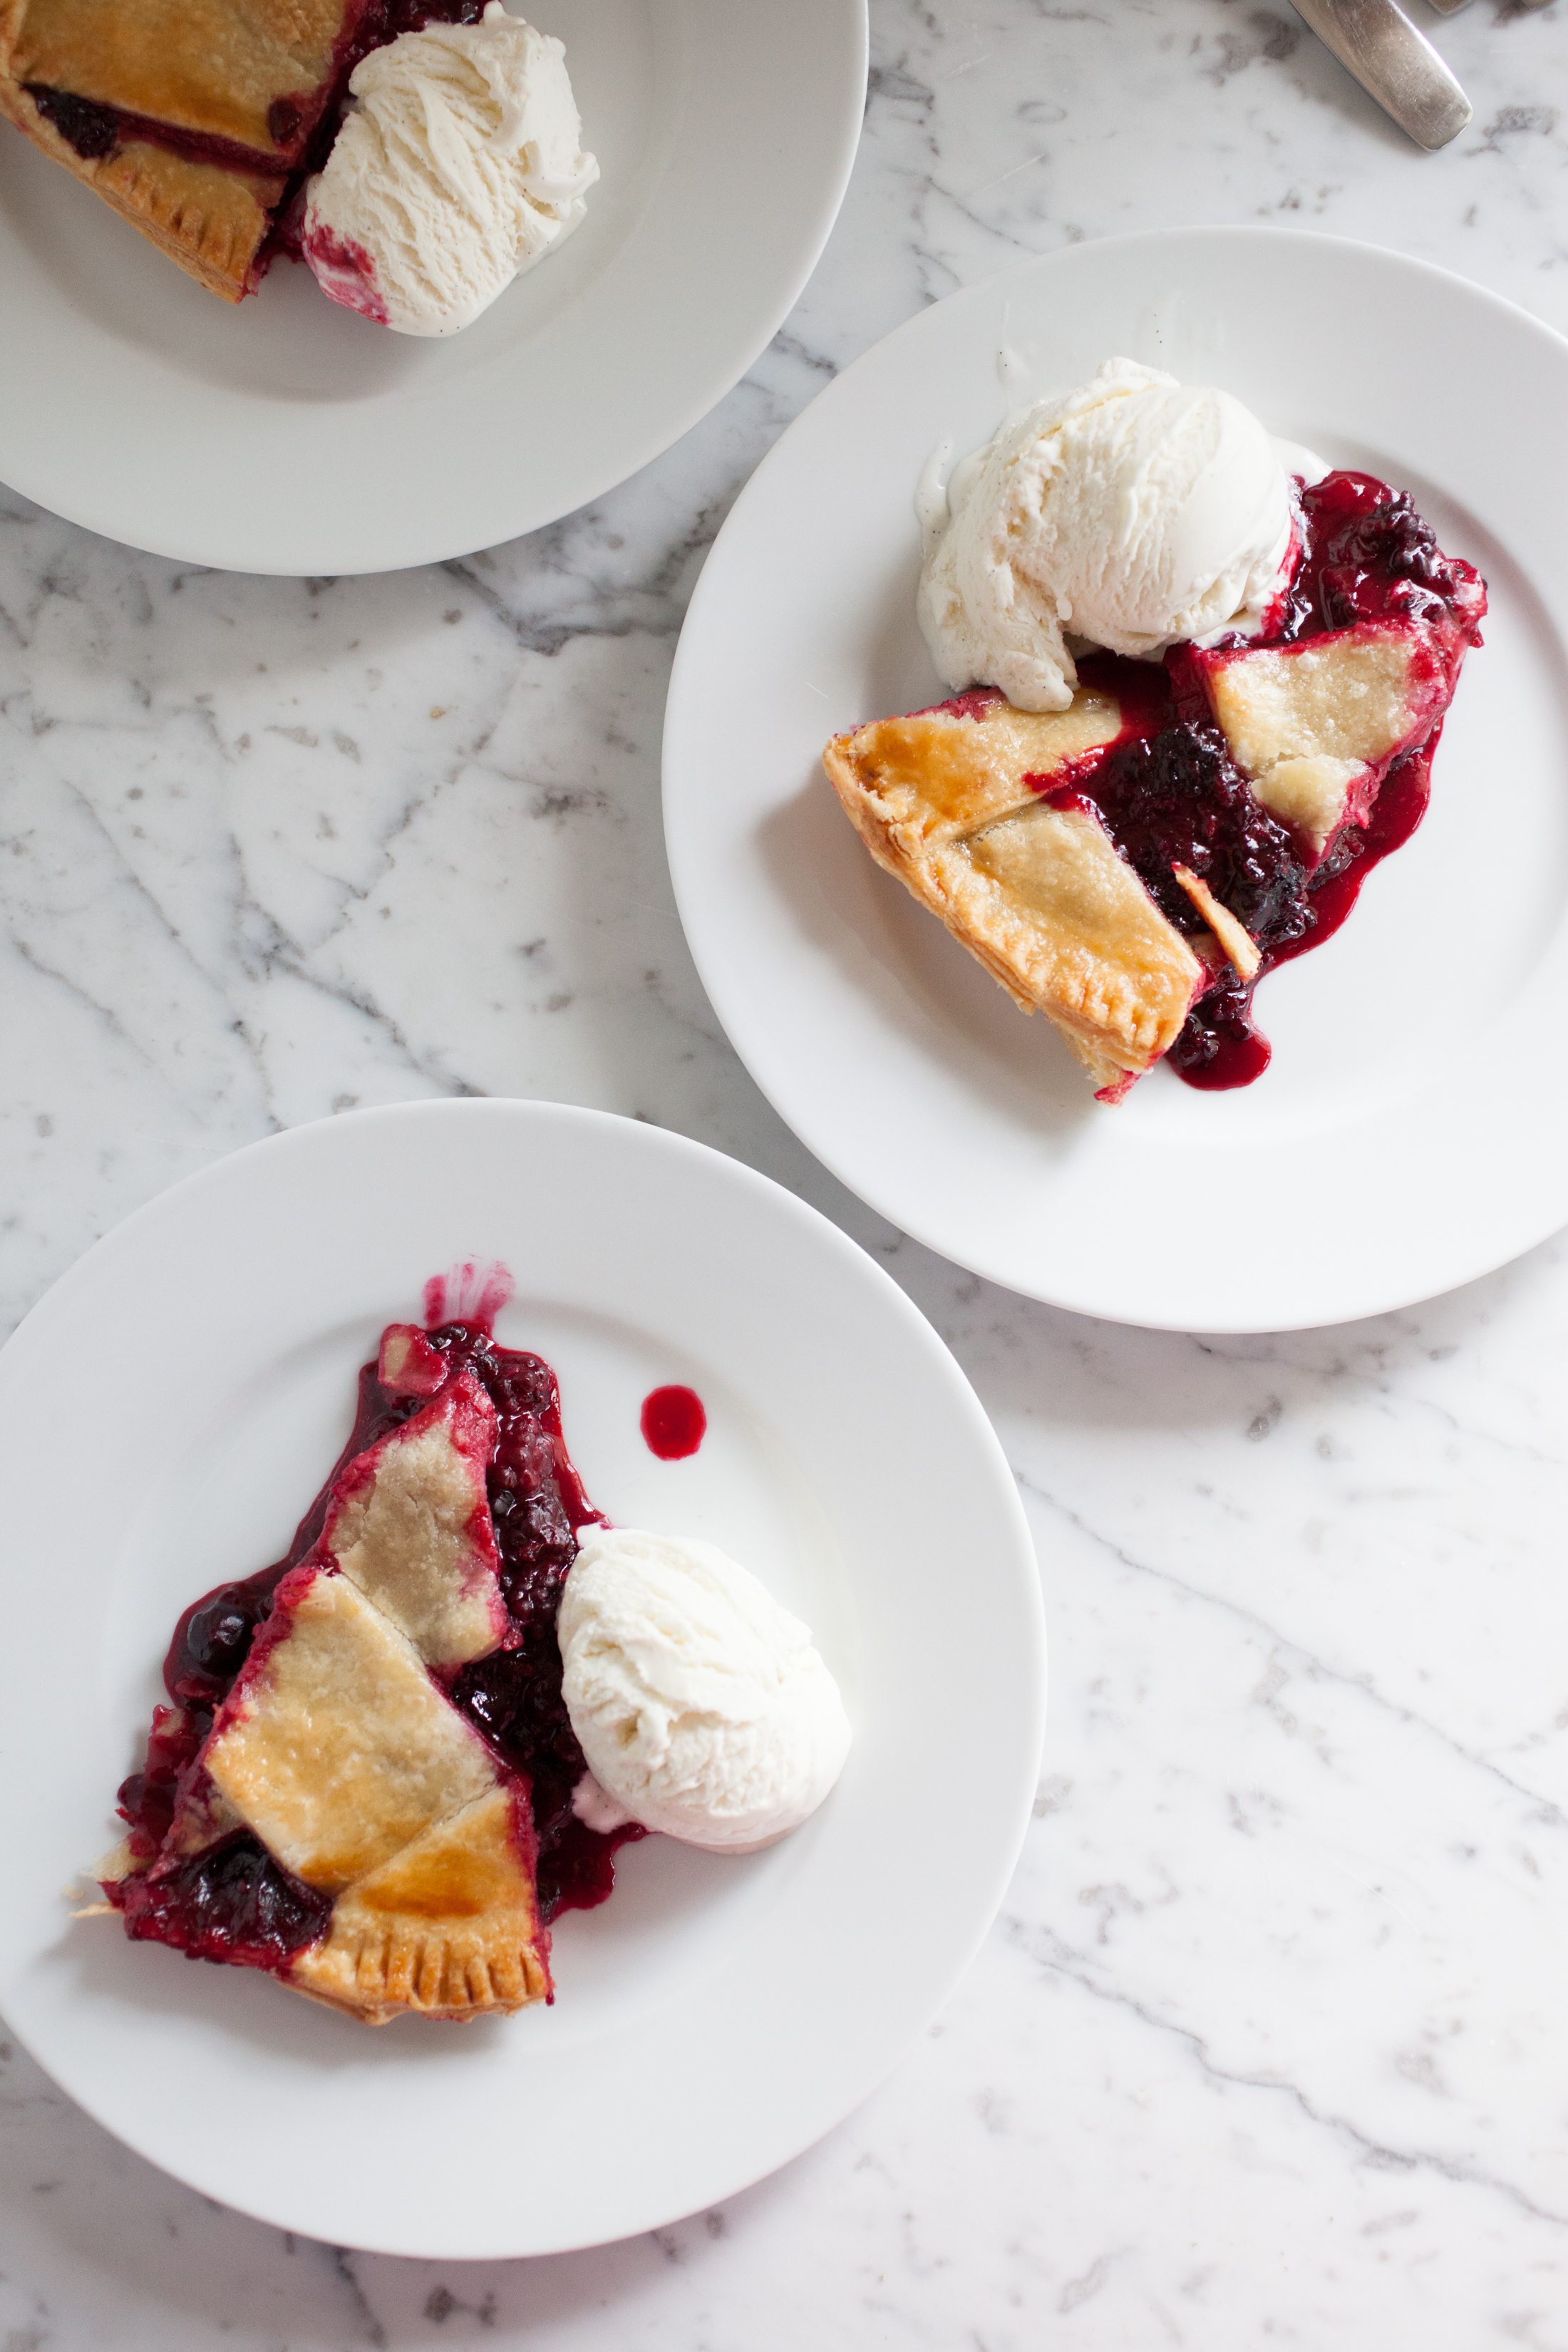
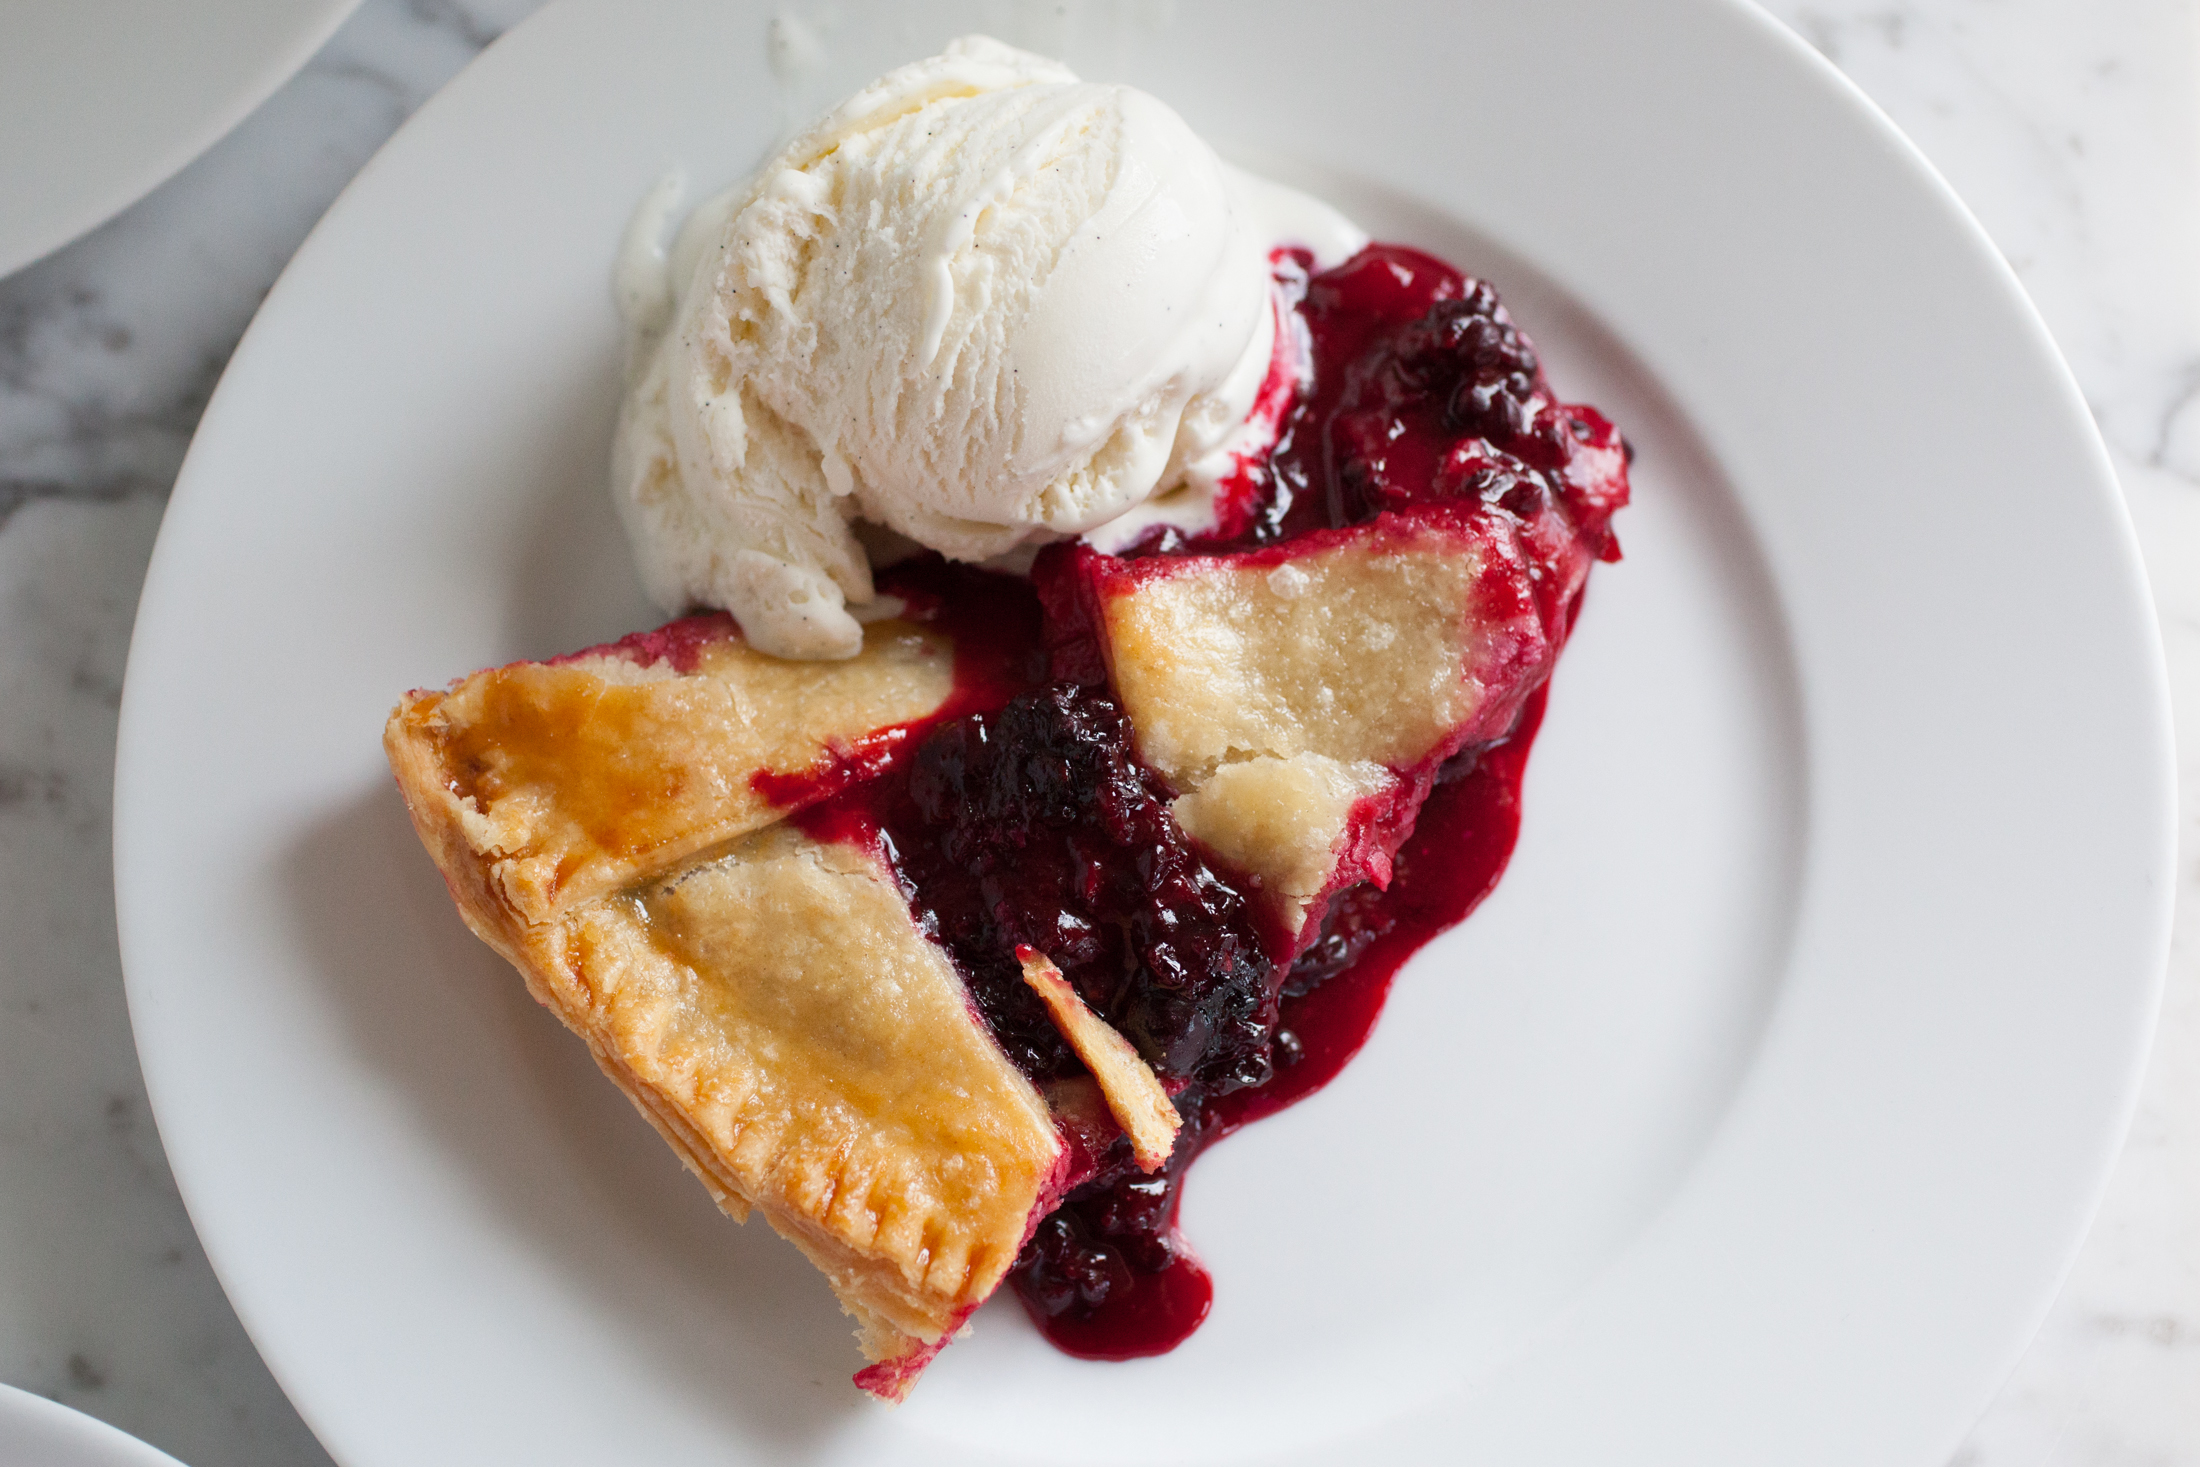
PINPINPINPINWith the base ready I ladled the filling into it just shy of the brim, rolled out my top and cut it into two inch lattice strips. After a quick egg wash and dusting of sugar, the pie went into a nice hot oven. An hour later it emerged – fragrant, flaky, and perfectly summery. I ended up with a bit leftover filling that I poured into a small casserole dish and topped with an excessive amount of crumble topping. The crumble is now tucked away in the freezer for a rainy day, and the pie is long gone, have been enjoyed for a couple of desserts and a couple of breakfasts.
PINPINPINPINBLACKBERRY AND BLUEBERRY PIE
Ingredients.
Crust.
2 1/3 all-purpose flour, plus more for rolling surface
1/2 cup (1 stick) very cold unsalted butter, cut into 1” slices
1 teaspoon fine salt
1/2 cup ice water
Filling.
2 lbs fresh blackberries
1 1/4 lbs fresh blueberries
zest of 1 lemon
3 tablespoons fresh squeezed lemon juice
3/4 teaspoon fine salt
1 cup granulated sugar (plus more to taste, and more for assembling)
1/2 teaspoon pure vanilla extract
1/2 teaspoon ground nutmeg
1 1/2 tablespoons corn starch
2 tablespoons all purpose flour
3/4 teaspoon almond extract
1 egg
1 1/2 tablespoon water
1/2 tablespoon unsalted butter
Directions.
To make the pie dough, put the flour in the food processor along with the salt. Pulse briefly to combine. Add in the chilled butter and pulse to combine, until the butter is broken up and the dough looks like sand. With the food processor running, slowly pour in the ice water just until the dough forms a ball. Transfer the dough to a floured surface and form it into a ball, being careful not to overwork it. Wrap tightly with plastic wrap and chill it in the refrigerator for at least four hours, up to overnight.
While the dough chills, combine the blackberries, blueberries, lemon zest and juice, salt, sugar, nutmeg, corn starch, flour, vanilla extract, and almond extract in a large bowl. Mix roughly with a wooden spoon to combine and slightly macerate. Taste for sweetness and add sugar as desired until it’s just as sweet as you like. Set aside to settle and meld for 20-30 minutes.
Preheat the oven to 425ºF.
Sprinkle about 1/2 teaspoon of sugar into the base of your pie dish – this will make it easier to maneuver you dough in the dish. Remove the dough from the fridge and cut it in half. Wrap what will be the top crust back up tightly and place it back in the fridge. On a lightly floured surface, roll out the bottom crust to 1/8th inch thick. Carefully transfer it to the pie dish. Fill it nearly to the brim with the filling, dot it with the 1/2 tablespoon of butter, and pull out the remaining pie dough to roll out. Roll the top dough to 1/8 inch thick and cut it into two inch strips for a wide lattice top, or simply roll it out for a basic pie crust.
Using a pastry brush, dampen the exposed rim of the bottom crust before adding the top crust to the pie. Crimp the edges by hand or with a fork. Trim the excess dough from the edge of the pie. Whisk together the water and 1 egg and, using a brush, lightly coat the top of the pie with the egg wash. Sprinkle the wash with a bit of sugar. If you have chosen a basic pie crust, as opposed to a lattice top, be sure to cut slits into it to allow the steam to escape.
Place the pie in the oven on the center rack, on top of a baking sheet in case it spills over a bit, and immediately turn the oven down to 350ºF. Bake the pie for 45 minutes – 1 hour, until the crust is golden and flakey, and the filling is heated through.
Allow the pie to cool completely, or at least as cool as you have the patience for, before slicing it and serving it with vanilla bean ice cream or fresh whipped cream. Keep it wrapped and stored in the fridge. It makes for a great breakfast served with a splash of heavy cream.
PRINTABLE RECIPE.
BLACKBERRY AND BLUEBERRY PIE
Save
Save
Save
|


 PIN
PIN PIN
PIN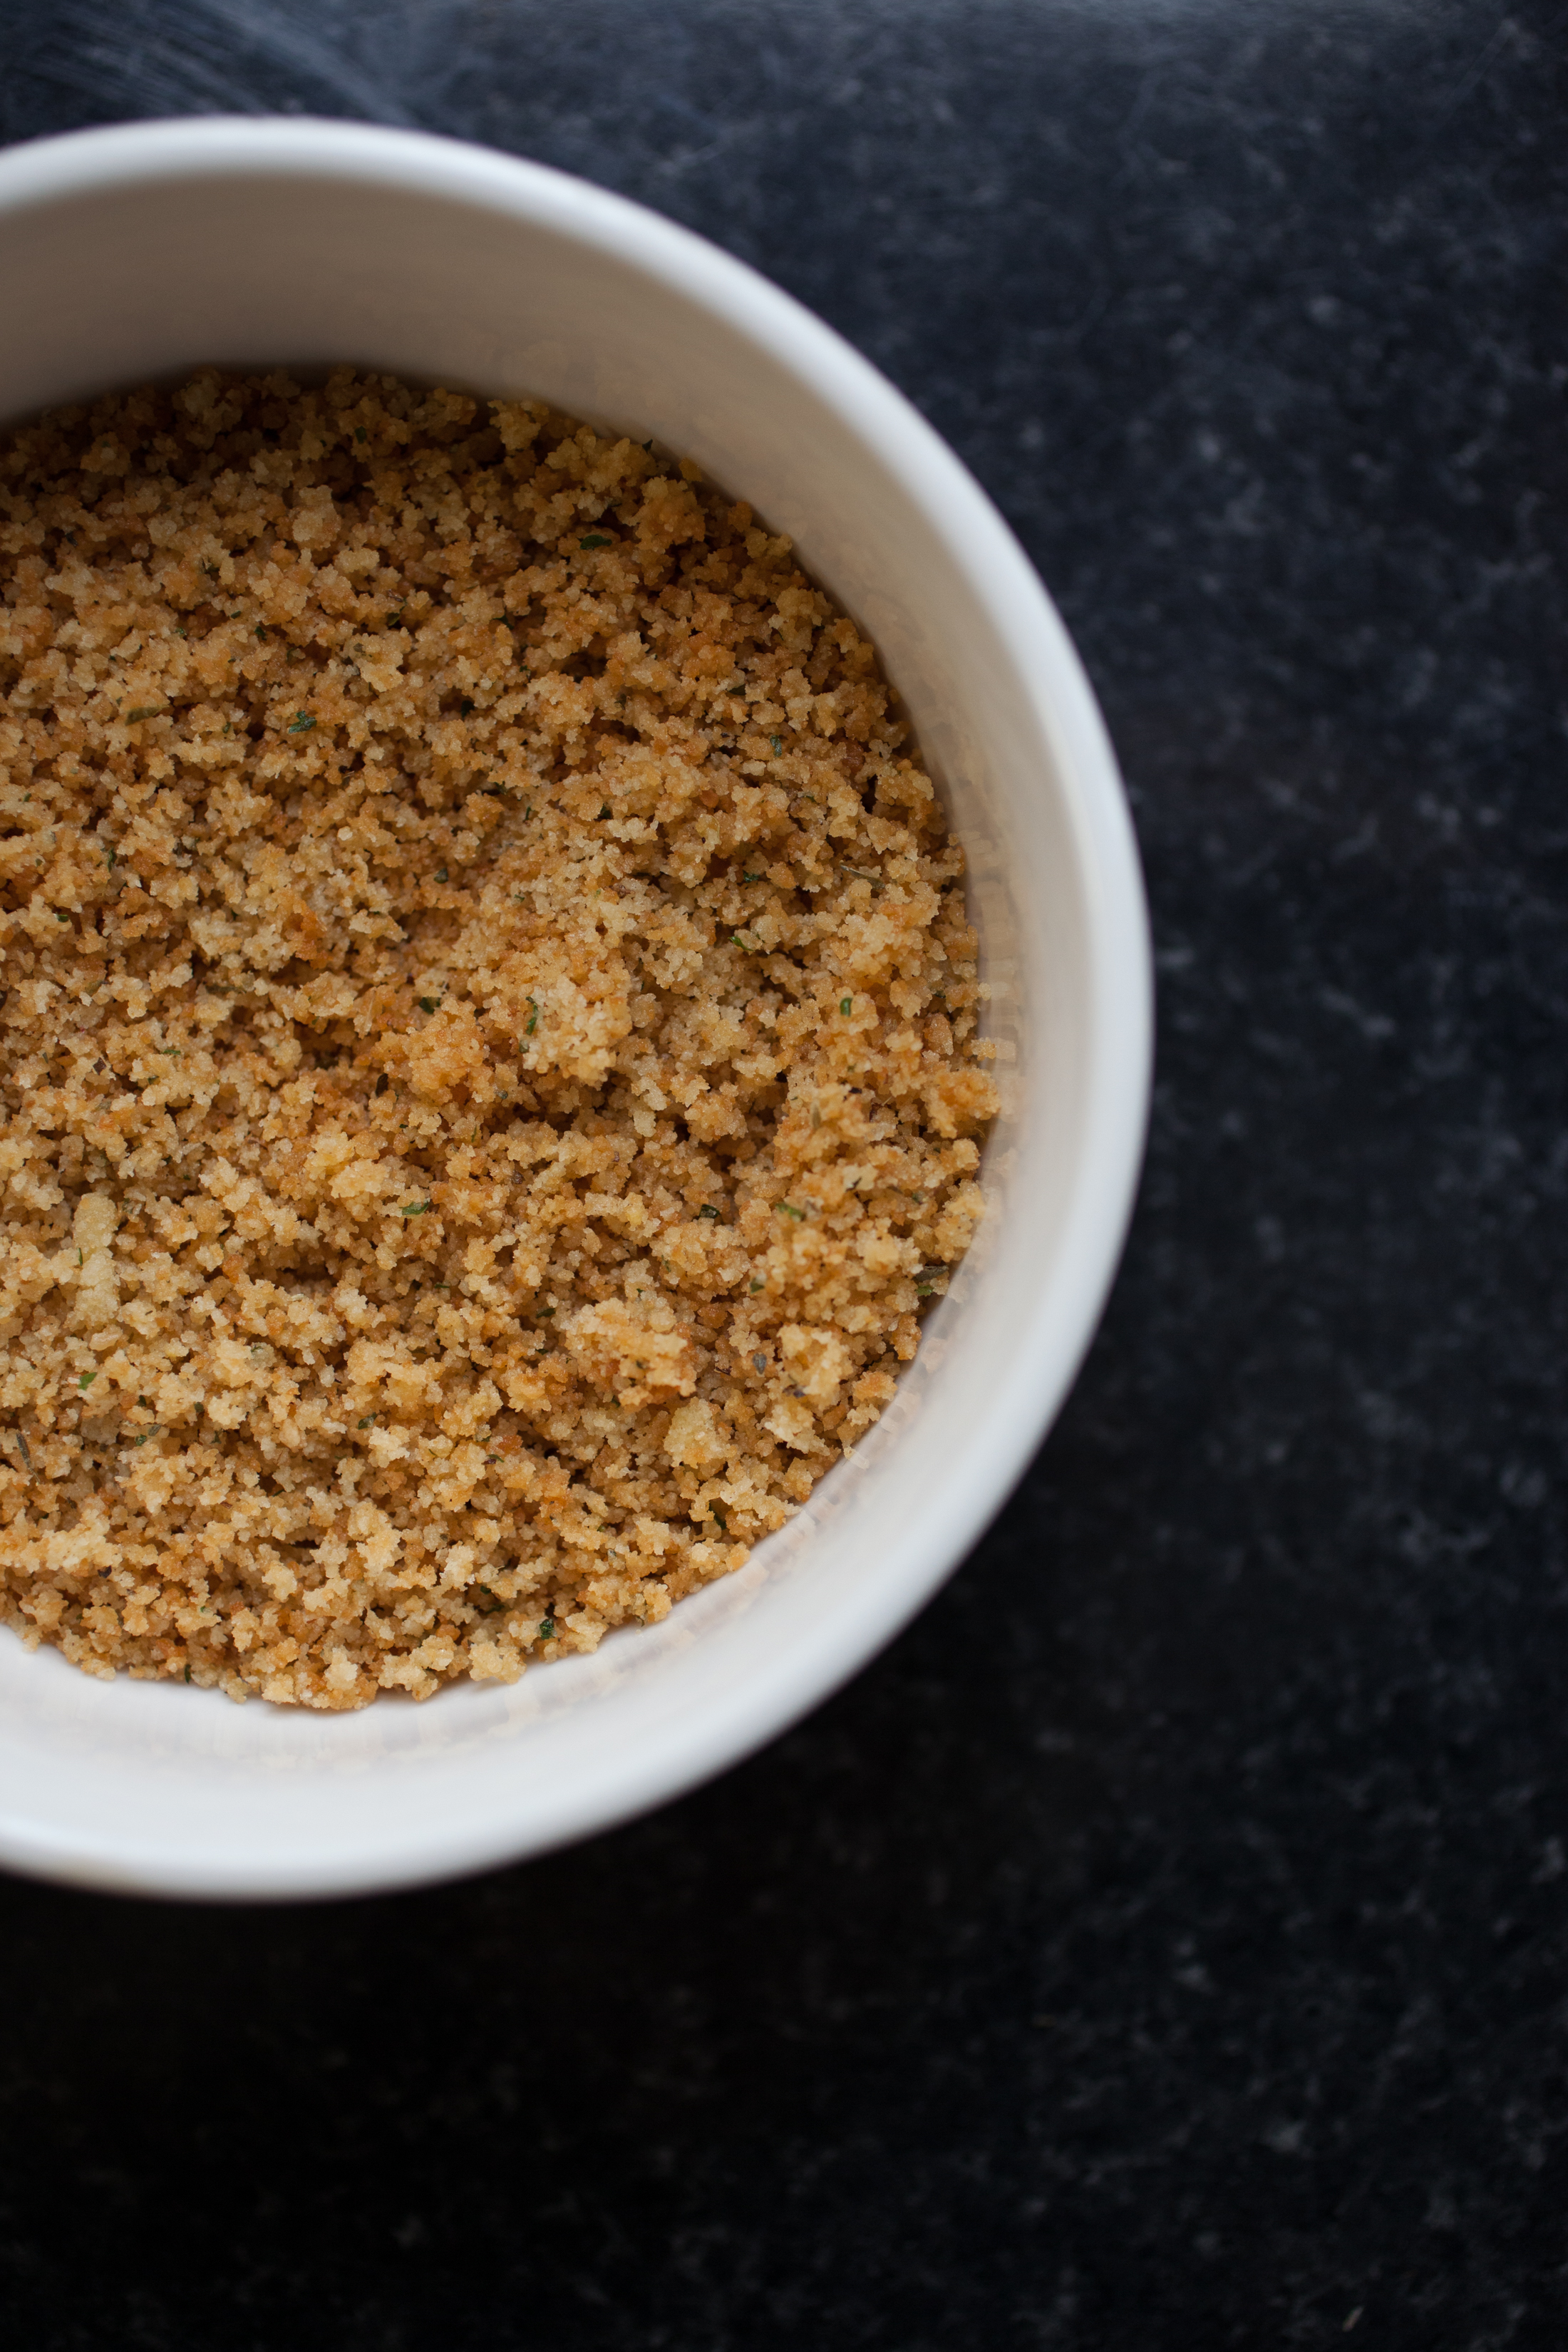 PIN
PIN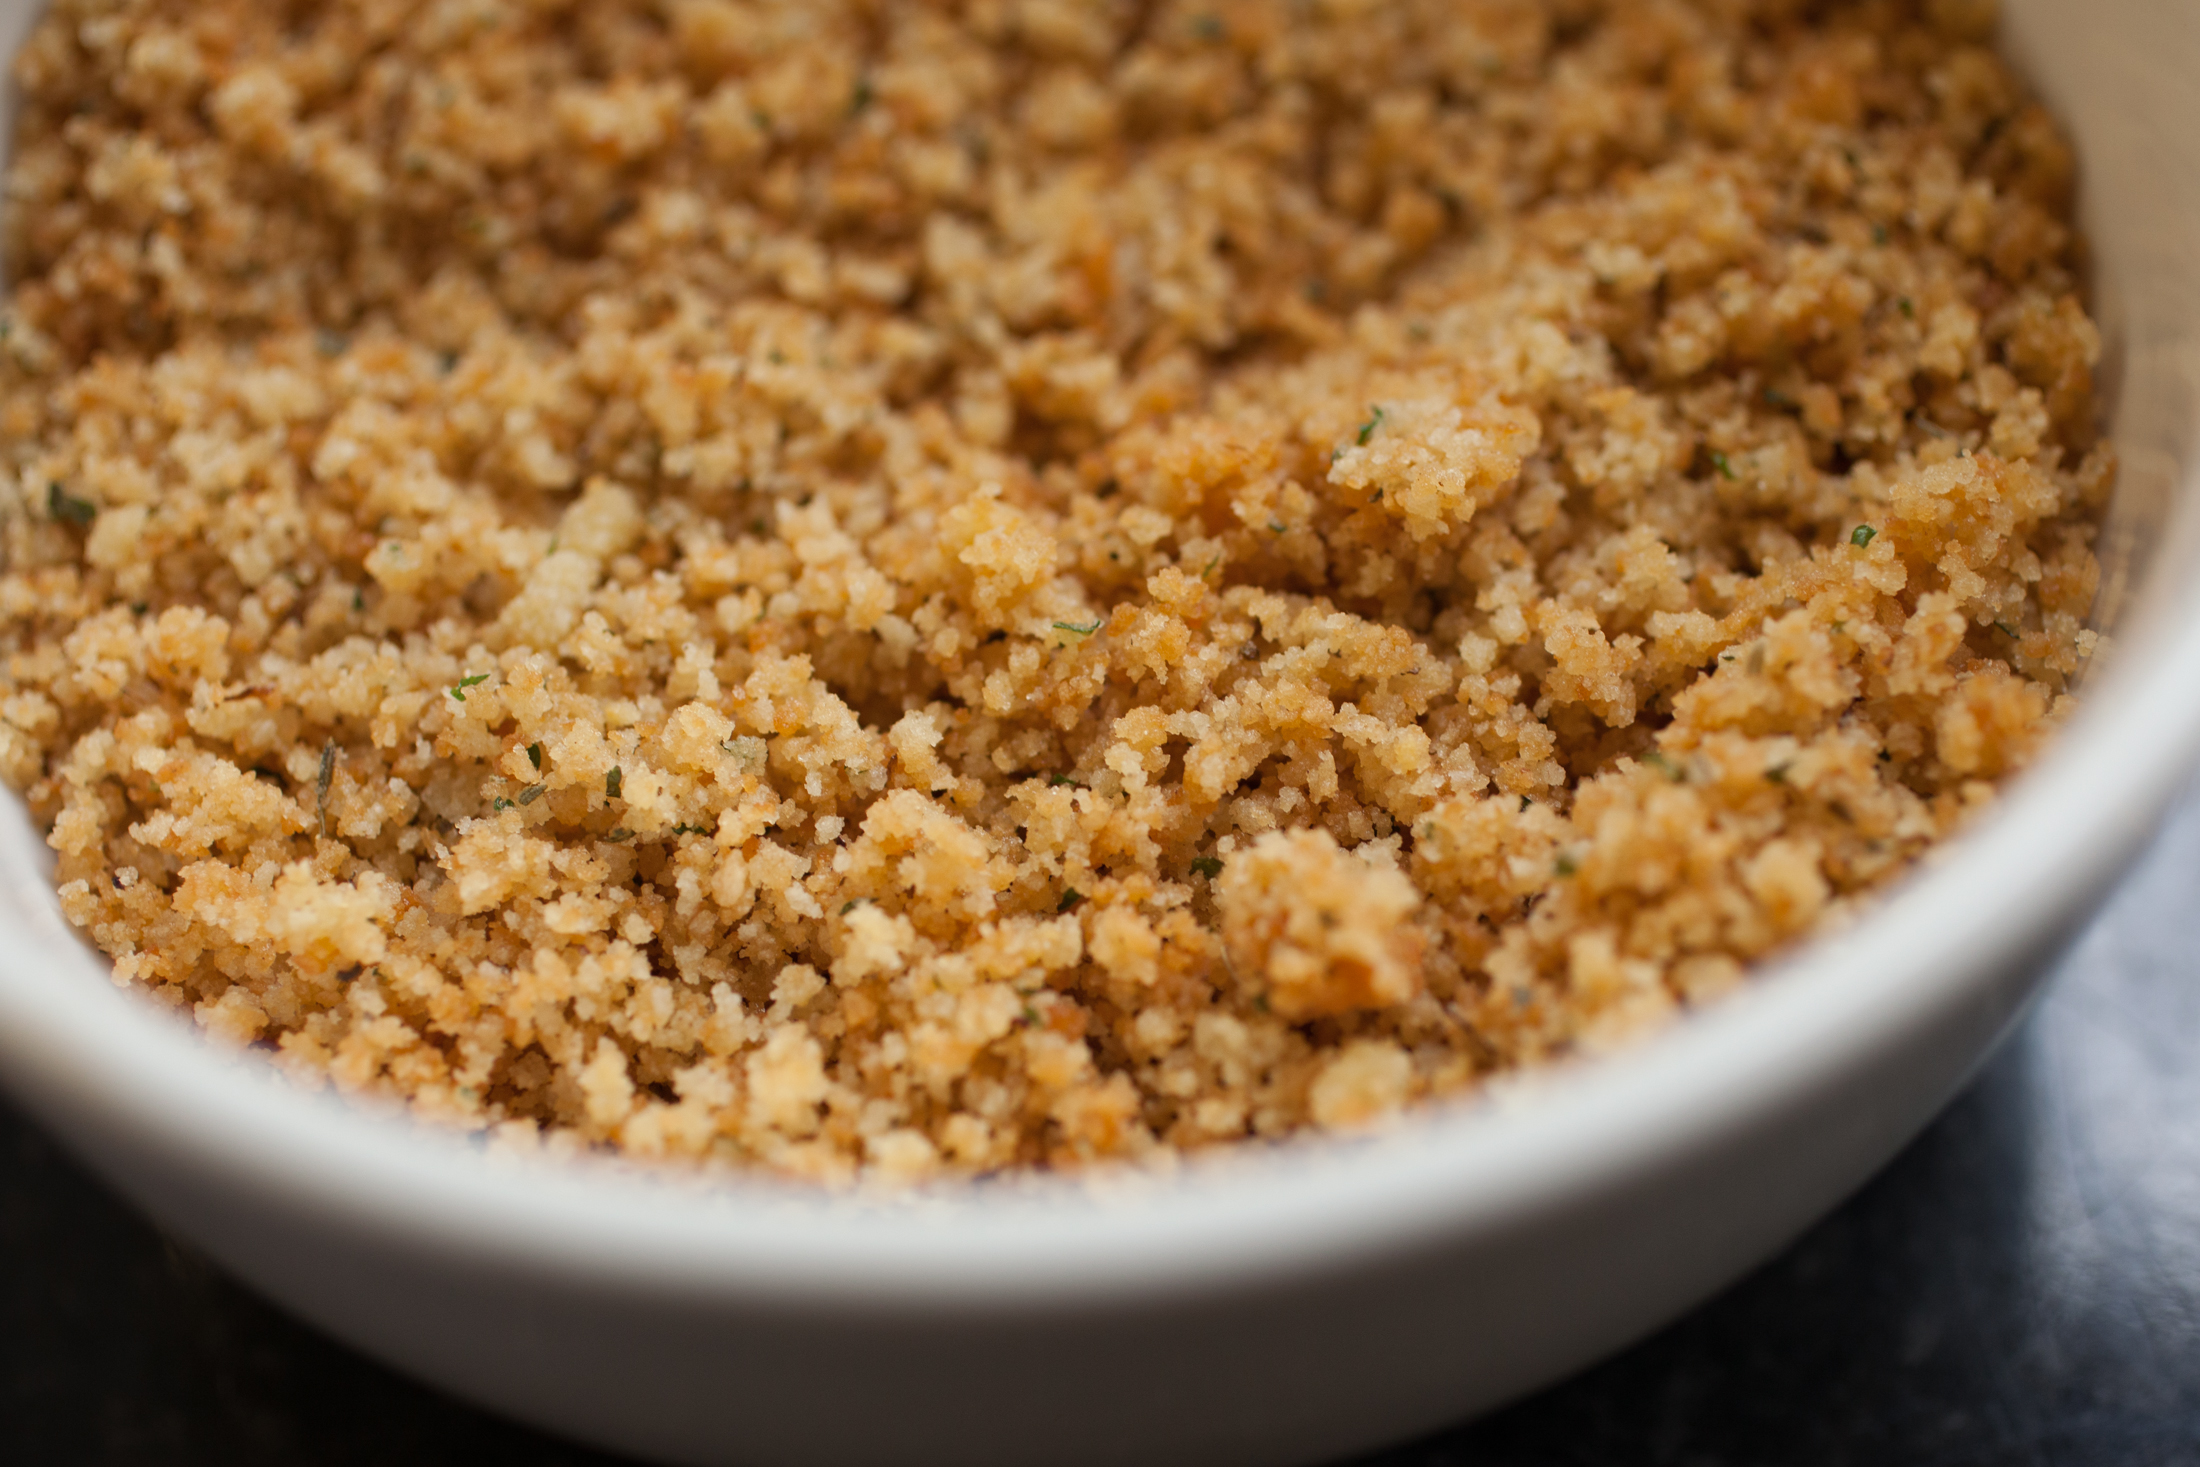 PIN
PIN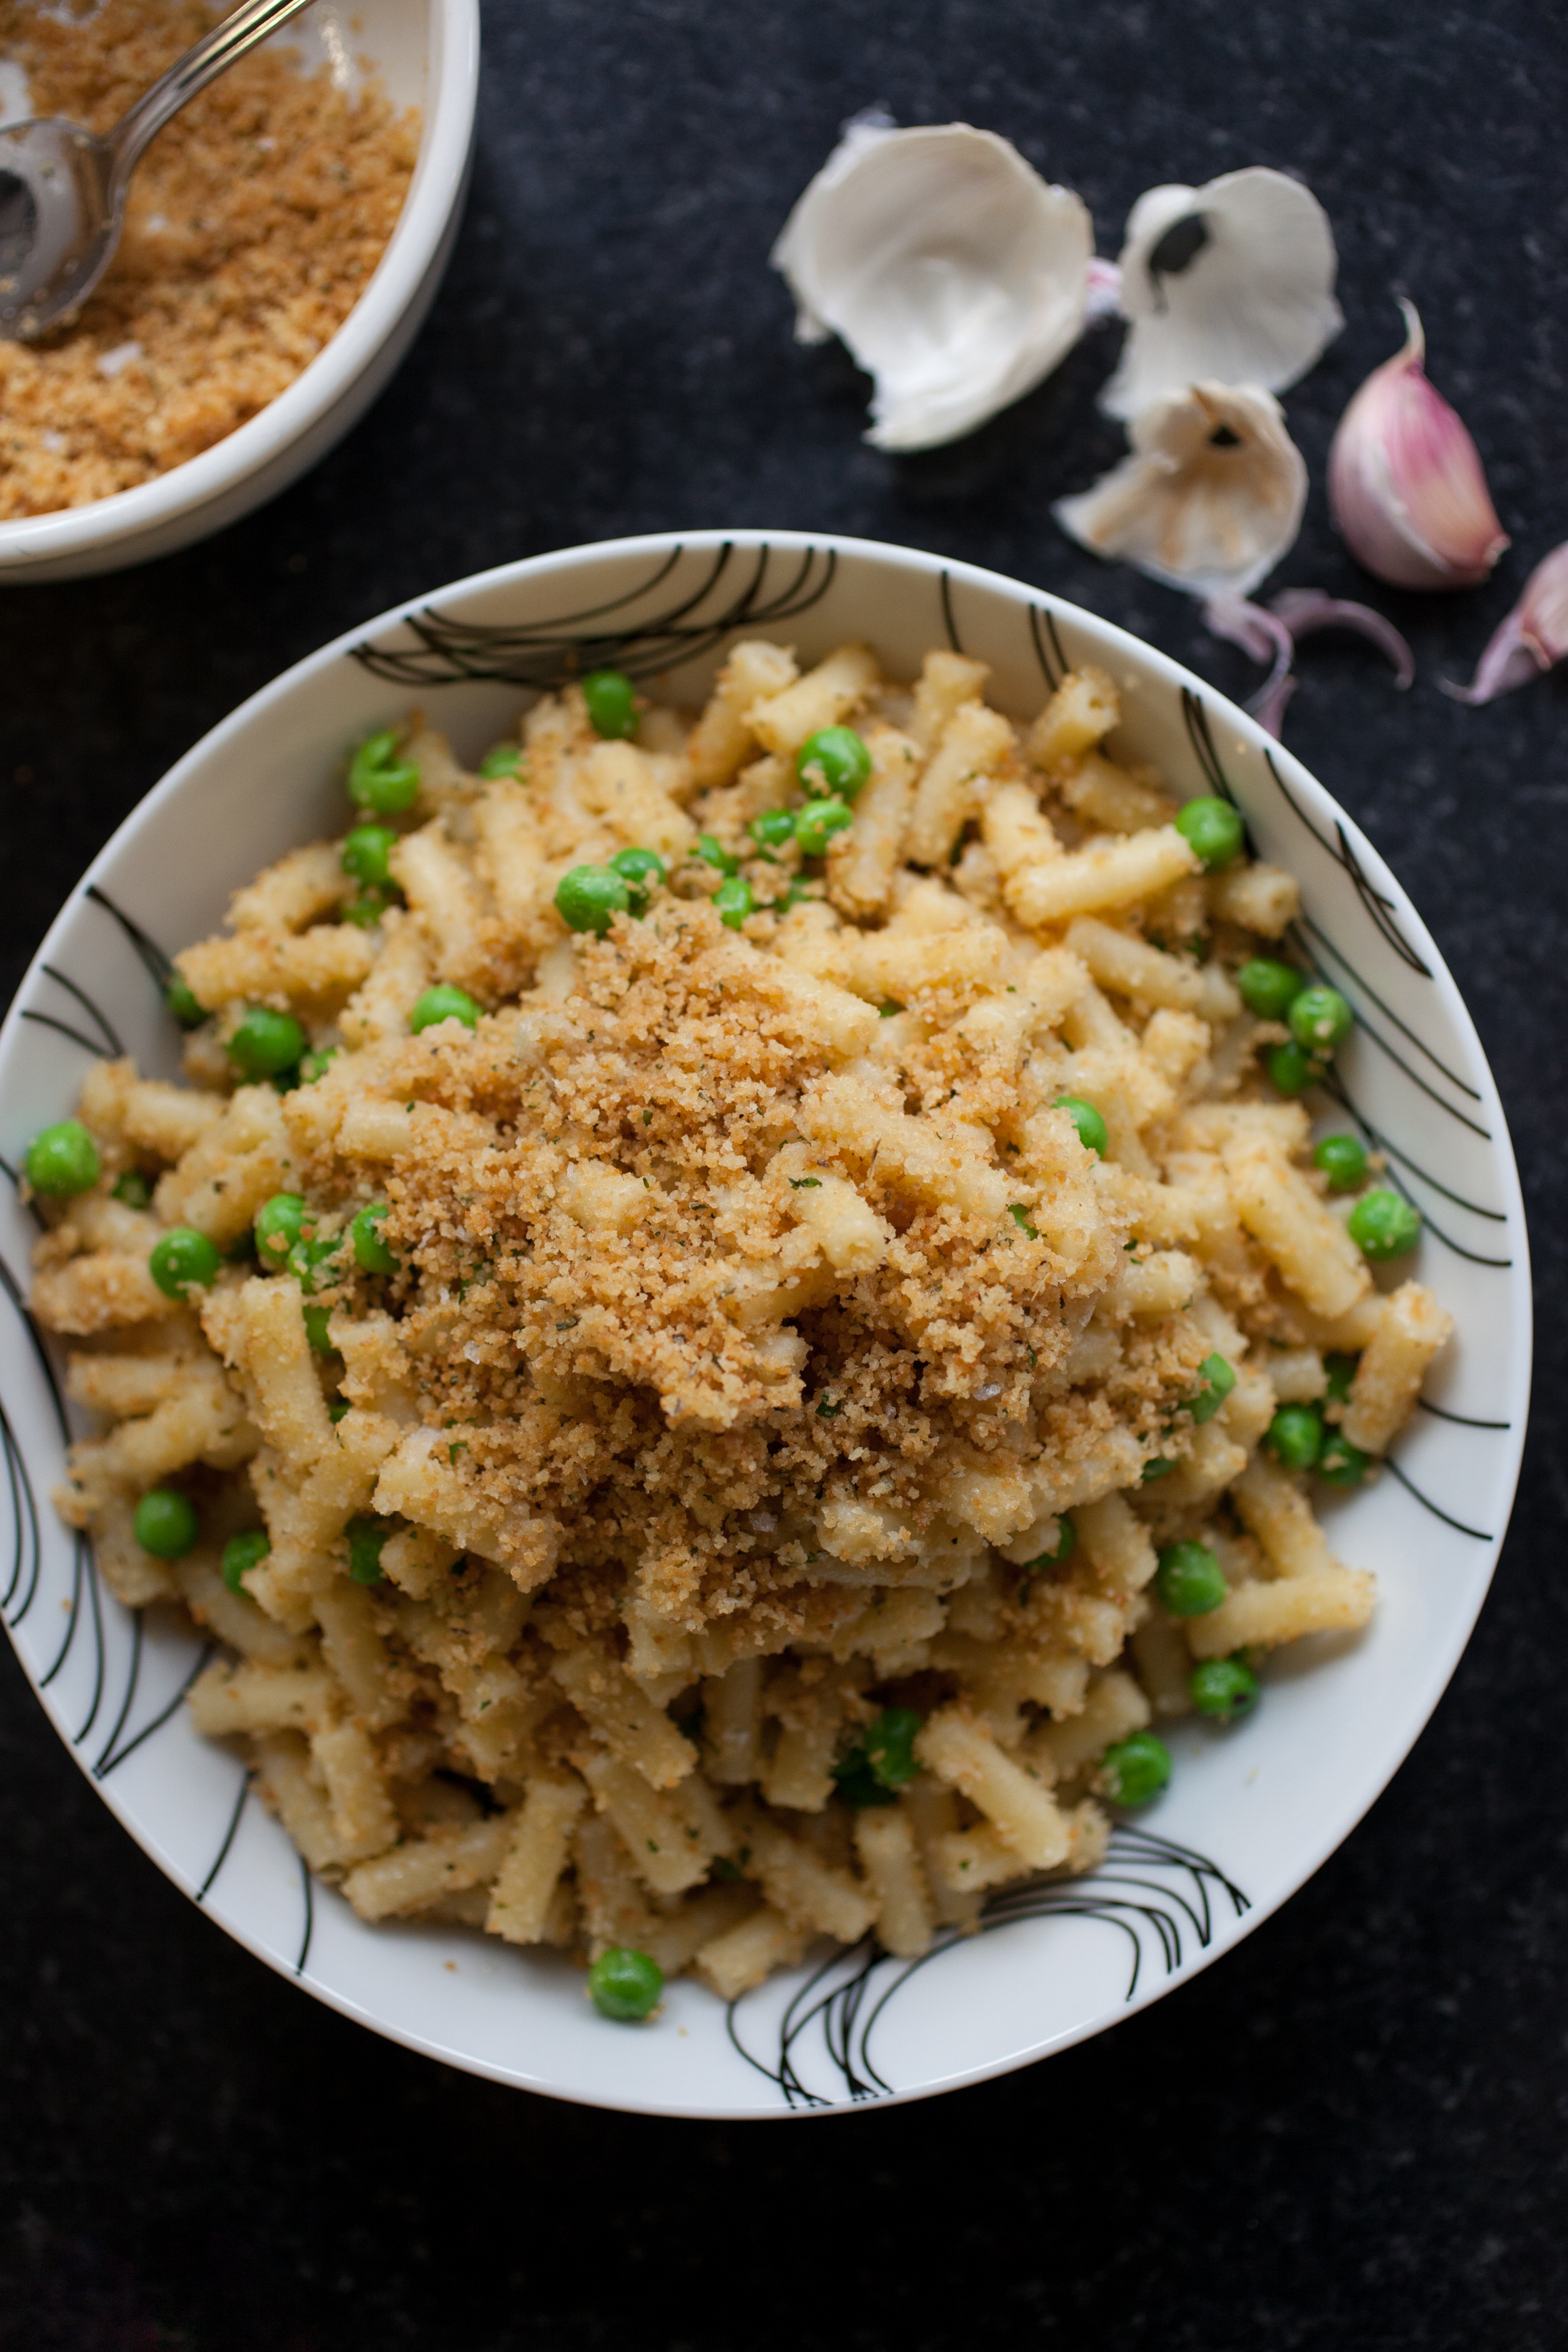 PIN
PIN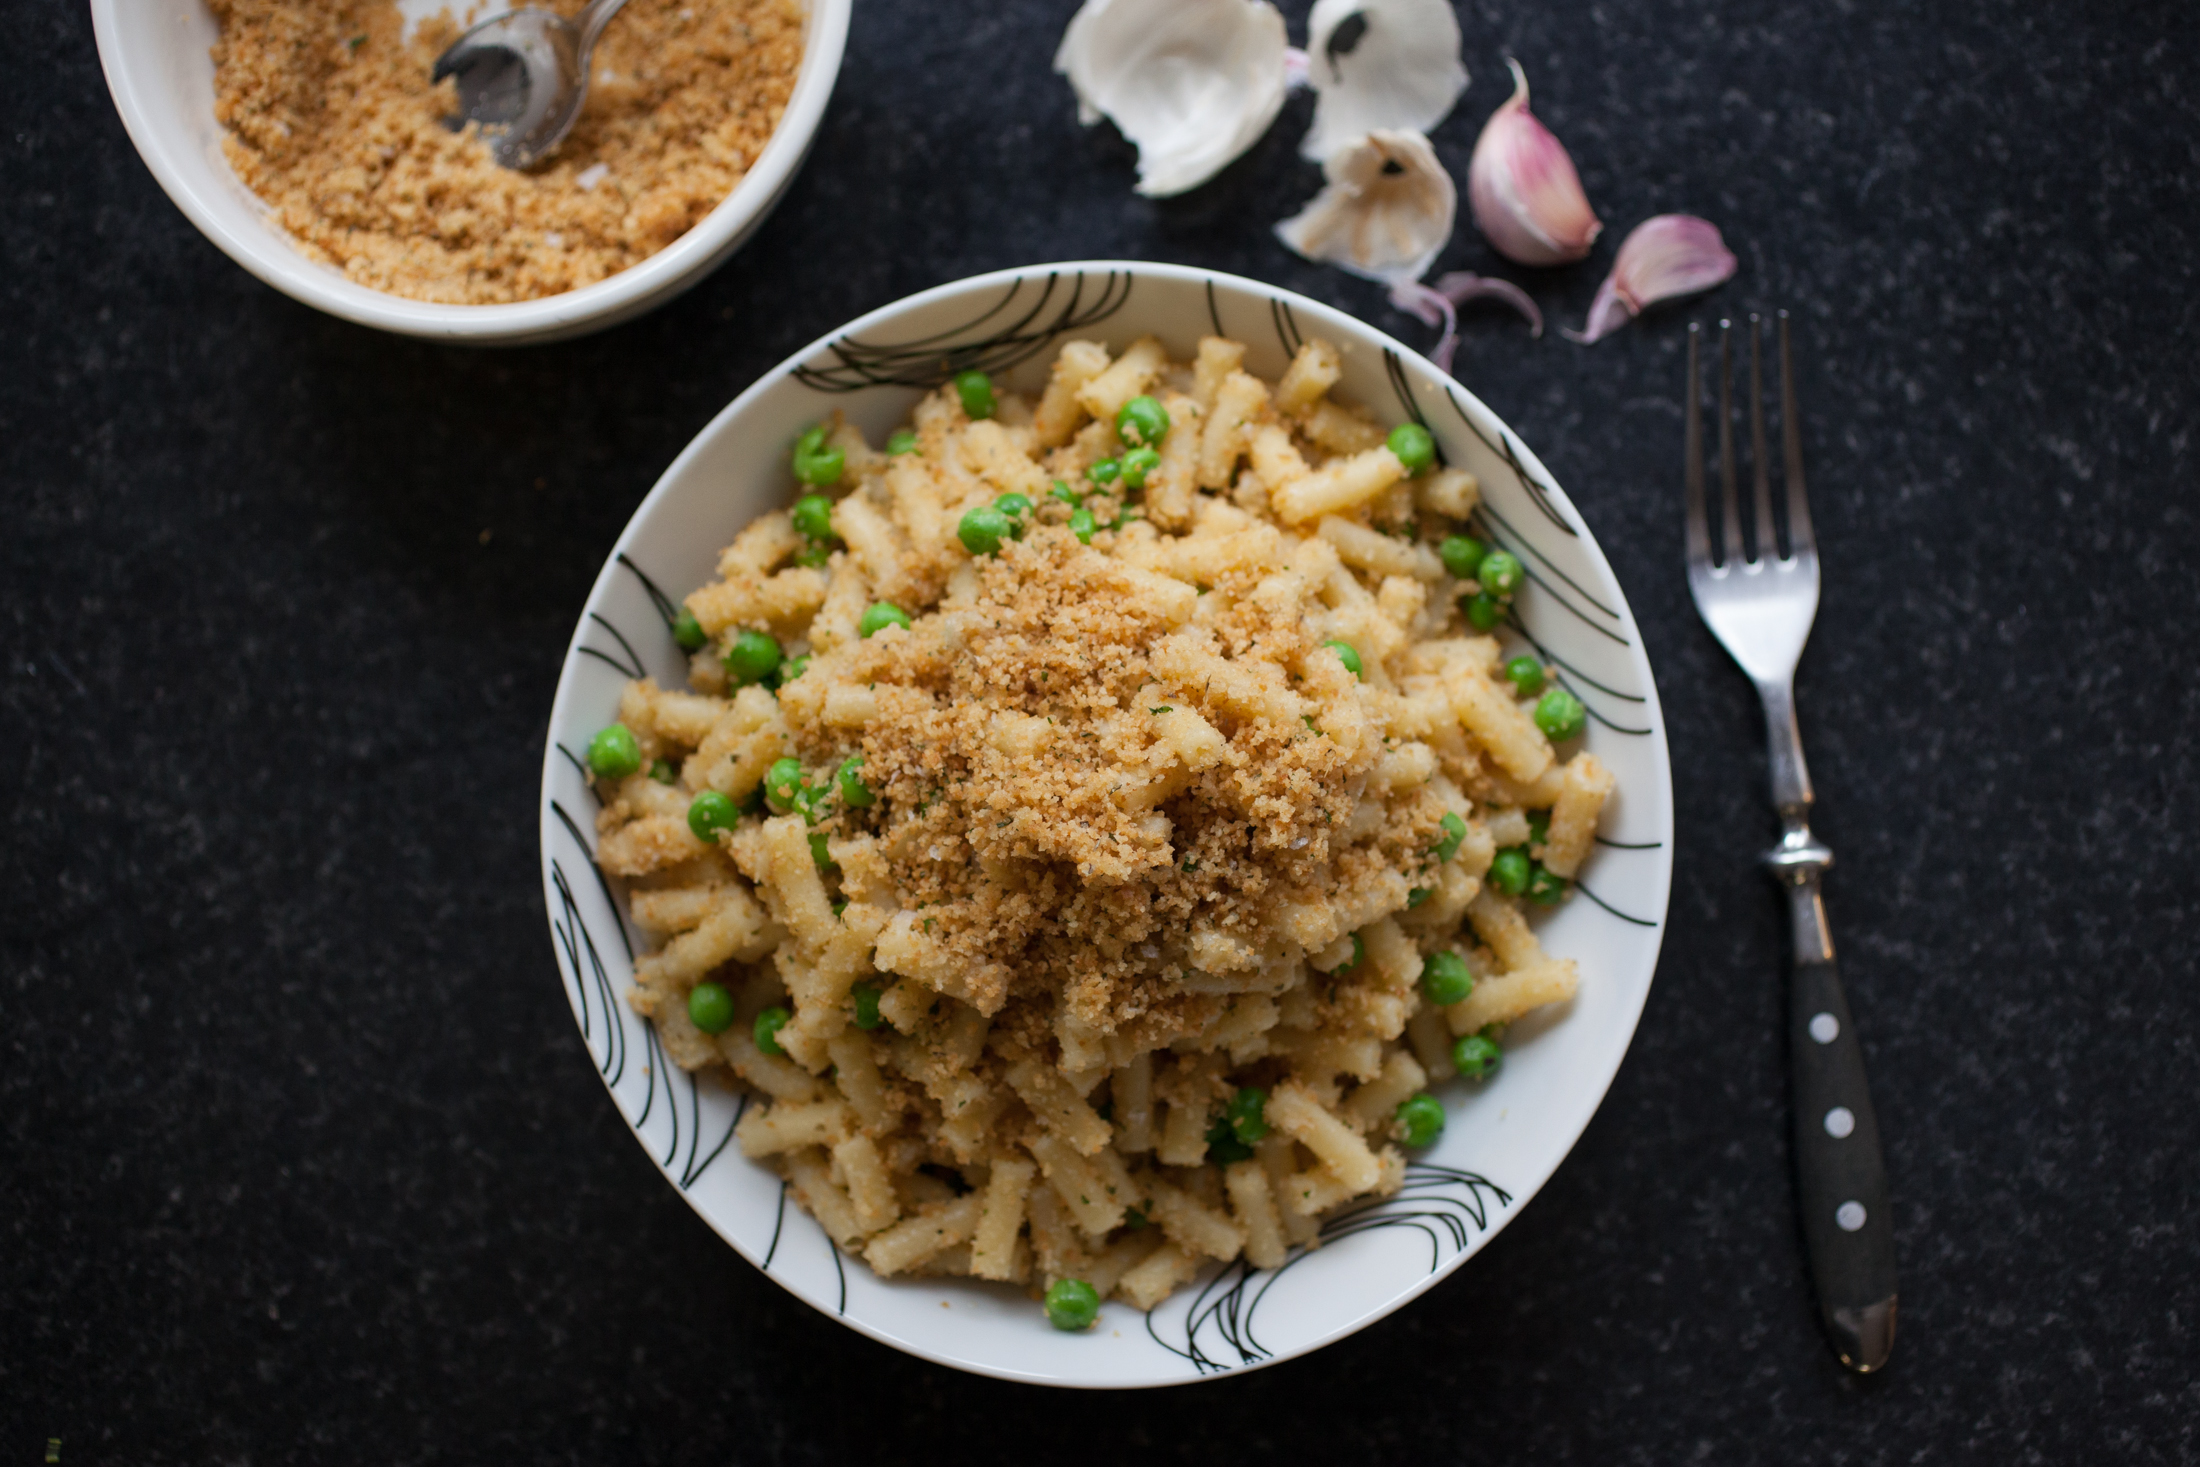 PIN
PIN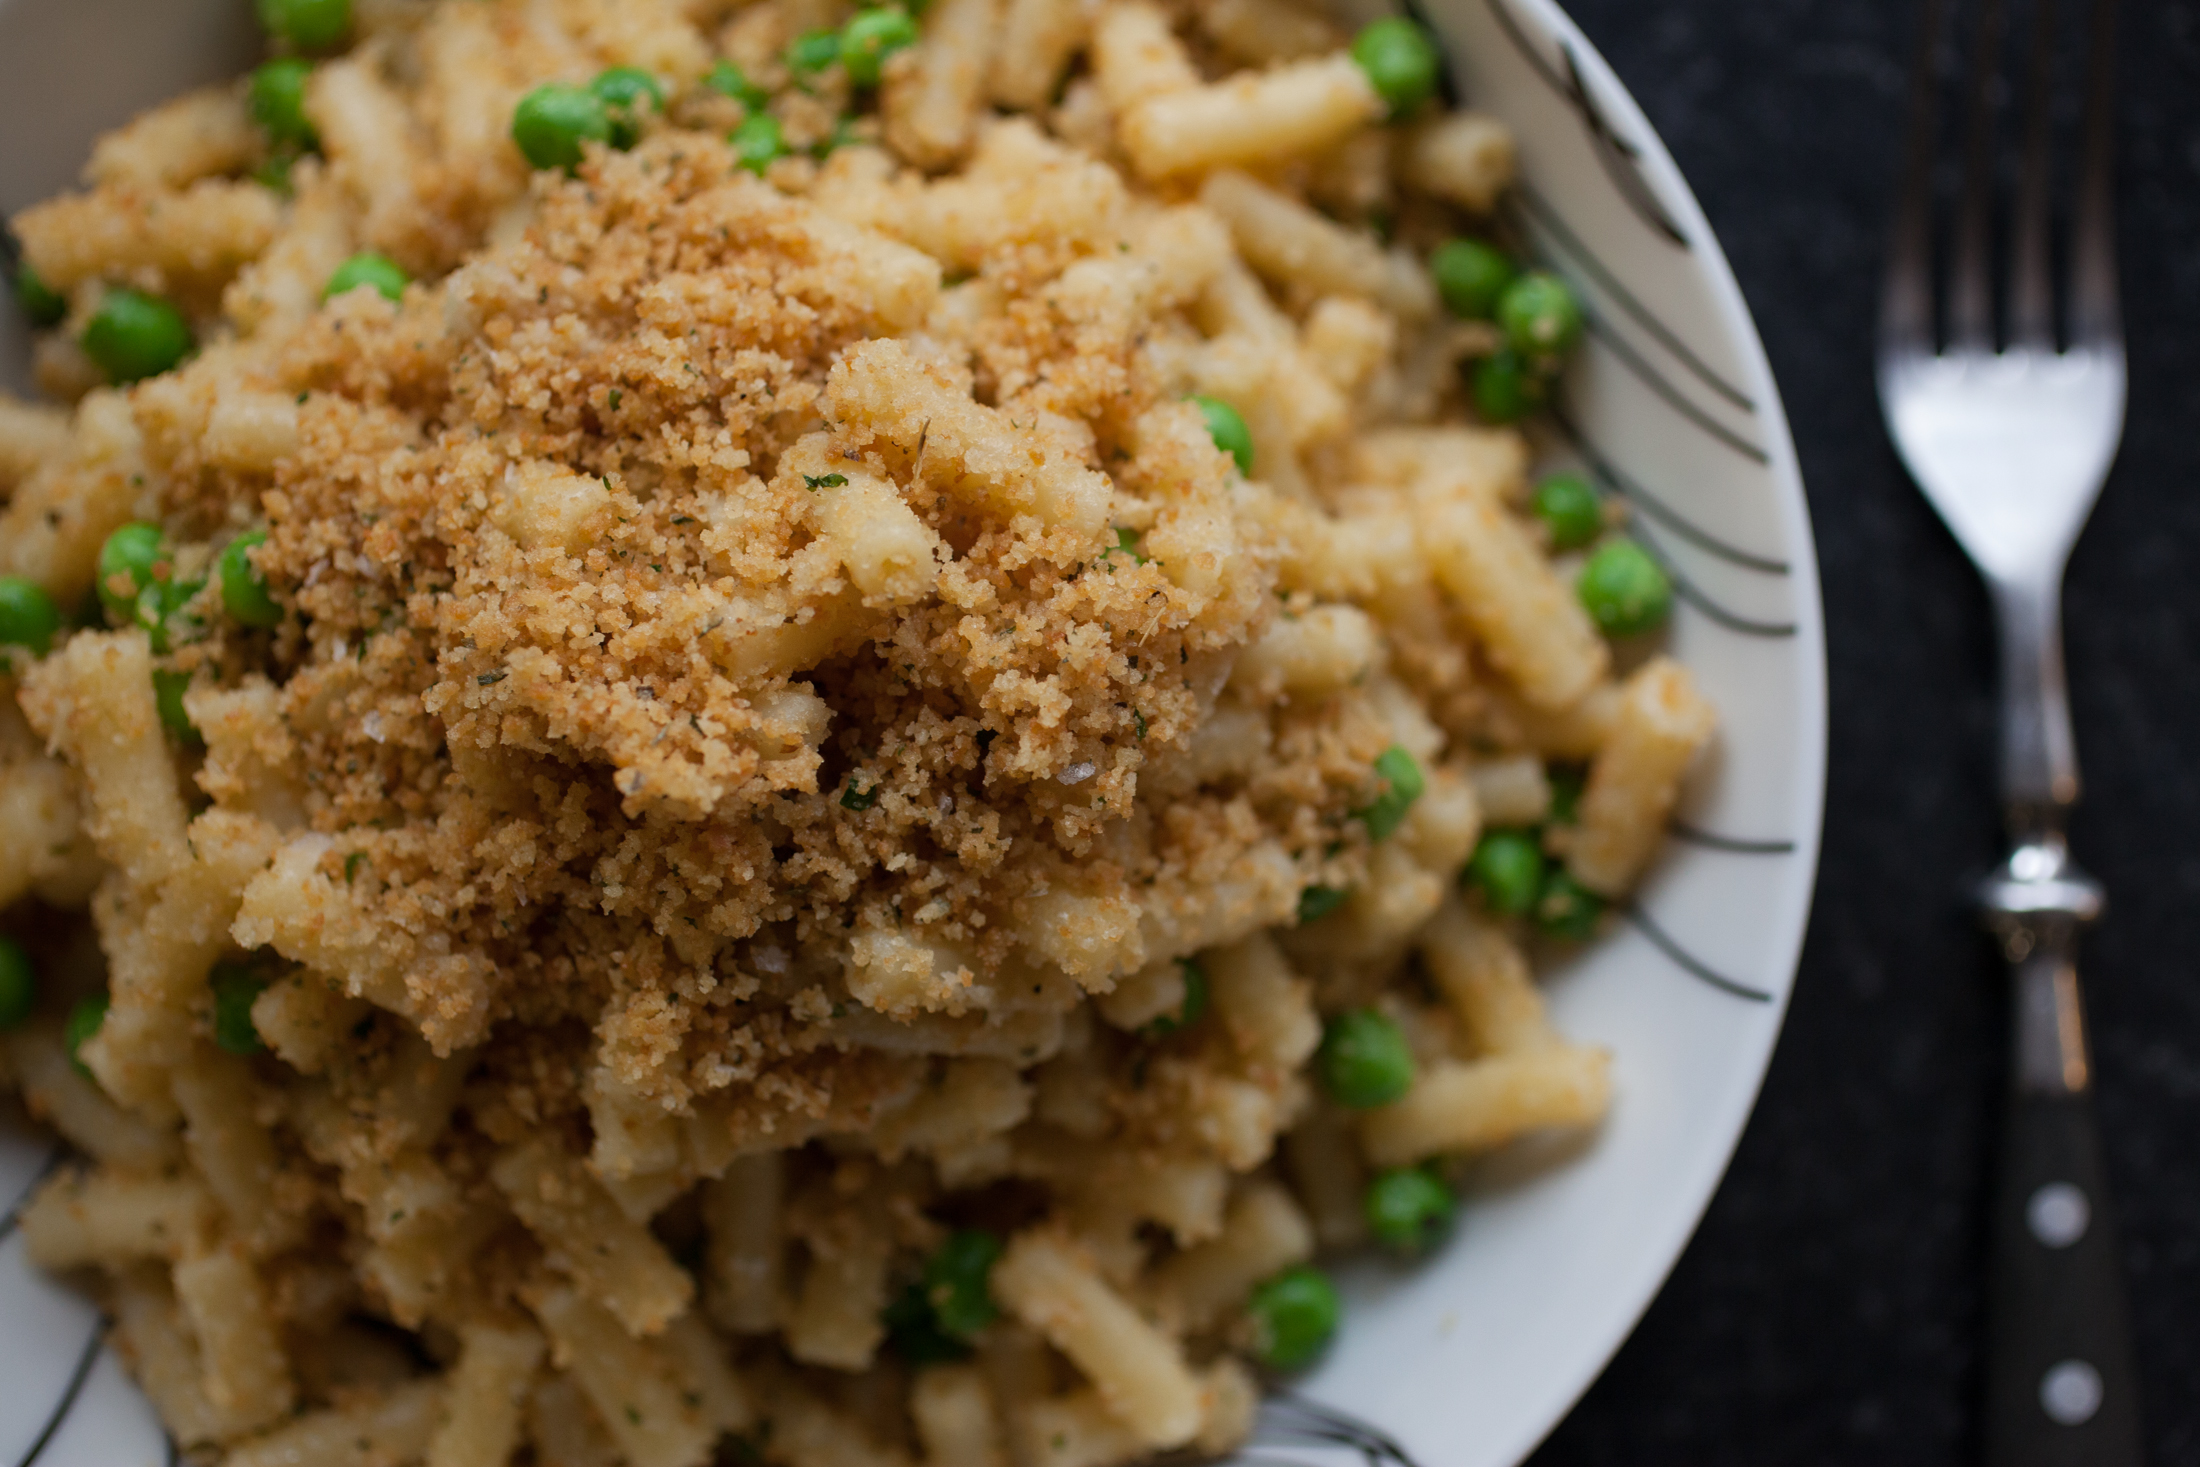 PIN
PIN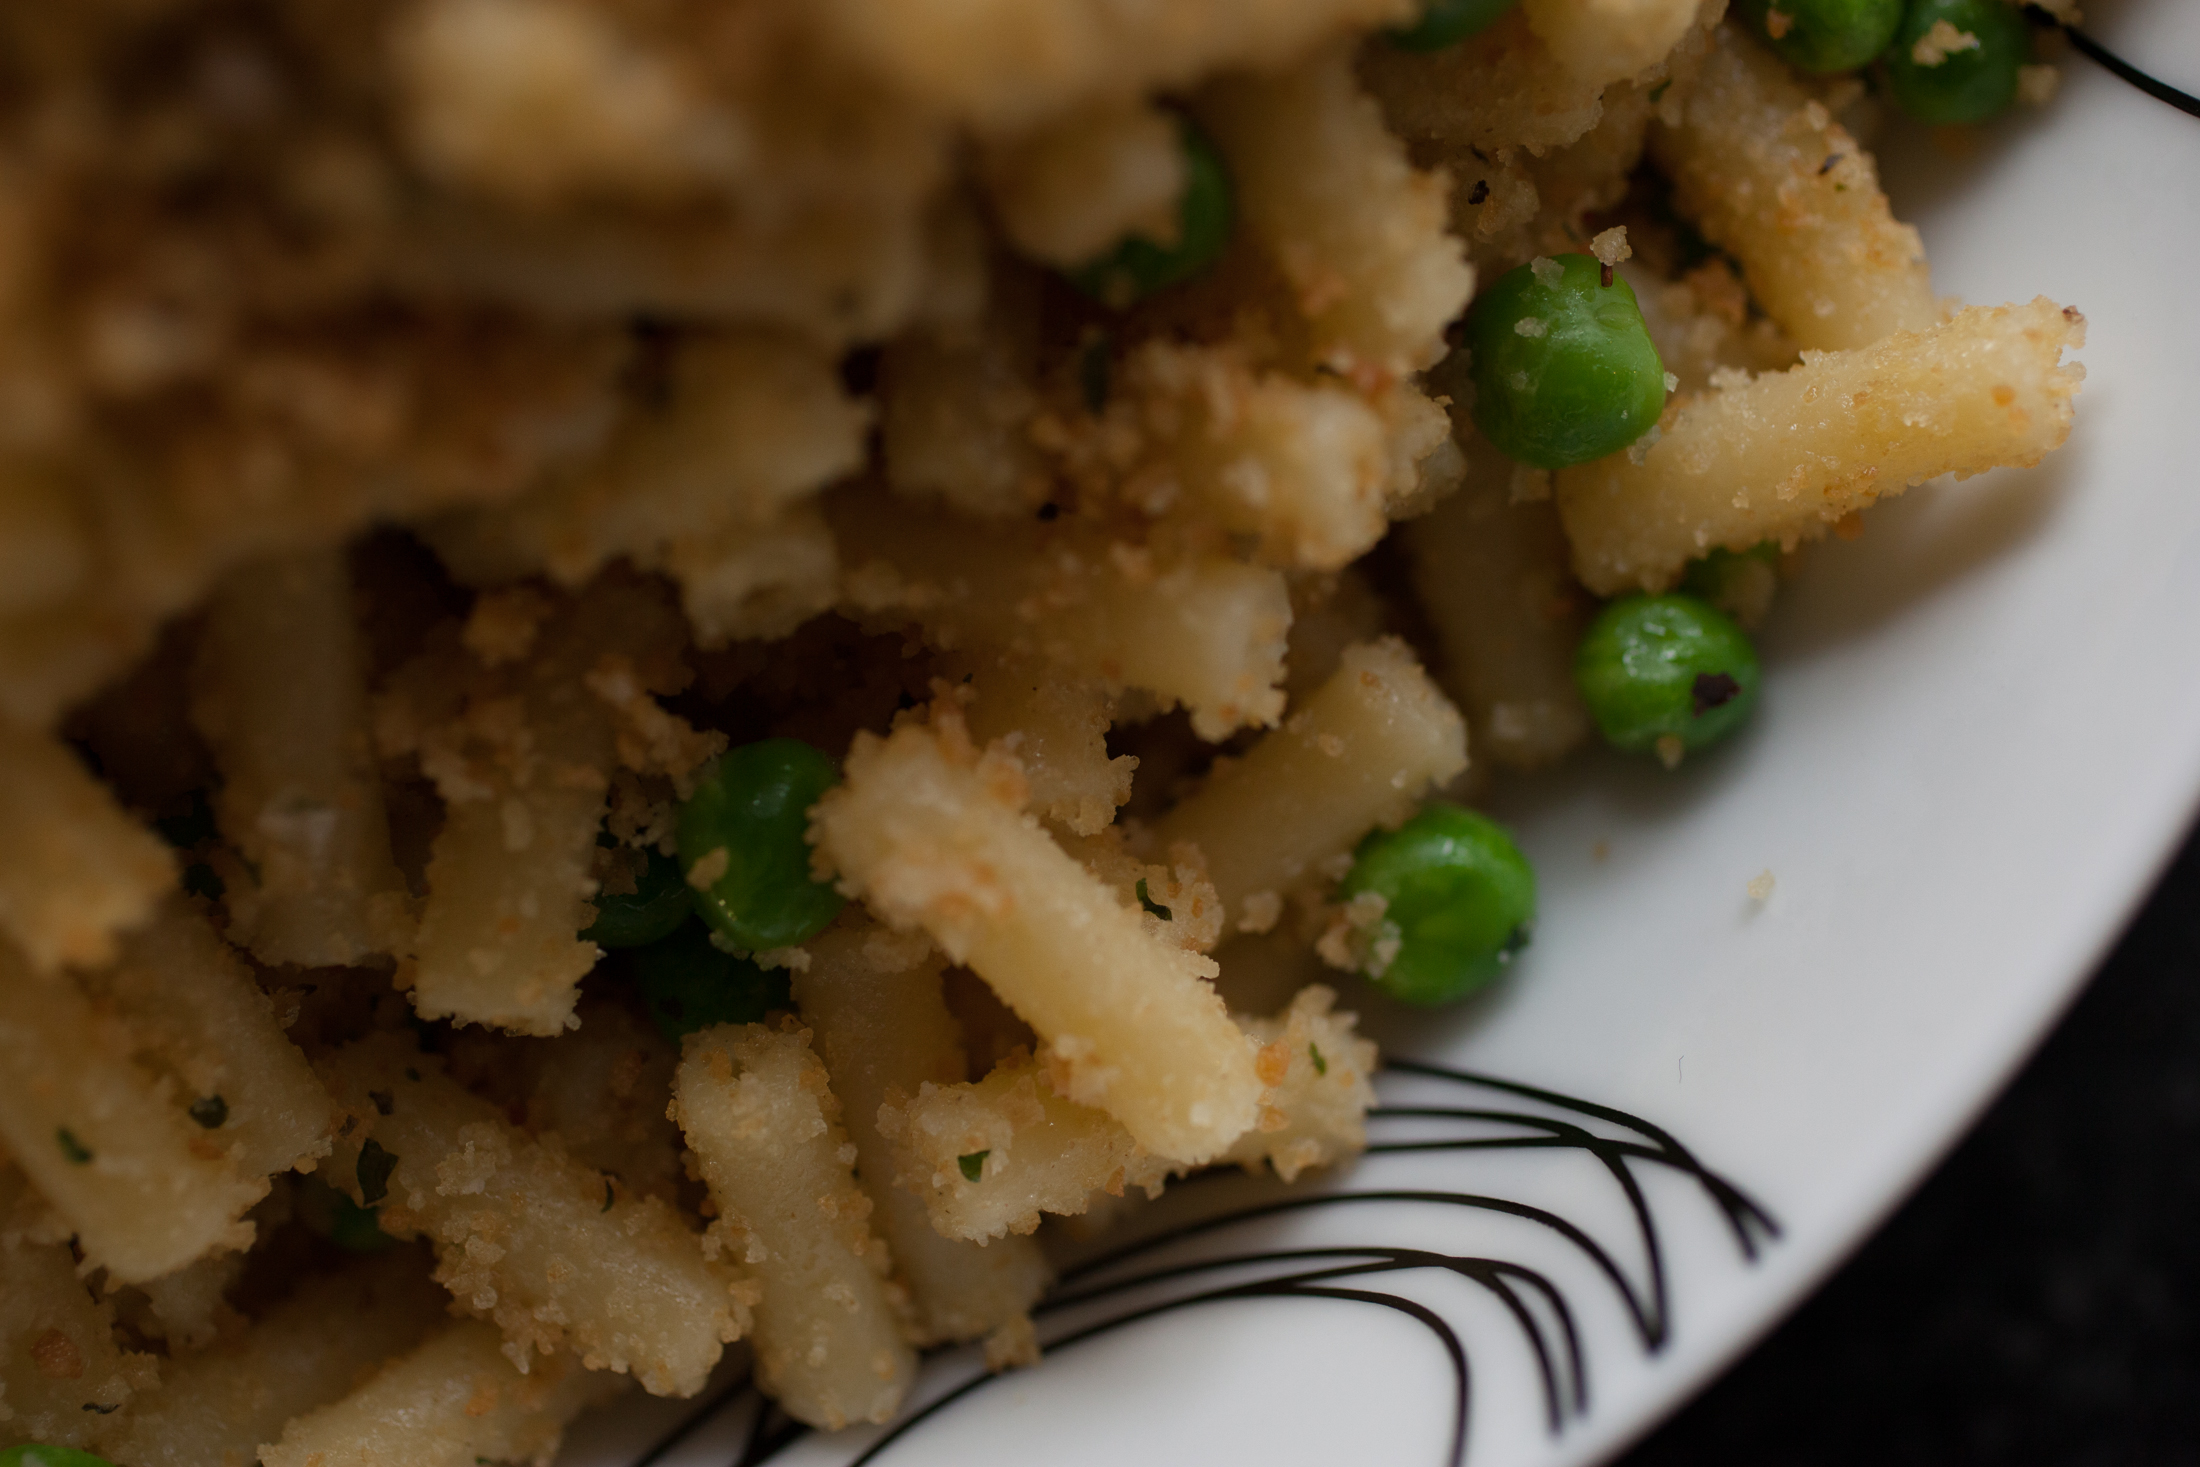 PIN
PIN


.png)