|
Category Archives: Recipes
It’s 8:25 in the morning and Gigi is running around the house wearing a to0 small swimsuit, and life jacket, and Little Miss Lulu is wearing too long princess dresses which she brings to me over and over and over again and demands, “cosuuuuume on, cosuuuuume on!” So the costumes go on and then come off, go on again, and off again. Gigi has orchestrated the conversion of our small living room into a beach: sand, water, beach chars, and pretend sunscreen. Something tells me these two are ready for warmer weather. Me too, kids.
.jpg) PIN PIN
While they are passing these grey, freezing, uneventful winter days lounging at the beach and testing boundaries, I have been in the kitchen. Thanks to so many of you who donated, I’ve been able to indulge a bit in the wonderful winter citrus fruits that have been tempting me all season! Last time we were at the store I grabbed a few Meyer lemons and blood oranges with the intent of candying the lemons and using the blood oranges to brighten up a simple salad. Yesterday morning I set out to candy the Meyer lemons; the minute I sliced into them I felt the greyness of January lift away. Meyer lemons have such a wonderful scent: like tangerines, lemons, sugar, and sunshine combined. The lemons turned out so well I figured I should probably candy a couple of blood oranges too.
Candyied citrus fruit tastes like… well, candy! They’re like candy for grown ups. The approach is pretty simple, although I do have a couple important tips. The majority of recipes “out there” did not call for blanching the fruit first. I did a test, blanching half and not the other, and found that the blanched, then candied fruit was much softer, and turned completely translucent, while the unblanched fruit was a lot chewier and never fully turned translucent. You can actually see this difference in the first photo of the cooling Meyer lemons; the lemons on the left weren’t blanched, the ones on the right were. Conclusion: It’s worth the extra step to blanch the slices. The other note is that it’s important to have plenty of simple syrup that the fruit is simmering in; this gives the fruit the ability to float about, and it doesn’t reduce to a thick, dark, caramelized syrup during the hour that the fruit is cooking!
.jpg) PIN PIN
Finally, you might be wondering what to do with candied citrus! Here’s a little list: eat it straight, add it to a cocktail (such as an Old Fashioned) in place of the syrup and lemon of orange garnish, you can also use it to top cakes or a bowl of ice cream or pancakes or yogurt! These are pretty versatile treats. This recipe would work well with all citrus fruit, and you could use the same approach for candying just the peels for cocktails. Now, without further ado, here is the recipe for Candied Meyer Lemon and Candied Blood Orange!
.jpg) PIN PIN PINPINPINPINPINPIN PINPINPINPINPINPIN
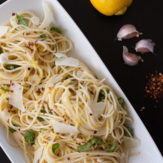
CANDIED MEYER LEMONS & CANDIED BLOOD ORANGES
Ingredients.
4 Meyer lemons
2 blood oranges
4 cups granulated sugar
4 cups water
large pot of boiling water
large bowl of ice water
Directions.
Wash the fruit, then slice 1/4” thick, discarding the ends. Pick out any seeds and discard them.
Bring a large pot of water to a boil and prepare a large bowl with ice water. Once the water is boiling, carefully drop in the slices of fruit. Stir gently and boil the slices for one minute. With tongs or a slotted spoon transfer the fruit to the ice bath until cool. Drain the fruit and separate the oranges from the lemons in preparation for candying them.
Divide the water and sugar into two large, non-reactive skillets, and heat on medium-high, stirring well, until the sugar has dissolved and the syrup is simmering.
Add the oranges to one pan and the lemons to the other. Bring the liquid back to a low simmer. Cook the fruit at a low simmer for 45 minutes to 1 hour, stirring and flipping the fruit occasionally. If the syrup starts to reduce to much add 1/4 cup of water to keep it the proper consistency. Cook until the white part of the rind has turned translucent. Using tongs, gently transfer the slices to a wire rack that has been placed over a baking sheet or roasting pan. Allow to cool completely before using.
Store in an airtight container with parchment paper to separate layers. The fruit will save in the refrigerator for about two weeks.
Save the cooled syrup for cocktails or to use over vanilla ice cream!
PRINTABLE RECIPE.
CANDIED MEYER LEMONS & CANDIED BLOOD ORANGES
It is a rainy, grey Sunday morning and I’m at the local coffee shop sipping a Cubano (latte made with a shot that’s been pulled through raw sugar) and working on the desperately needed redesign for my photography website. Well, I guess I’m technically working on this blog post and procrastinating the work that needs to be done on my photography site. It’s been ages since I’ve updated it the site. I kept thinking, “Well, if I’m going to redesign it soon why should I update it now?” Months passed and then more months passed and here I am, finally getting ready to tackle it. Compared to the building of this site and my Gorge in the Gorge site it should be a breeze. Fingers crossed.
This past week really wasn’t much different than the one before, which is how seems to go this time of year. I did finally shake my fever and cold, but I haven’t given up binging on movie watching. The last two books I read were Wild and Gone Girl, so we watched those two movies this week. I really liked both, though there’s something to be said for allowing a little time between finishing a book and watching the story unfold on a screen. I finished reading Wild only hours before we curled up to watch it, so I was acutely aware of every nuanced difference. Gone Girl was such an intense read, and the movie watching experience was too… the casting was perfect!
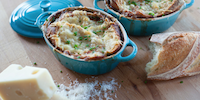
On that note, my PSA for today is to remind you all that the Golden Globes are on tonight! I love award season. It’s my version of the playoffs and the SuperBowl. Tonight I am going to make Pasta e Fagioli from Ashley’s cookbook, Date Night In. I spent the day yesterday simmering homemade stock for it, Kyle is making sourdough bread, and I’ve been fending Gigi off from eating all of the jamón serrano which, in compliance with Ashley’s recipe, gets crisped up and served alongside the soupy pasta like fancy, frilly bacon. Yesterday G saw a illustration of a chicken that looked disturbingly like a pig. She brought it to me and said, “Did you know that baby pigs are called “chickens” and big, grown up pigs are called “serrano”?!” I only corrected her about the chicken part.
Tonight dessert will be served, as it should be during the Golden Globes, on the couch. I’m making one of my favorite desserts that only takes minutes to pull together. There are few salty, sweet desserts I love more than Kettle Corn. Because Kettle Corn has a savory side, it allows for the addition of earthy, hearty herbs. I love to add fresh thyme, but since our thyme has frozen over, blackened and died for the winter, I’ve moved on to adding fried sage. The thick, perfume heavy leaves thin out and brighten up when they’re fried. They take on the fruity quality of the olive oil in which they’re fried, and they simultaneously crumble and melt when they hit your tongue.
PINPIN
Making Kettle Corn is so easy that you’ll thank and curse me in equal measure for sharing this recipe with you… hopefully more of the former.
PIN
KETTLE CORN WITH FRIED SAGE
Ingredients.
1/4 cup butter
1 Tablespoon vegetable or canola oil
1/4 granulated sugar
1/2 cup corn kernels
5-7 sage leaves
1/4 cup extra virgin olive oil
kosher salt
A Couple Notes.
Do not use enameled cast iron or Le Creuset for this recipe. The heat diffuses too much and the popcorn kernels will just burn and never actually pop! Use a heavy, stainless steel pot with a tight fitting lid.
Cooking Kettle Corn is all about finding the right temperature and getting it out of the pot and into a bowl the second it’s done popping. You’ll have to practice on your stove. I use our largest gas burner on medium heat.
Be sure to transfer the popcorn out of the pot the second the popping starts to space out or it will start to burn.
Directions.
In a small sauté pan, heat 1/4 cup extra virgin olive oil until shimmering. Gently place in a few sage leaves at a time and allow to fry for 10-15 seconds. You don’t want them to brown. Remove using tongs and set on a paper towel to drain. Repeat with the remaining leaves. Set the leaves aside.
Put your butter, oil, sugar, and corn kernels in a large pot (I use a three quart saucepan with a tight fitting lid) over medium heat stirring constantly until the butter is melted. When the butter has melted completely, cover with a tight fitting lid, and either leave the heat on medium or reduce it; depending on your individual stove.
Keep the pot tightly covered by using a towel and holding the lid in place. It can take 4-7 minutes for the corn to start popping depending on your temperature. Don’t be tempted to lift the lid. That will just let out the steam and it will take longer and then it can burn. Once it starts popping give the pot a good shimmy every 10-15 seconds to make sure that all of the popcorn is getting coated evenly. When the popping slows down, remove your pot from the heat and immediately (and carefully) transfer your kettle corn into a large bowl.
Allow the Kettle Corn to cool for a minute or two. Season with a bit of salt, add the fried sage leaves, toss, and serve immediately.
Below is my video for how to fry sage leaves in case you’d like a visual…
Printable Recipe.
KETTLE CORN WITH FRIED SAGE
Things have been a little quiet around our house lately. Between the frigid temps and our end of the year budget, we’ve been a staying in. A lot. We are up against the end of the year tight finances time, yet again. Every November, despite our best attempts to stick to our rigid budget, any overspending from the rest of the year seems to catch up to us in November. We sat down with big glasses of (really cheap) wine and go over our budget from “now until we get our tax return comes in”. Our budget comes down to the following goal: Don’t spend any money.
With this goal in mind, I went through our chest freezer and pantry on Monday and pulled out every single thing that could be used, and tossed a few random things marked “2012” into the trash. I’m confident that we can make it through the end of the month only buying the necessary ingredients for my Thanksgiving stuffing that we are taking to my Dad and Stepmom’s house for dinner. This kind of resourcefulness can be bolstering, but also, if I’m being completely honest, kind of depressing. This too shall pass, as my Grandma would say. In the meantime we are staying bundled up, wearing extra thick socks, playing in the snow, and eating meals prepared from ingredients on hand.
PINPIN
One thing I almost always have ingredients for is cobbler. Since it’s basically a matter of having oats, butter, brown sugar, some spices, and some fruit or berries, it’s my go-to dessert all year round. This time of year my favorite type of cobbler to make is Apple Cobbler. There’s nothing that compares to stormy weather outside and the smell of baking apples, cinnamon, and nutmeg inside.
This recipe makes two smaller cobblers, or one 9×13” cobbler. You can cook them both at once, or freeze one. And, this recipe has about 1 1/2 times the typical amount of crumbly topping because, let’s face it, that’s the best part about cobbler! This makes a wonderful dessert, but an even better breakfast the next day with a strong cup of black coffee.
Also, I should note that I tend to use tart apple varieties for my baking, if you buy apples that are sweeter you should adjust the sugar a bit so you don’t end up with an overly sweet dessert!
PINPINPINPINPIN
APPLE COBBLER
Ingredients.
3 lbs diced apples, peels and cores discarded
zest from one lemon
juice from one lemon
1/4 cup flour
1/2 cup sugar
1/2 teaspoon cinnamon
1/4 teaspoon nutmeg
1/2 teaspoon kosher salt
For the Topping.
1 1/2 cup rolled oats
1
1/12 cup all-purpose flour
1/2 cup granulated sugar
3/4 cup packed brown sugar
1/2 teaspoon kosher salt
2 sticks unsalted butter, at room temperature
Directions.
Peel and core your apples, and dice them into small pieces. In a large bowl, toss the apples with the lemon zest, lemon juice, 1/4 cup flour, 1/2 cup (or less if the apples are sweet) of sugar, 1/2 teaspoon cinnamon, 1/4 teaspoon nutmeg, and 1/2 teaspoon kosher salt. Transfer the mixture to your baking dishes.
Preheat your oven to 350˚F.
In another large bowl, combine the 1 1/2 cup rolled oats, 1 1/2 cup flour, 1/2 cup sugar, 3/4 cup brown sugar, and salt. After it’s tossed together and combined, add in the butter and, using your hands, knead the mixture together until the butter is mixed in and broken up into small, pea-sized pieces.
Bake in the oven for 45 minutes to 1 hour. The apples should be cooked through and completely tender and the topping should be beautifully golden. Allow to cool for about half an hour before serving.
PRINTABLE RECIPE.
APPLE COBBLER
We played out in the snow all weekend. We got several inches in the middle of last week, and then the temperatures dropped into the teens, making for great sledding and potential frostbite. The kids have been really enjoying the change of scenery, mostly from their view out the living room window, or peeking out from beneath several layers of hats, scarves, and hoods. I spent most of my weekend making hot chocolate for half-frozen children, organizing our new office space, setting up a curriculum for our “preschool at home” program, and cooking meals from things we had on hand (since going to the store sounded treacherous).
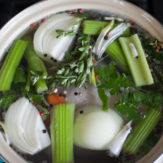
We are on the tail end of yet another fall/winter cold. It’s been pretty non-stop around here since the beginning of September! I made up a batch of Elderberry Extract in an effort to get our immune systems back on track. I got in the habit of buying Elderberry Extract along with my Echinacea and Vitamin C when we are feeling under the weather, but Elderberry Extract is expensive! Last year I discovered that it can be easily made at home. And although I thought elderberries would be hard to find, they had them in the bulk section at our main grocery store!
PIN
The syrup can stay in the refrigerator for about two weeks, although I usually freeze mine in 1 oz cubes and add one a large glass of water along with 3oz of Just Cranberry juice and 3oz of just Pomegranate juice. I take it almost every day for cold prevention and sometimes double up my dose if I feel sick.
PINPIN
*For Lulu (18 months) I’ll add a couple drops to her water once a day. For Gigi I add about 1/2 teaspoon to a small glass of water. I feel comfortable giving this syrup to my kids because I know exactly what’s in it, but make sure to ask your pediatrician before giving your kids any supplements!
ELDERBERRY EXTRACT
Ingredients.
3/4 cup elderberries
3 tablespoons peeled and grated fresh ginger
2 cinnamon sticks
1 cup honey (preferably raw and local)
4 cups water
Directions.
Combine the water, elderberries, ginger, and cinnamon sticks in a medium saucepan and simmer over medium-low heat for 30-45 minutes, or until the liquid has reduced by about half.
Strain the liquid through a fine mesh strainer and let it cool to room temperature. Stir in the honey until well combined.
For Use.
The syrup can stay in the refrigerator for about 7-10 days, although I usually freeze mine in 1 oz cubes and add one a large glass of water along with 3oz of Just Cranberry juice and 3oz of just Pomegranate juice. I take it almost every day for cold prevention and sometimes double up my dose if I feel sick.
*For Lulu (18 months) I’ll add a couple drops to her water once a day. For Gigi I add about 1/2 teaspoon to a small glass of water. I feel comfortable giving this syrup to my kids because I know exactly what’s in it, but make sure to ask your pediatrician before giving your kids any supplements!
PRINTABLE RECIPE.
ELDERBERRY EXTRACT
It’s dumping snow here today, and we have a cold (again), which makes it the perfect day to catch up on laundry, attempt to make the house cozy, and to watch Cinderella and play in the dollhouse. That’s exactly what the girls and I spent the morning doing. Right now, Gigi is outside playing with her best buddy in the snow, so it’s just me and Lulu. I’m taking advantage of the fact that she’s currently eating yogurt (read: smearing yogurt all over her highchair) to fix an error on my site.
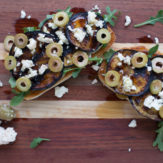
The other day, my best friend pointed out that my recipe for garlic bread wasn’t up on the site. I insisted that she must be mistaken! I make this garlic bread every week! I’m kind of famous for it, or notorious if you are counting calories. But, after a quick search I discovered that she was right! Naturally, I set out right away to correct this error.
PIN
This garlic bread is garlicky, creamy, salty, and flavorful. It goes with everything: soups, salads, pastas, tapas-style snacks, chicken, beef stew… everything! Which is why I make it so often. That, and it’s incredibly easy to make. Not to mention it’s the base of one of our very favorite meals! I like to make this with a baguette that is a little chewy, and doesn’t have too thick of a crust, but even a mediocre store bought baguette will work fine.
PIN
PINPIN
Once this garlic bread makes it’s appearance on your table, it will quickly become a comfort food favorite. Feel free to adjust the ingredients to customize it to your tastes. We like a lot of garlic!
GARLIC BREAD
Ingredients.
1 baguette
2 large garlic cloves, finely minced (or 1 minced, 1 very thinly sliced for mellower flavor)
3 tablespoons butter, melted
3/4 cup Parmesan cheese, shredded or grated
1 tablespoon fresh parsley, minced (1 teaspoon dried parsley will work too)
1/4 cup mayonnaise
paprika (optional)
Directions.
Turn on the broiler. Add the garlic to the hot, melted butter and stir. Add in the Parmesan, parsley, and mayonnaise. Slice your baguette down the middle (like in the photos) or thin round slices. Place the bread on a cookie sheet. Evenly distribute the garlic spread onto the exposed surface of the bread. Sprinkle with a little bit of paprika. Put the cookie sheet in the oven on the middle rack and broil until it’s bubbly, fragrant, and golden, about 5-7 minutes. Slice it up into pieces if needed and enjoy!
PRINTABLE RECIPE.
GARLIC BREAD
|


.png)